
Calculoid Documentation old
Calculoid documentation for developers
How to create, save and delete a calculator
Calculator design and field design
How to integrate Google Analytics
How to prefill data in the calculator
How to create, save and delete a calculator
Calculoid.com is plain static JavaScript web application which uses AngularJS framework to run. It is a heavyweight application compared to embed app whose main goal is to be a public library for calculators and powerful calculator editor. For more information about Calculoid, please read "How does Calculoid work?".
In order to create a new calculator, navigate to "List of calculators" in the main menu and click on "New calculator" button in the top right corner. In the first step (choose your template), select the template of your calculator (blank, pricing, ROI, cost, etc.).
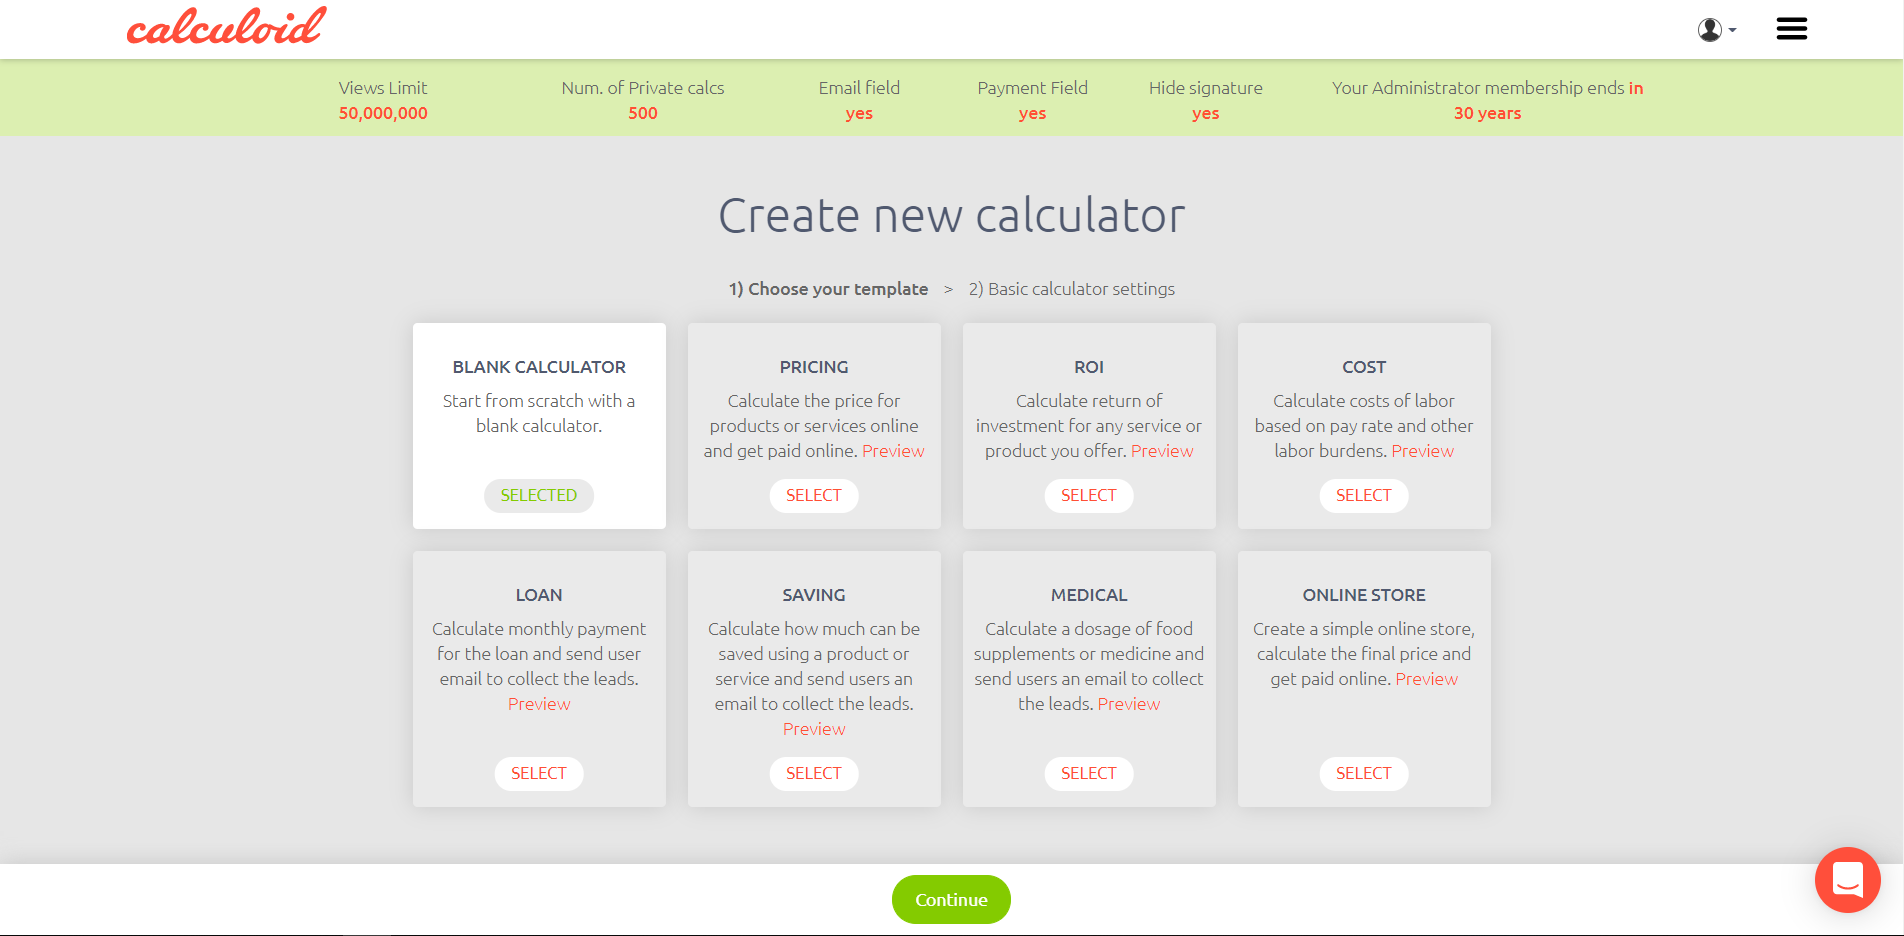
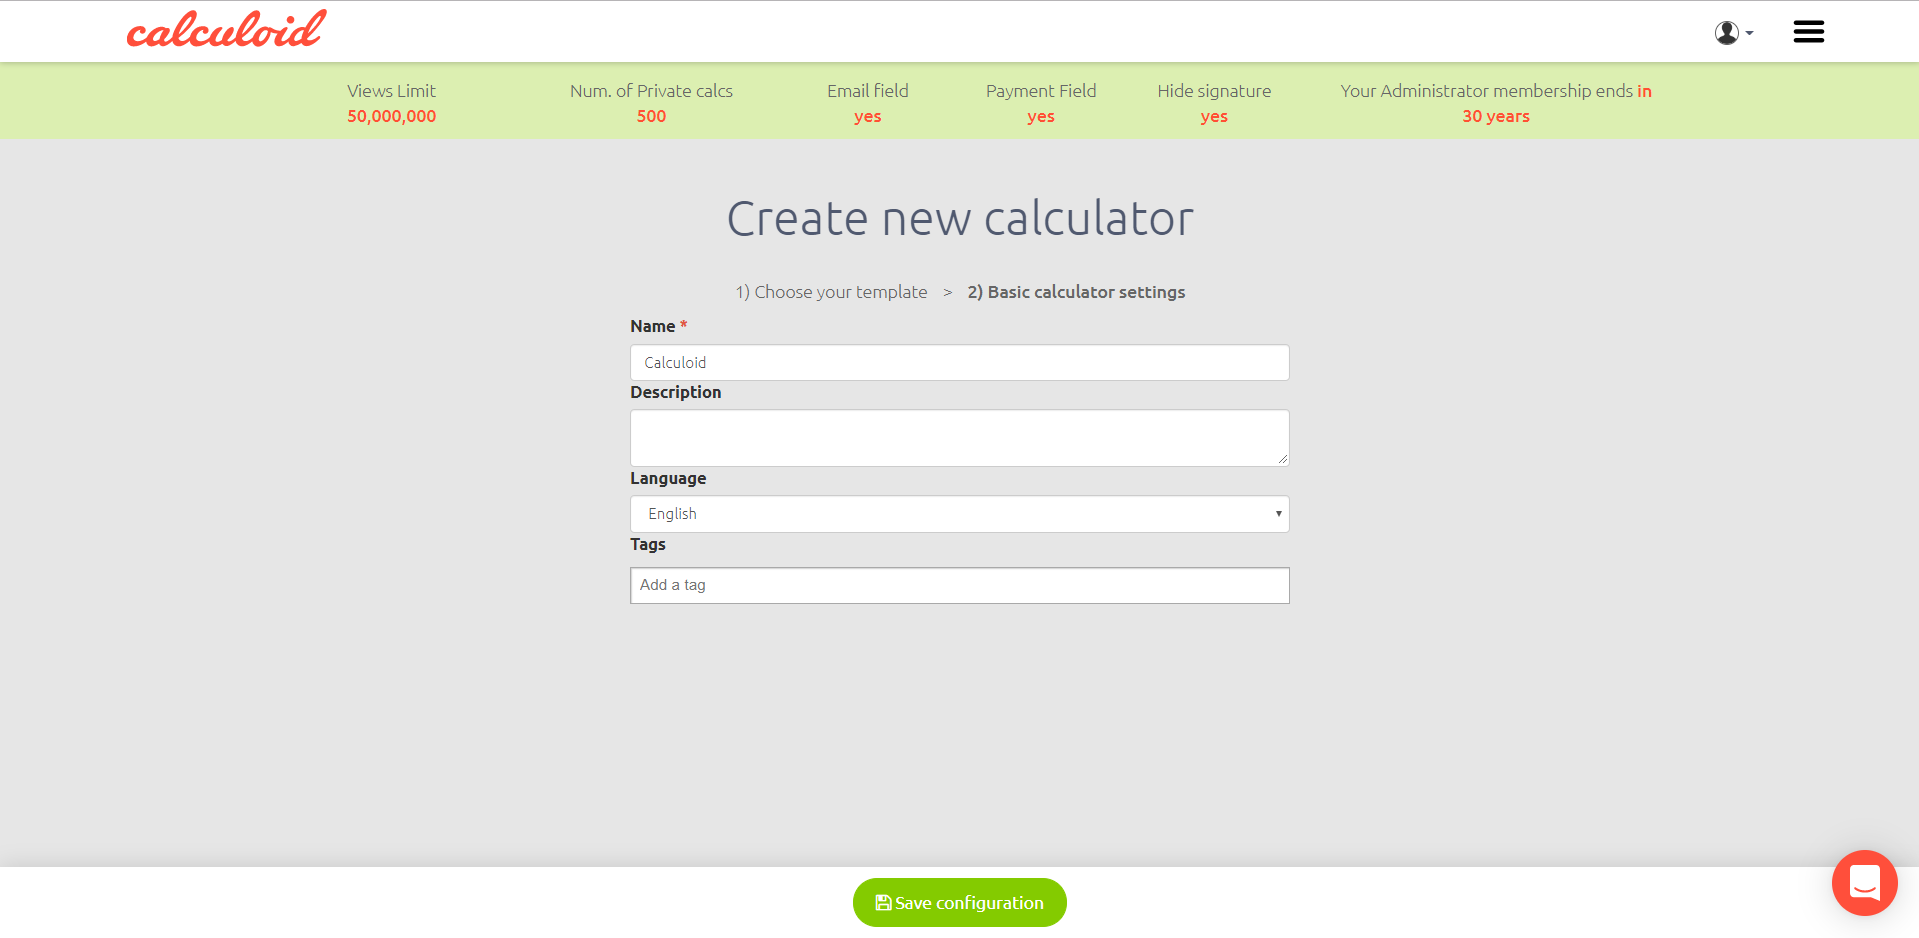
In the second step (basic calculator settings), enter the name of the calculator, description, language, tags and click on the "Save configuration" button. You will be taken to the building wizard where you can add fields to your calculator.
To save the changes you have made in your calculator, use the green button "Save Calc" in the top right corner.
To delete a calculator, go to the "Config" tab and scroll down to the bottom where you find "Delete calculator" option.
How to add and remove a field
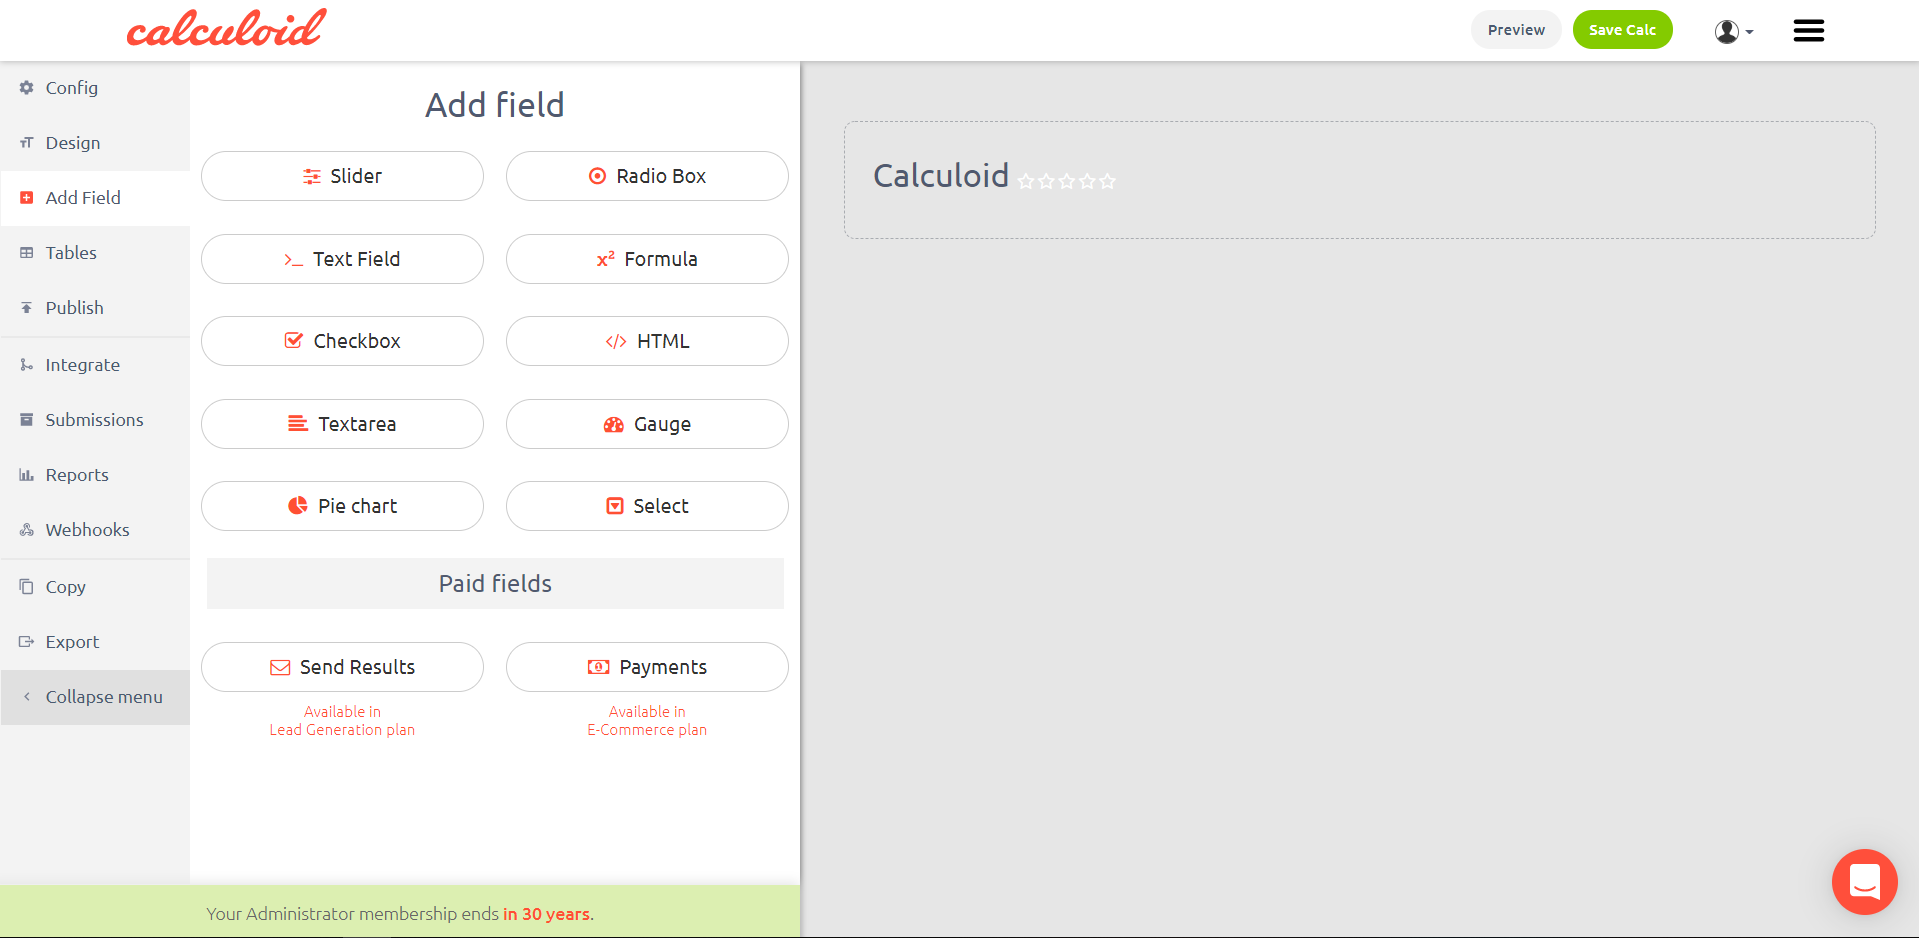
In "Add" tab, choose a field to add - slider / radio box / text field / formula / checkbox / send results / payments / html / textarea / gauge. In the "Edit" tab, edit the particular field.
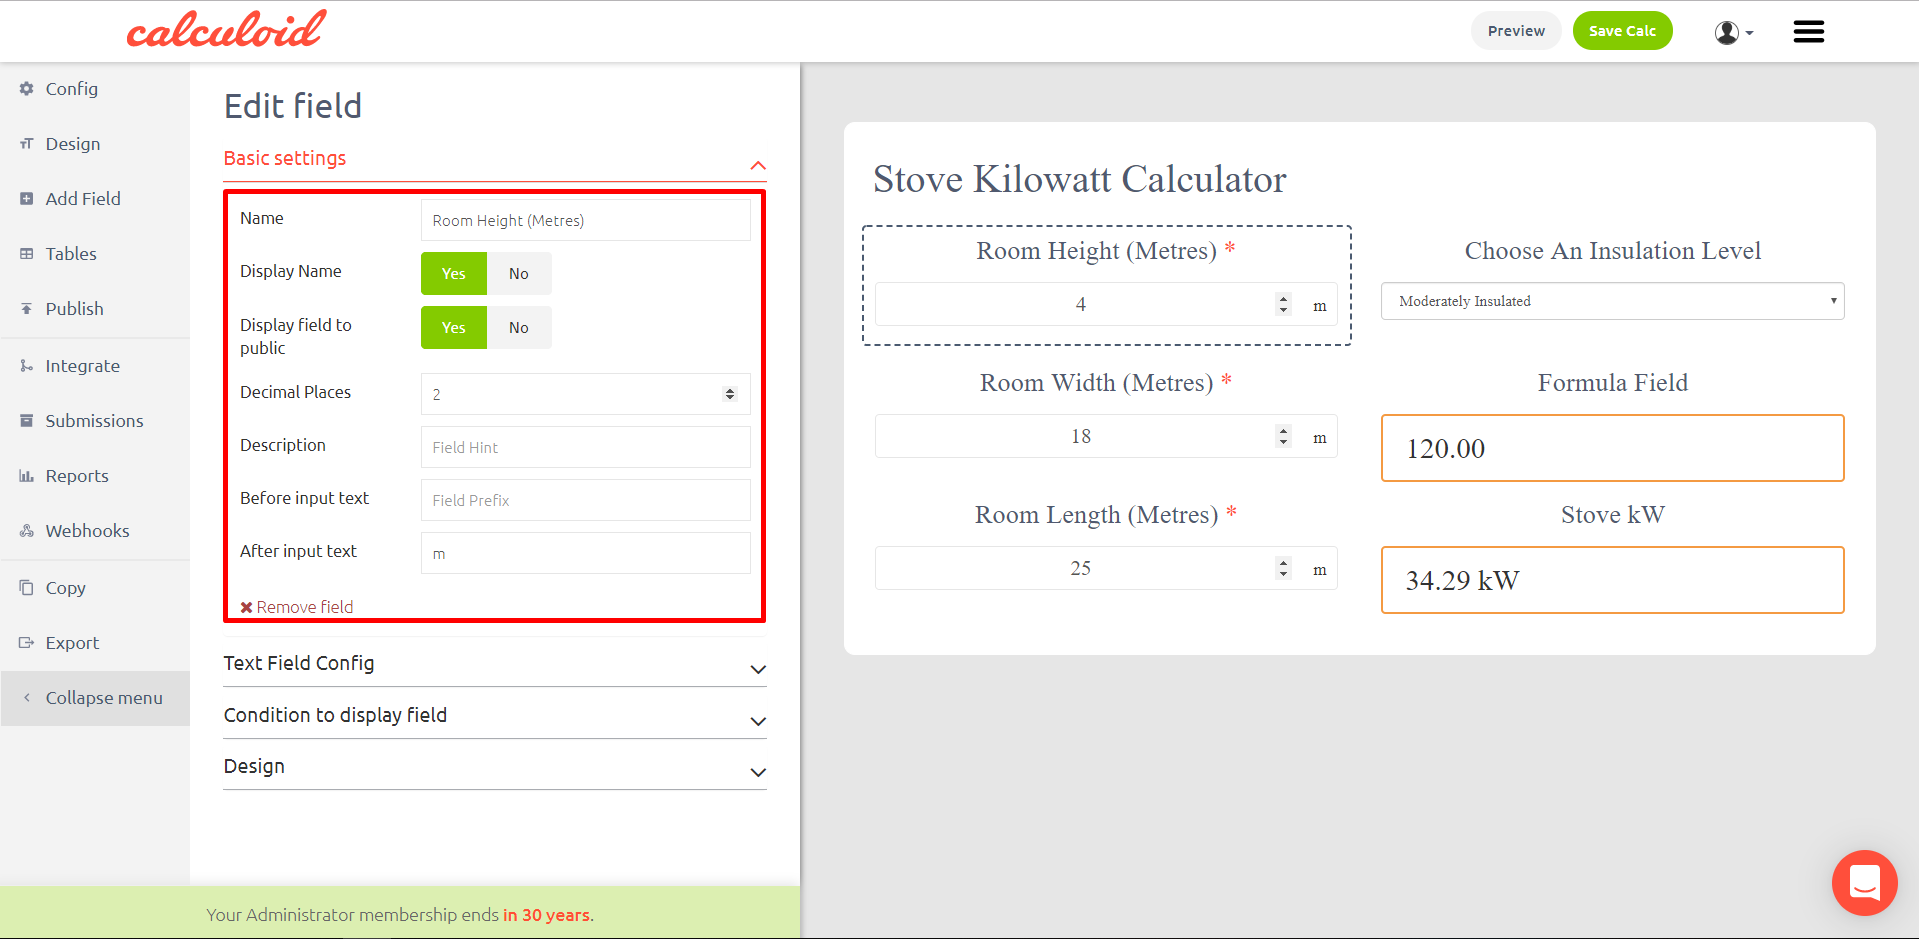
To delete a field form your calculator, click on "Edit" (a pen icon) on the particular field and then the "Edit" tab will open on the left side and there you will find "Remove field" option.
Basic settings are the same for all types of fields:
- Field name - name the field and choose whether to display the name and whether to display the field to the public
- Decimal places - choose how many decimal places to show
- Hint - field hint
- Prefix - add a prefix such as % or a currency
- Postfix - add a postfix such as % or a currency
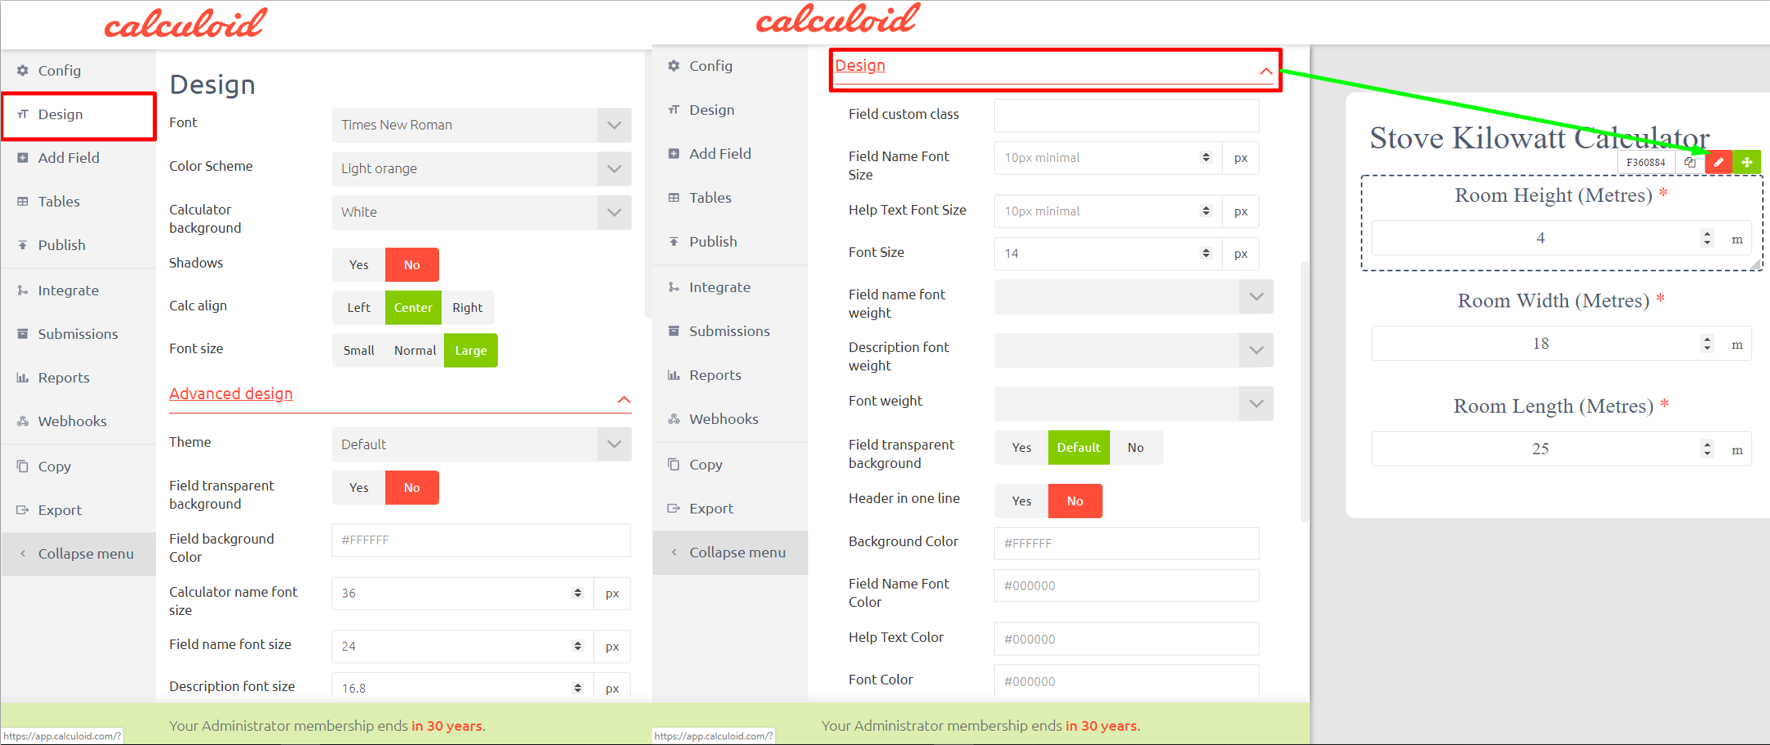
Calculator design and field design
There are two design configurations in Calculoid - one for the whole calculator and second for each field of the calculator. The calculator design can be configured in Config > Design, respectively Config > Advanced design. The field design can be configured under Edit field > Design. If the field design is configured, it overrules the calculator design configuration. If the field design is not configured, then the calculator design applies also for the field.
Available types of fields
Slider - variable field, users define the value of the variable via sliding the pointer on the bar.
The Slider field is a great option if you need to have predefined max and min values for an input field. For example, if you want to let a user select a percentage, you know that the min value is 0 and the max value is 100%. The slider is a nice interactive element for the whole calculator since it allows the user to drag&drop the pointer or select a value by just a click or touch. This field is optimized for mobile as well. Additional input option allows to type in particular number if required. With Calculoid slider, you can also set particular options to choose from. Such a setting is very useful when the user should pick only predefined numbers or options.
Slider settings:
- Min Value: The minimal value a user can select. 0 by default.
- Max Value: The maximal value a user can select. 100 by default.
- Step: The step the slider can select. For example, if you have a slider from 0 to 1.000.000, you can let a user select only full thousands by selecting the step to be 1000. 1 by default.
- Default Value: The default value a user will see when the calculator loads for the first time.
- Scale: The slider field can display a scale below the slider. Fill in the scale values separated by comma character. For example: 25,50,75. If you want to display some labels instead of the actual numbers, add the labels like this: 25:low,50:medium:75:high.
- Show scale values: Yes/No setting to show or hide the scale values.
- Additional input: Add a small box next to the slider where the final user can type in the number needed.
- Hide Selection Bar: Yes/No setting to show on the scale selected part.
- Selection Bar Gradient: Design setting for the scale color.
- Logarithmic scale: Available only if Min value is more then 0. Change the space given for each section on the slider.
- Force Decimal Places: Yes/No setting.
- Before scale text: A text presented before the value on the scale.
- After scale text: A text presented after the value on the scale.
Options:
- New option: Adds a predefined option to the slider.
Calculoid uses this open-source library for sliders.
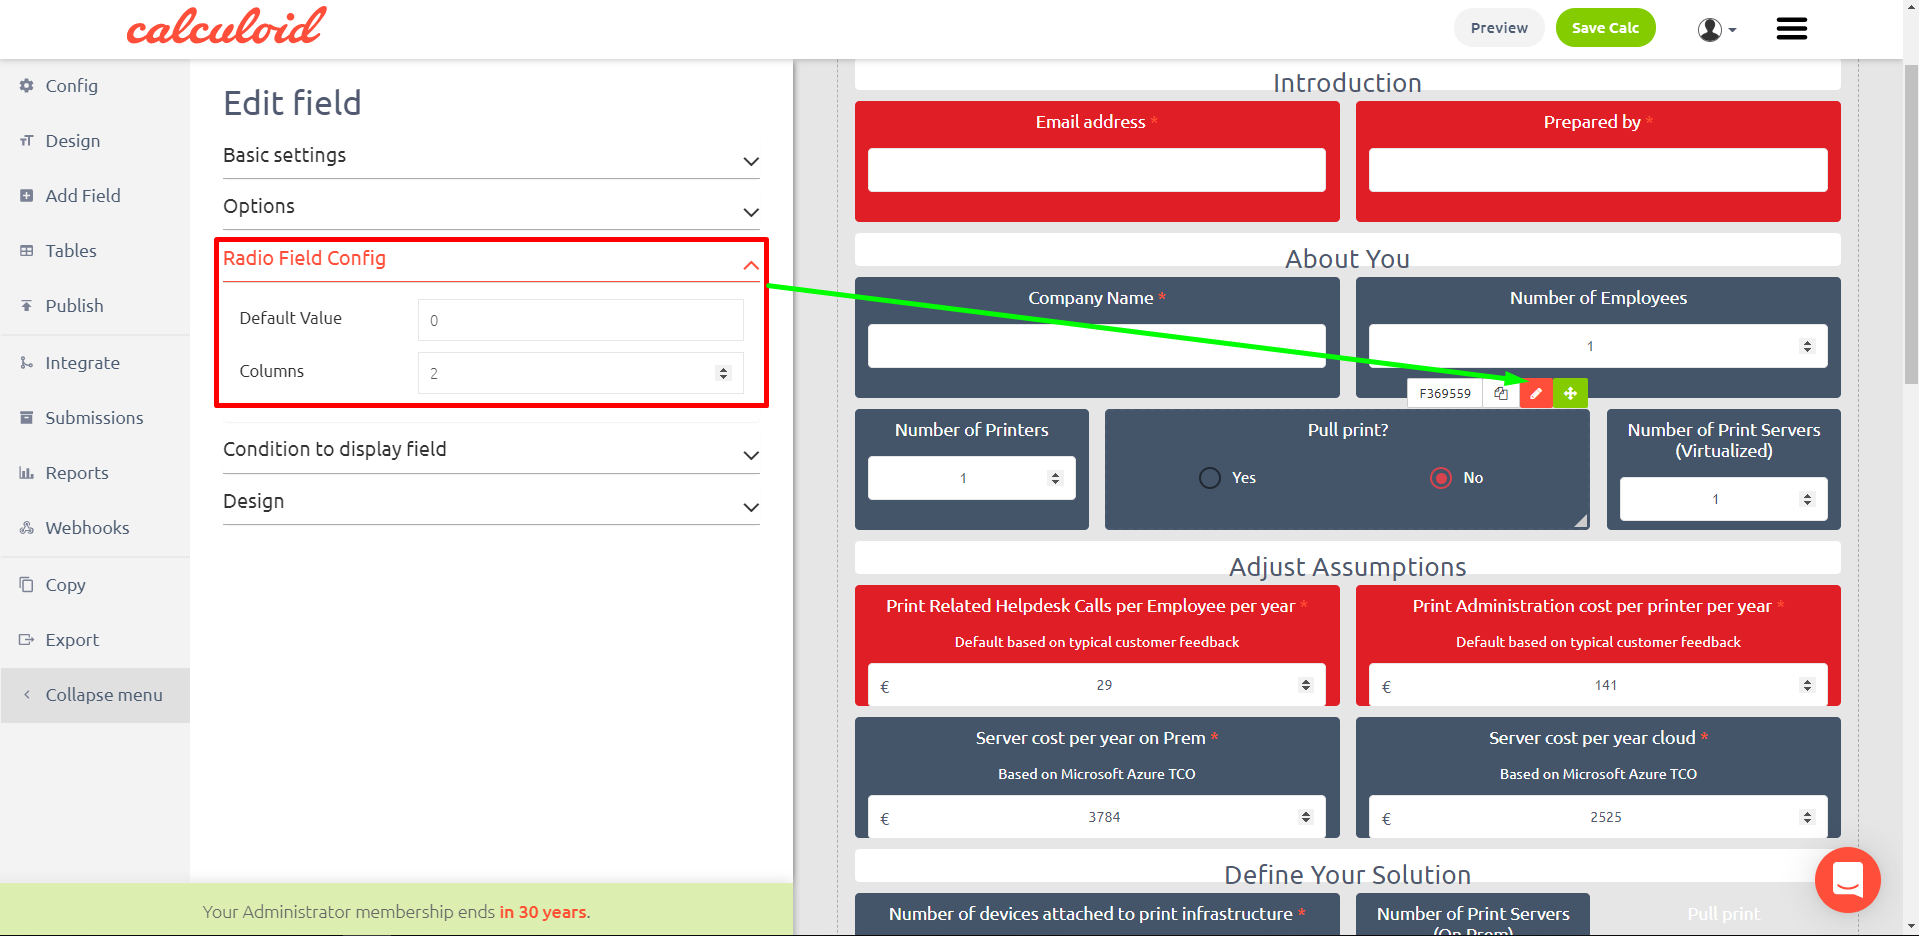
Radio Box - variable field, users select one value/option from the defined list.
Options:
- New Option - add a new option to select
- Option Name - a name of the option
- Option Value - a hidden value of the option, such as price (should be numerical and unique for each option)
Radio field config:
- Default Value - a value pre-selected by default when the calculator is loaded (the option having this value will be pre-selected)
- Columns - a number of columns to show the options in
Text Field - variable field, users insert variable value manually into the text field.
Text Field Config:
- Default Value - A value pre-filled by default, such as text string or number
- Is Required? - Yes/No - Select whether the field must be filled in
- Field type - Text/Number/Email/Phone/Other
- Force String - Yes/No - Any input entered into the field will be of string data type, including numbers, to prevent an automatic change of formatting when it is undesirable (such as for bank account numbers, personal identification numbers, social security numbers, etc.)
For more information about Text Field, please read:

Formula - result field, the administrator define how the variables are calculated. Users see the result.
A formula is an algorithm that derives its value from other fields, expressions, or values. Formulas can help you automatically calculate the value of a field based on other fields. For more information about Formula, please read:
- Value variables, Expression Syntax & Function operators
- Formula field - all about Syntax and Operators
- If function can be used in the formula
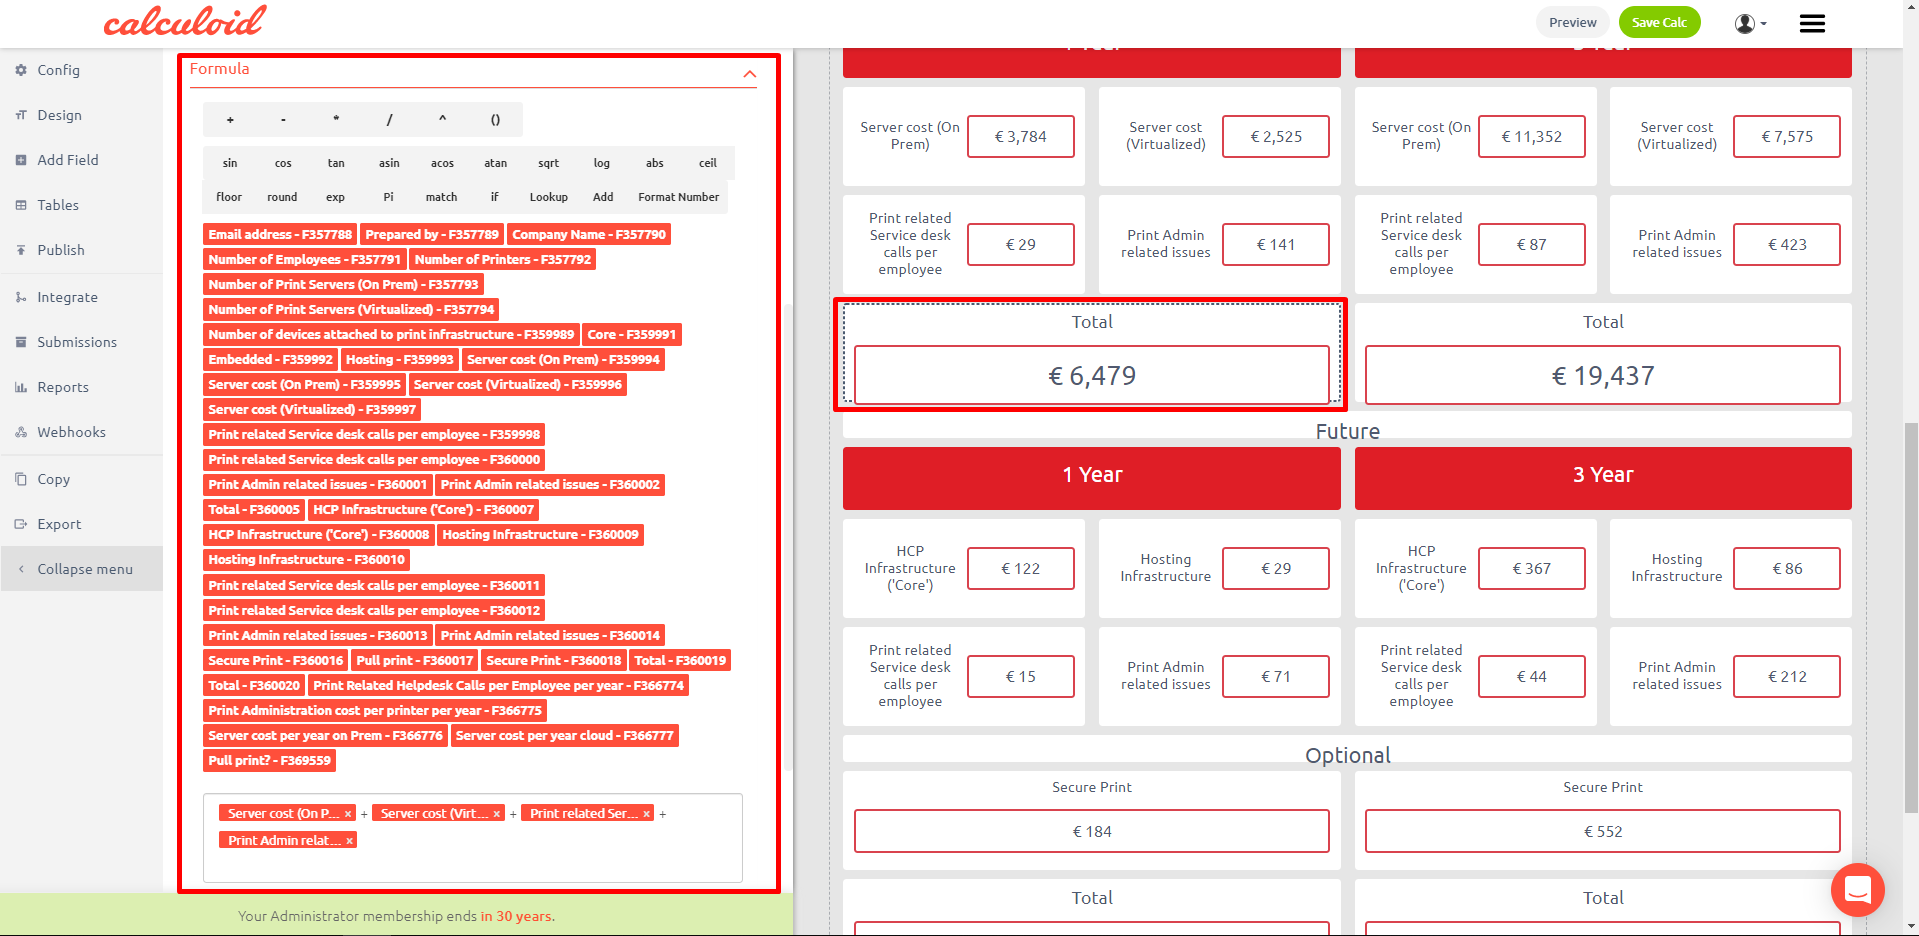
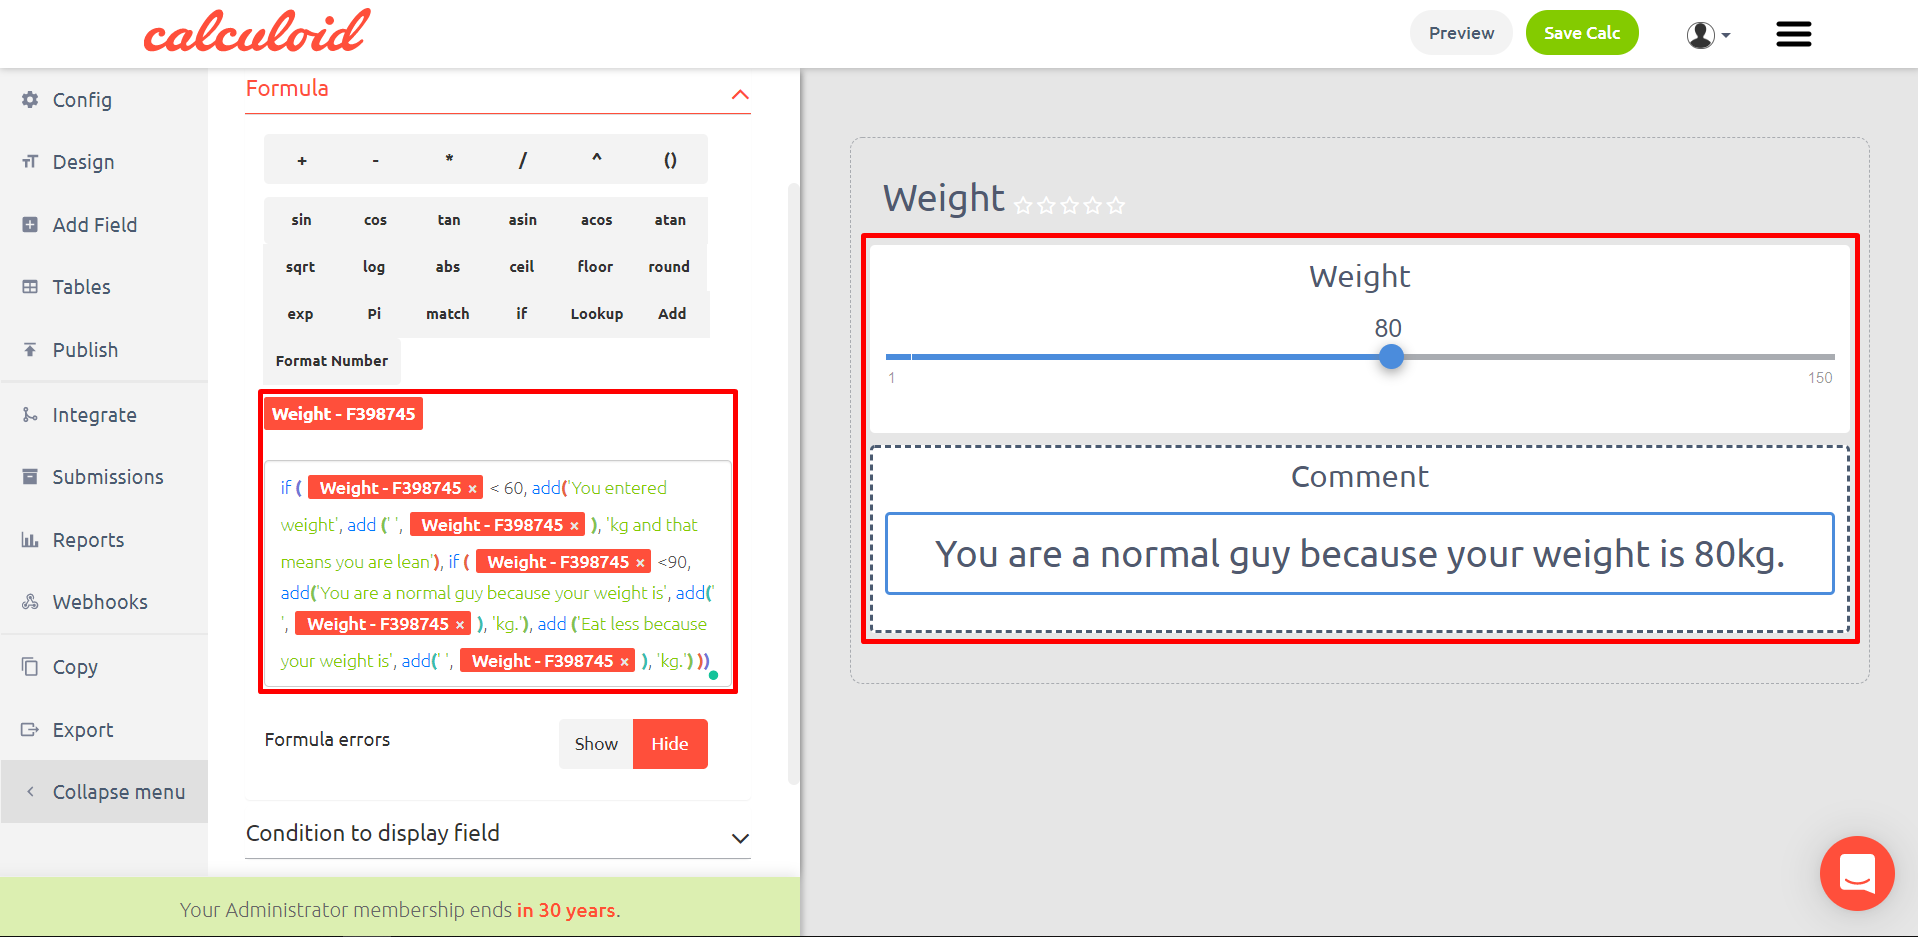
Use case of Formula field - predefined Comments box based on a field value
Using Formula field with "add" function in the formula, you can create a practical Comments box that shows one of the predefined comments based on the value of another field. Here is an example:
- In the Weight field, you entered a value less than 60 kg. → It will automatically show you a comment "You entered weight XX kg and that means you are lean."
- In the Weight field, you entered a value between 60-90 kg. → It will automatically show you a comment "You are a normal guy because your weight is XX kg".
- In the Weight field, you entered a value more than 90 kg. → It will automatically show you a comment "Eat less because your weight is XX kg."
Below you may see an example formula and the two fields in Calculoid.
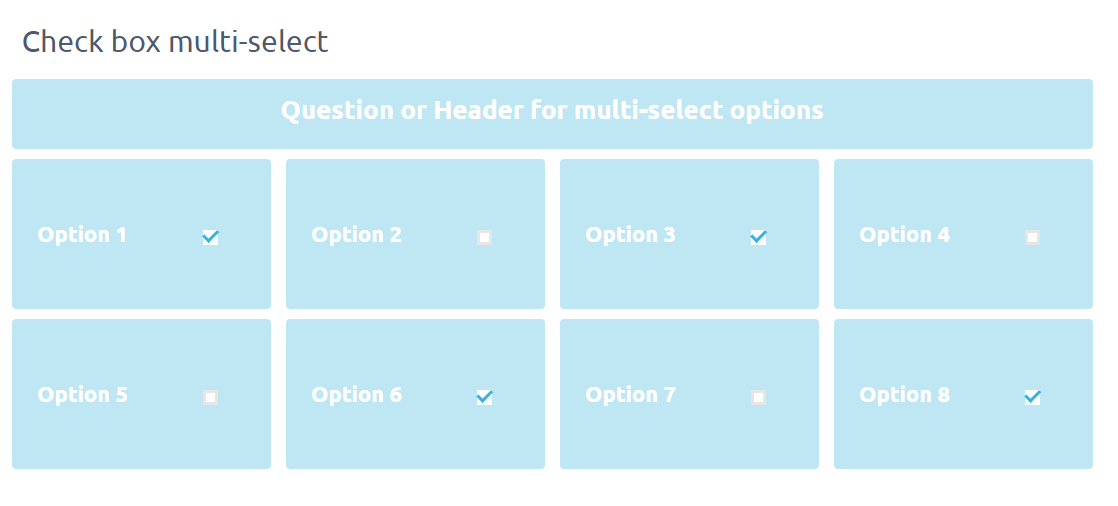
CheckBox - field for Yes/No questions/conditions and for multi-select options.
Checkbox Field Config:
- Value if checked - a numerical value of the field when checked
- Value if unchecked - a numerical value of the field when unchecked

Set value for checked/unchecked for further calculations in the formula field.
Several checkboxes can be used for multi-select. Use HTML field to present the question and the checkbox fields for answers/options.
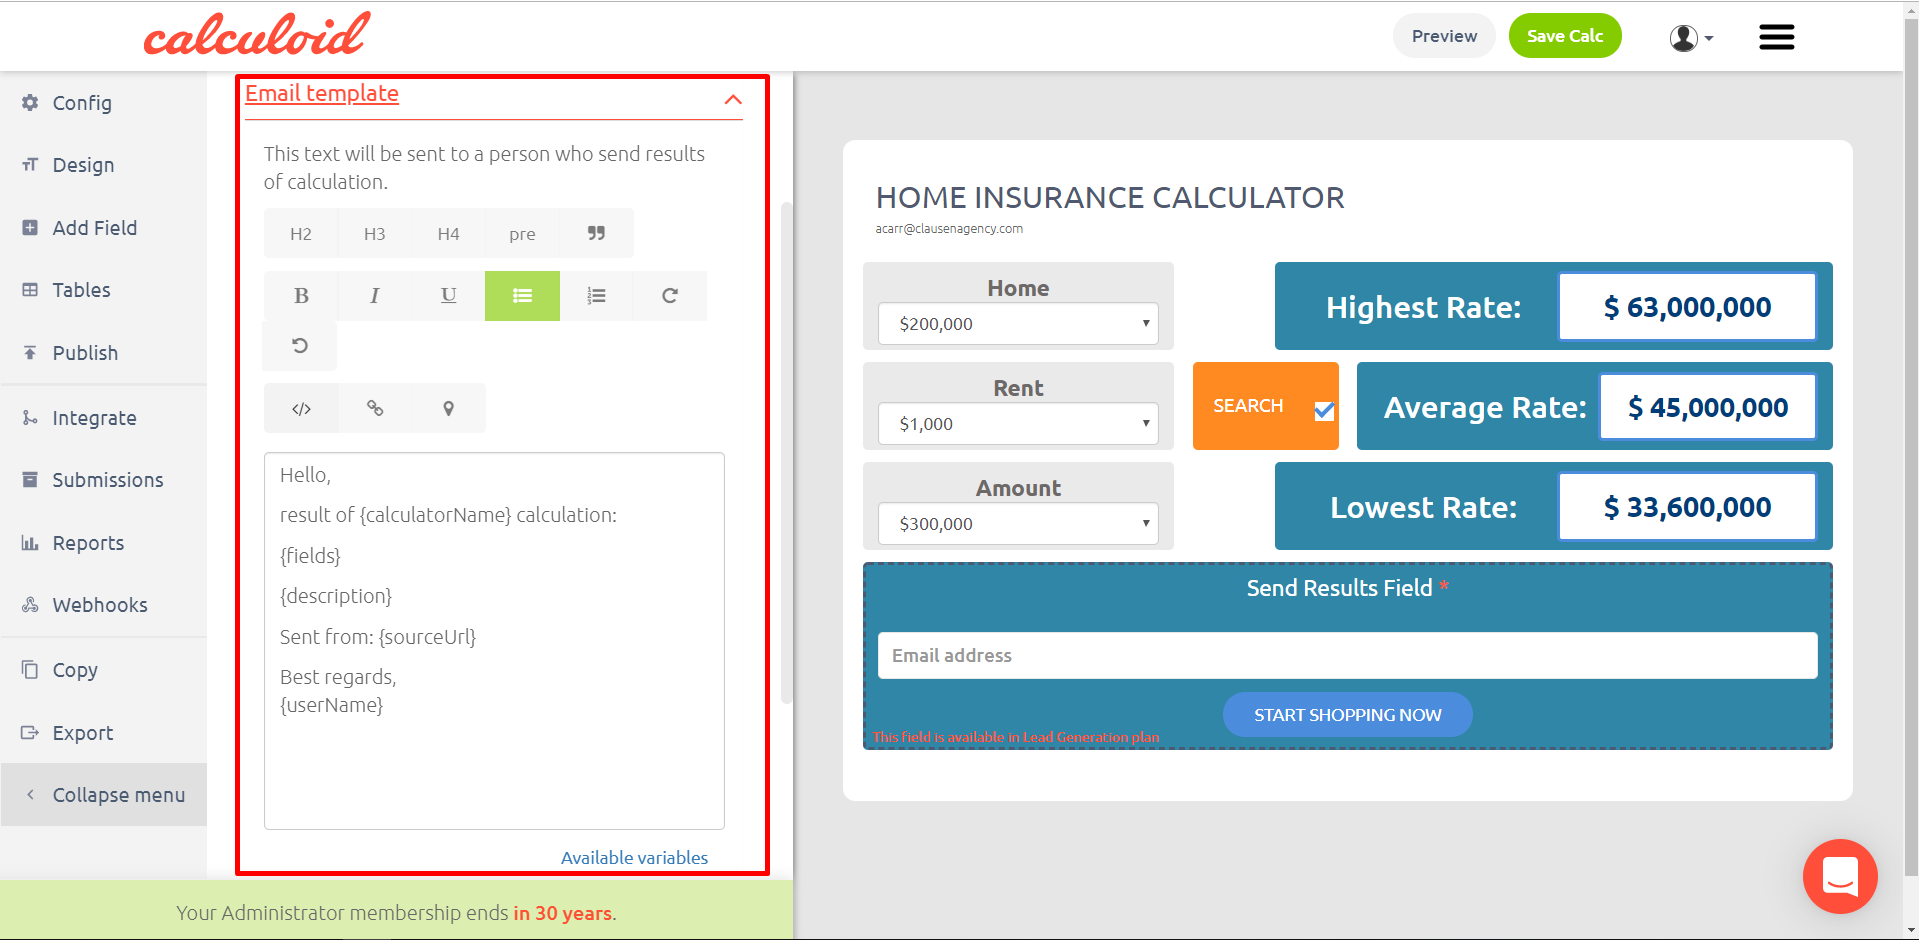
Send Results - conversion field, a result of the calculation can be sent on submitted e-mail.
Email details:
- Send results also to - insert email address the results will also be sent to (in addition to the email address provided by the user of the calculator)
- Send from email
- Sender name
- Subject
- Redirect - enter URL to redirect
- Send email - Yes/No - if yes, an email will be sent to the address entered in "Send results also to", otherwise no email will be sent to the address
- Send to customer - Yes/No - if yes, an email will be sent to the address provided by the user of the calculator, otherwise no email will be sent to the address
For more information about Send Results, please read "Craft a result email to the smallest detail".
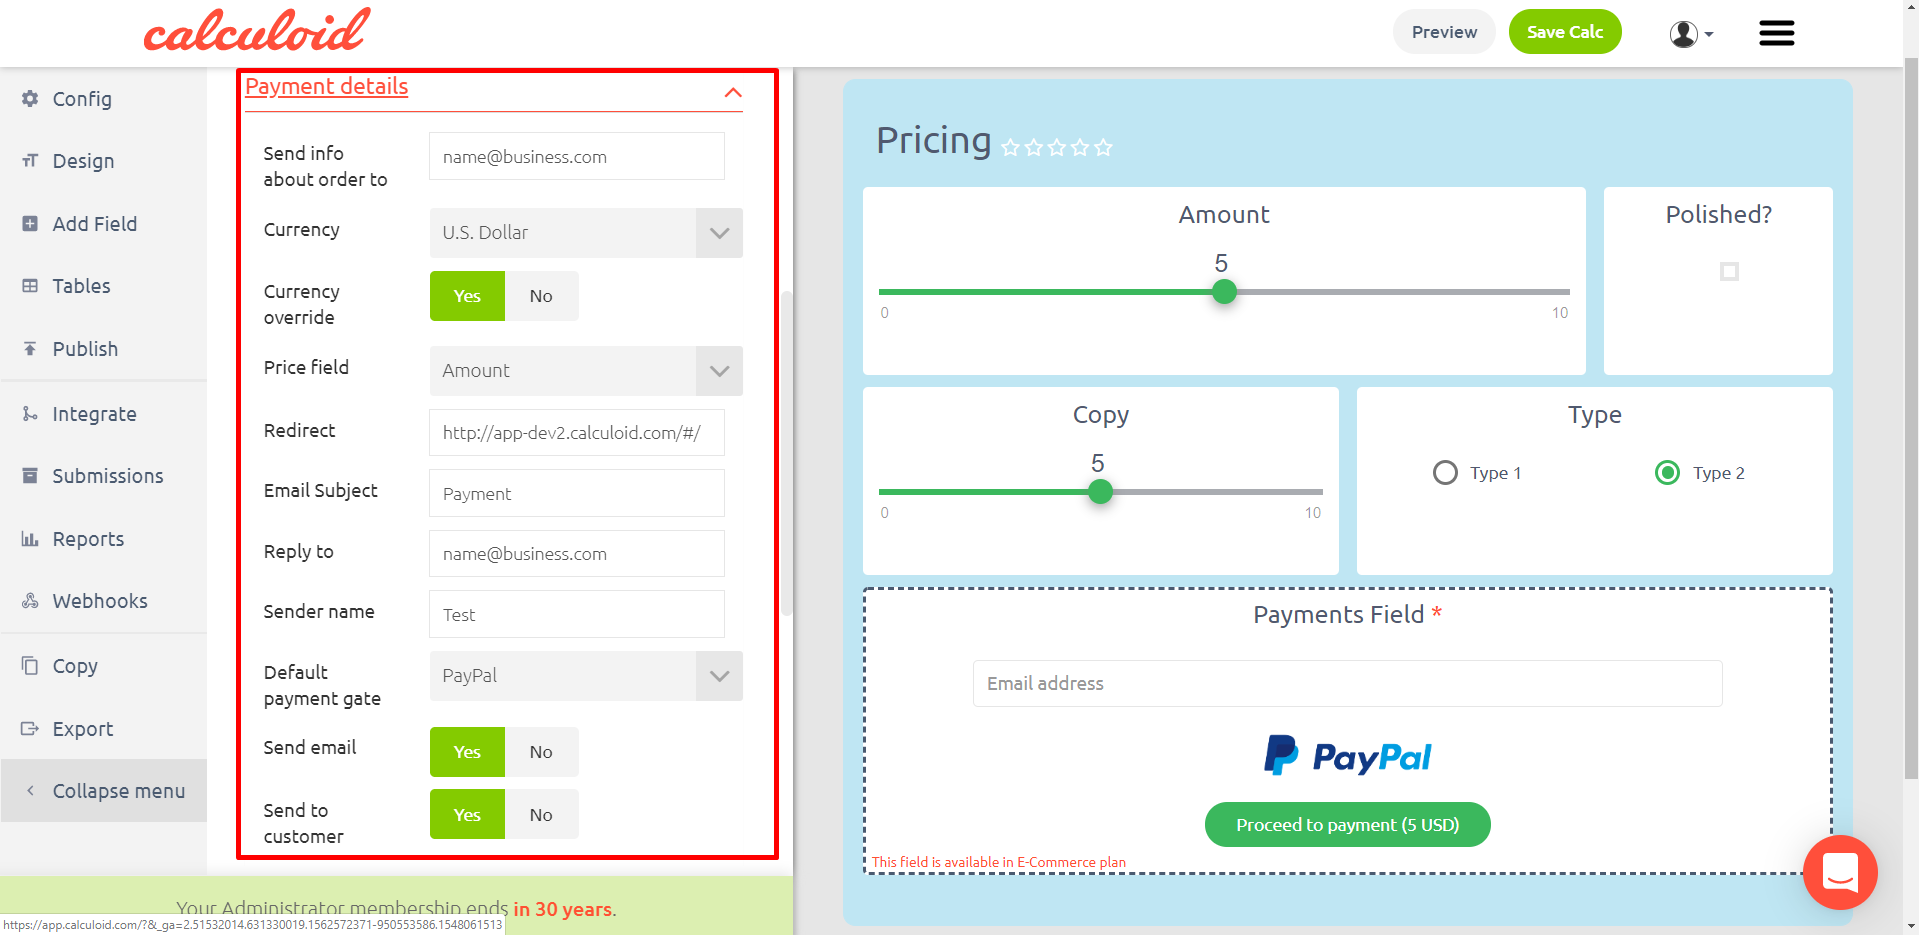
Payments - conversion field, users can pay calculated amounts on the administrator's account
Available payment methods:
- PayPal
- Credit card
- Invoice / Bank transfer
Payment details:
- Send info about order to - insert email address the info will also be sent to (in addition to the email address provided by the user of the calculator)
- Currency - select a currency from the list
- Price field - choose a field with price information
- Redirect - enter URL to redirect
- Email Subject
- Email Send from
- Sender name
- Default payment gate - PayPal/Stripe/Global Payments/GoPay/GP webpay
- Send email - Yes/No - if yes, an email will be sent to the address entered in "Send results also to", otherwise no email will be sent to the address
- Send to customer - Yes/No - if yes, an email will be sent to the address provided by the user of the calculator, otherwise no email will be sent to the address
Billing information:
- Show billing information? - Yes/No
Available variables:
- {amount} - The numeric amount from the field you've selected to be paid amount.
- {currency} - The currency you've selected.
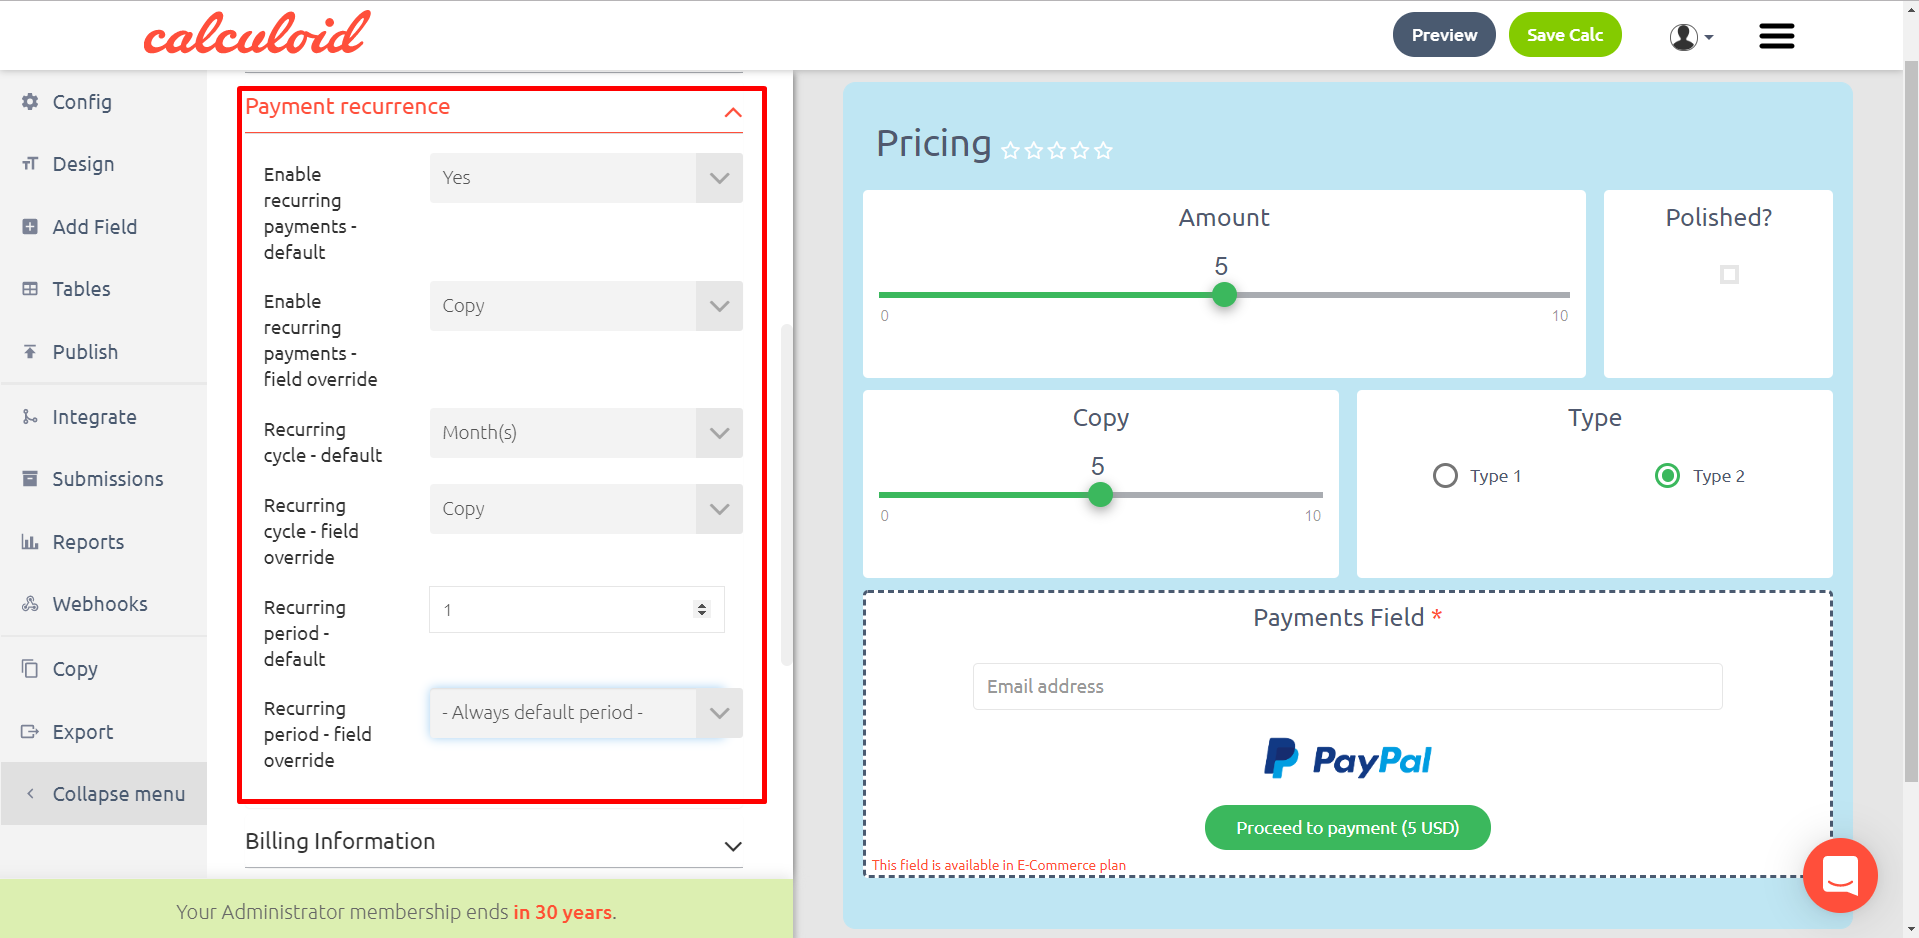
Payment recurrence:
This feature enables repeating a payment automatically in a defined recurring cycle/period. Go to the "Edit Field" menu of a "Payments" field. Here open the "Payment recurrence" sub-menu. In order for payment recurrence to work, you need to set the following fields:
- Enable recurring payments - default - Select Yes or No to enable/disable recurring payments for this field by default.
- Enable recurring payments - field override - Select which field controls if the recurrent is enabled. Field value 1 for enabled, any other value means disabled. This gives the user the freedom to decide himself and overrides the above-defined default setting.
- Recurring cycle - default - Select time unit for the recurring period (days, weeks, months or years).
- Recurring cycle - field override - Select which field holds the recurrent cycle. Field value must be one of the following characters: D, W, M, Y. This gives the user the freedom to decide himself and overrides the above-defined default setting.
- Recurring period - default - Enter the number of cycles between payments.
- Recurring period - field override - Select which field holds the recurrent period. Field value must be a positive number (integer). This gives the user the freedom to decide himself and overrides the above-defined default setting.
The details about realized payments can also be found under Details > Submissions menu of the calculator with the payment field. Moreover, if you have your calculator integrated with an external system (such as Mautic, Redmine or others), a realized payment can be configured so as to automatically create a CRM case in the system.
If you have your Calculoid integrated with third-party systems, there is an option to also repeat executions of these integrations with each payment recurrence. For example, when a standard payment is set up to automatically create a new task or CRM case, another task or CRM case will be created with each repetition of the payment. To configure this setting, go to "Integrate" tab in the top menu, select "Other" in the left sidebar and toggle the switch "Recurrent Payment Integrations" to enable.

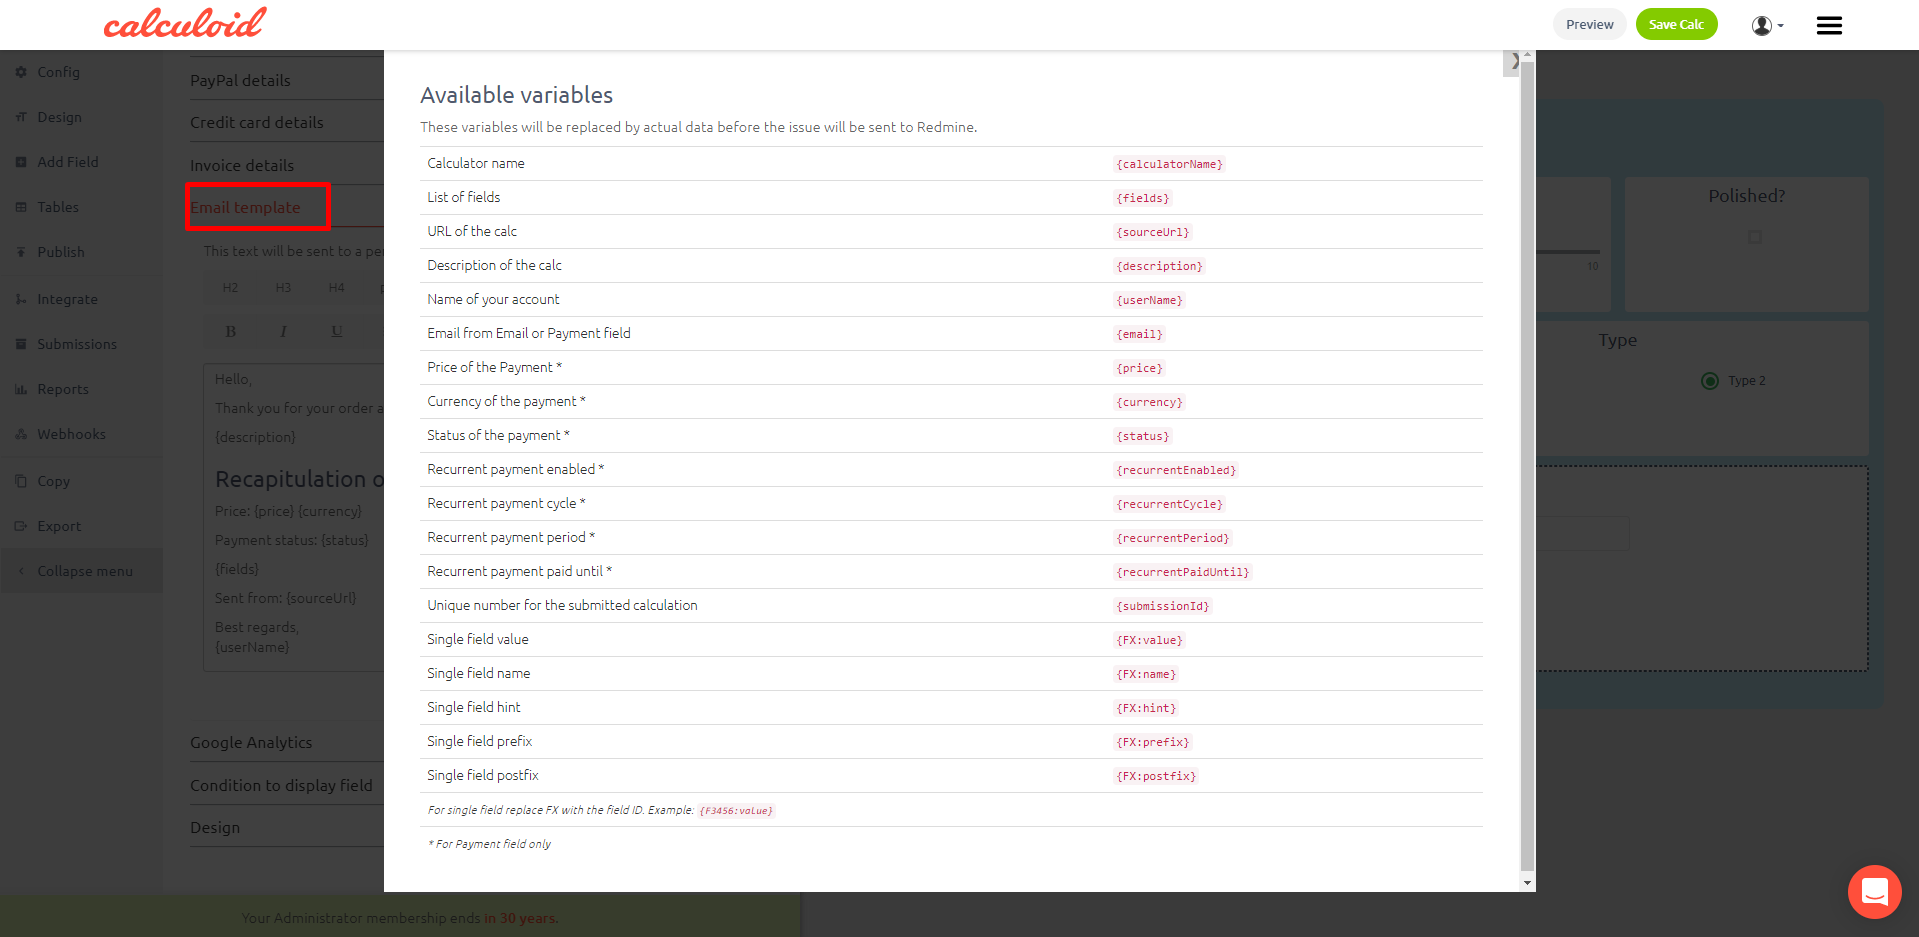
Special variables are available in the context of payment recurrence. These can be used with e-mail templates or other entities with variables applicable.
For more information about Payments, please read:
- Web calculators collecting client’s billing information
- Web calculator with online payments. Easy now!
- Payment Field use case
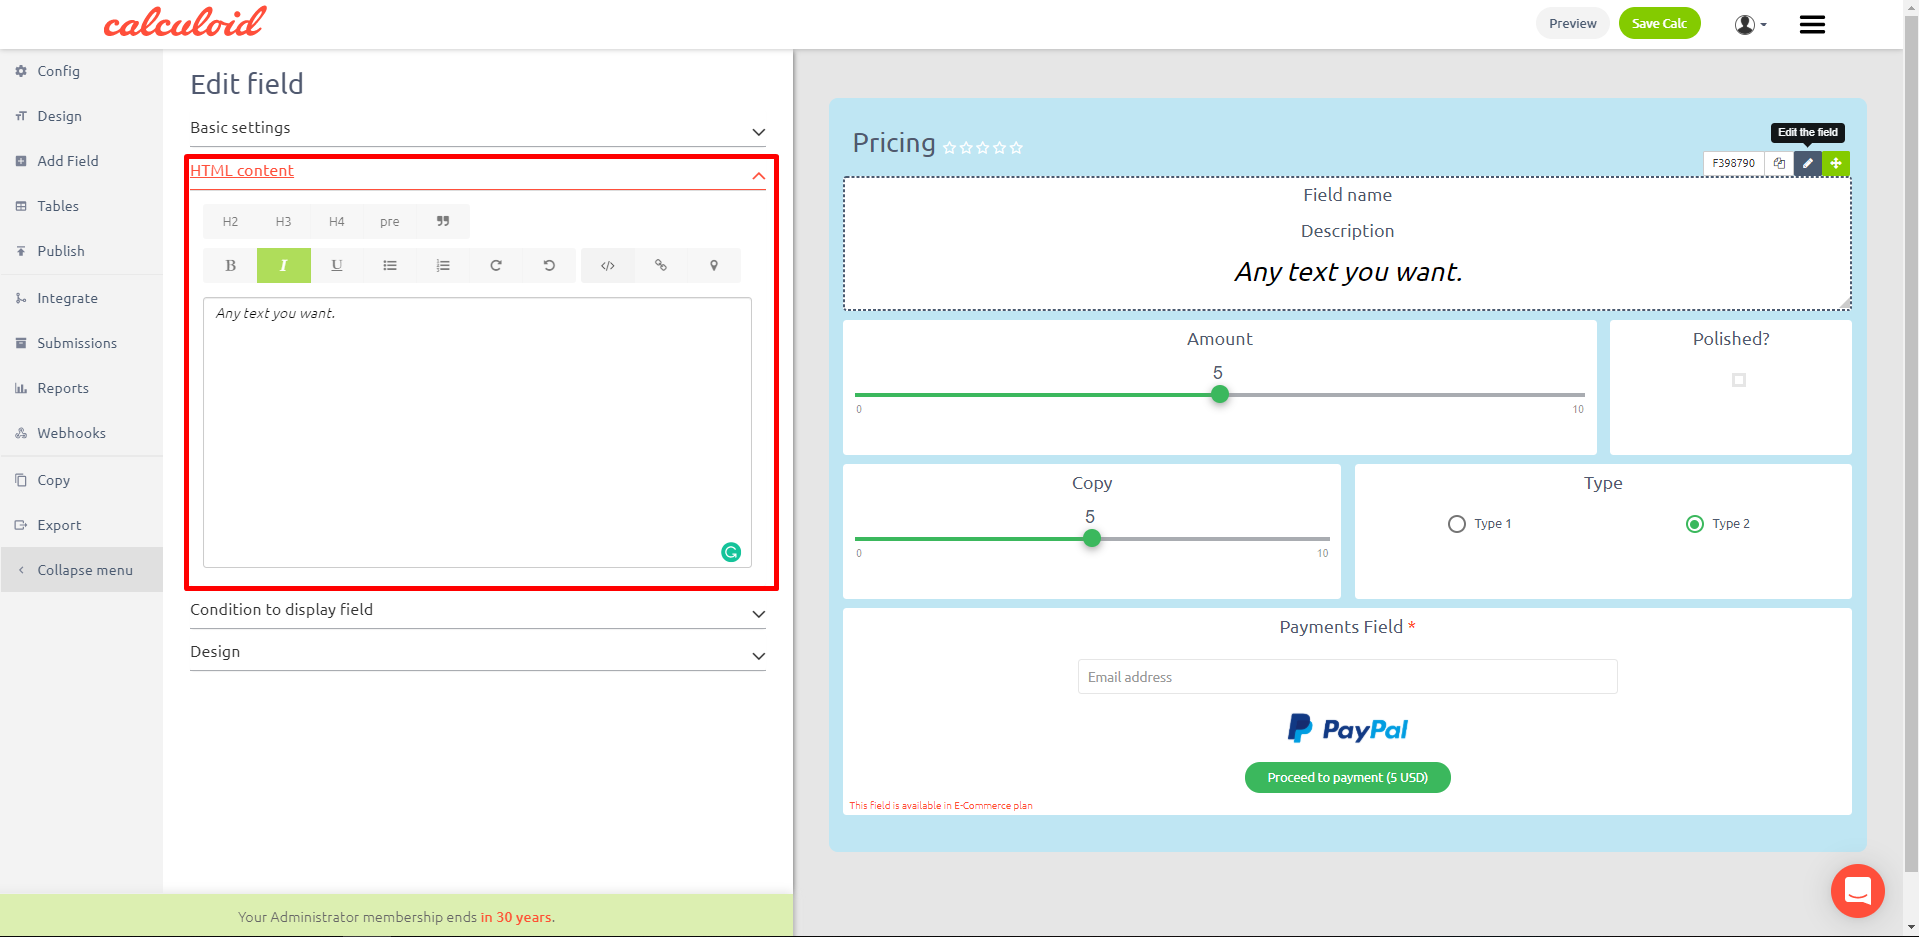
HTML - description field, serves for inserting any HTML into calculator.
HTML field is limited by approximately 3000 characters. To reduce the effective number of characters, remove HTML font styles (color, size...) from the text.
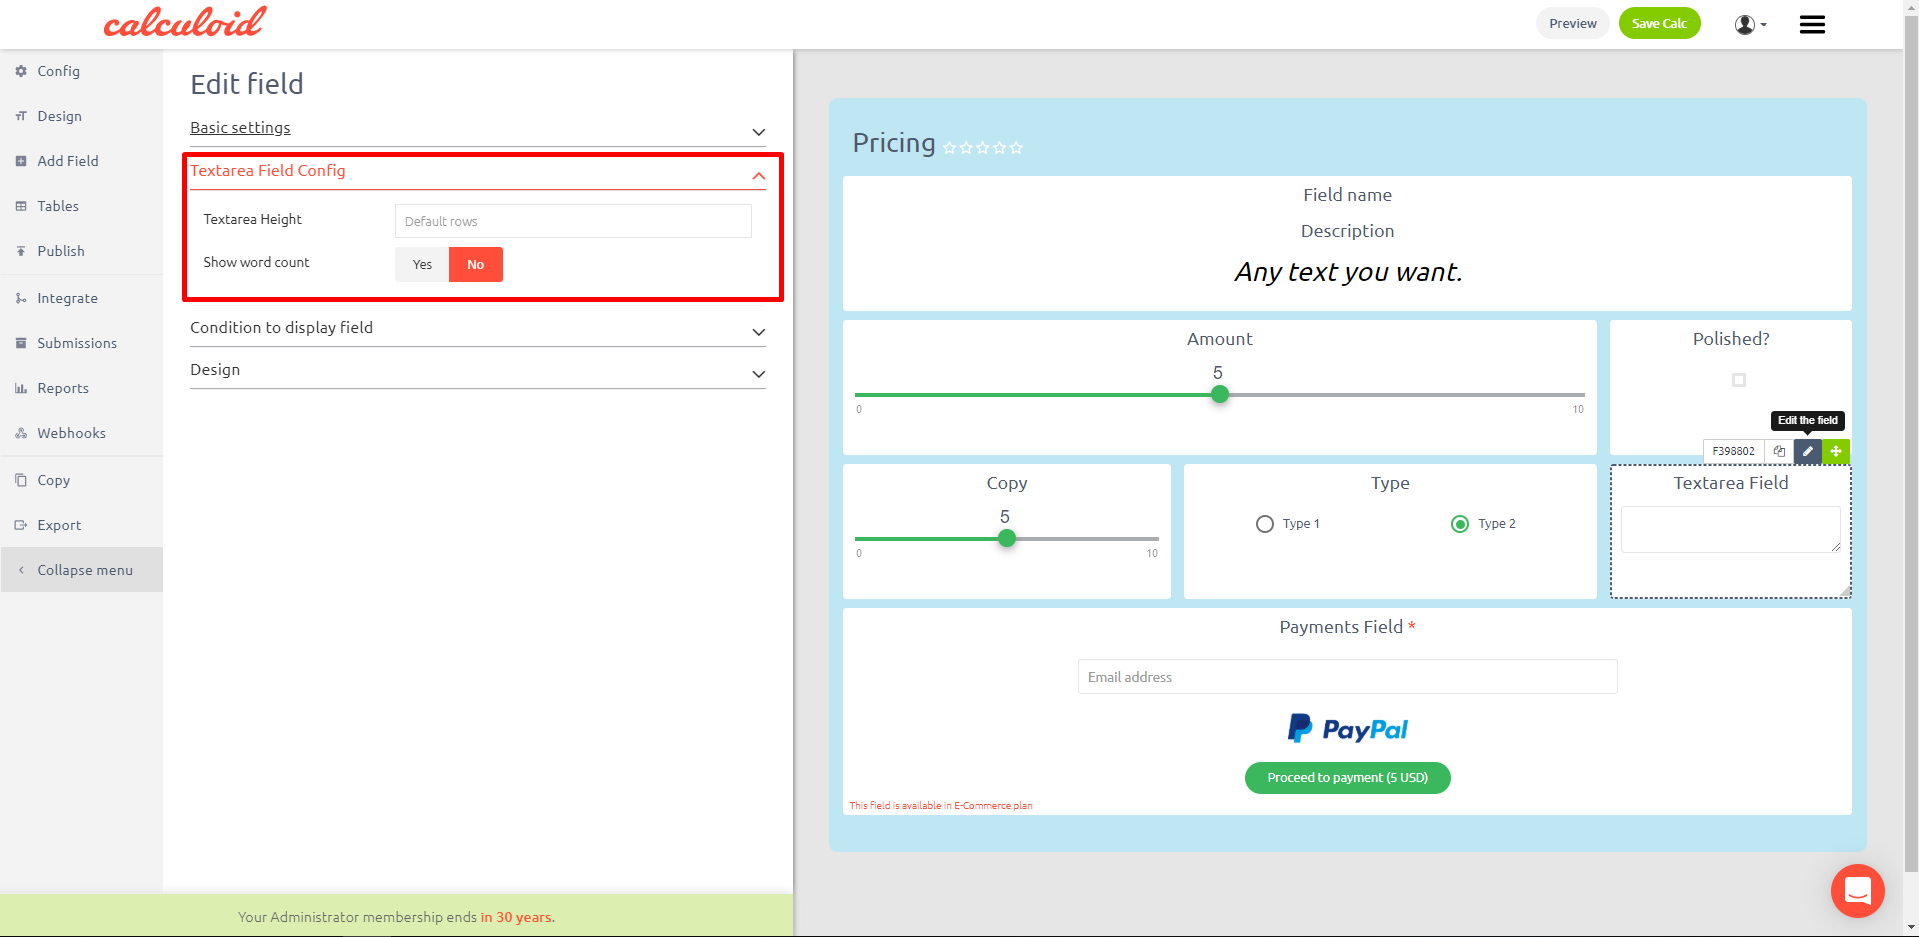
Textarea - calculator user can type in a message before sending his/her result.
Textarea Field Config:
- Textarea Height - enter a value in pixels
- Show word count - Yes/No
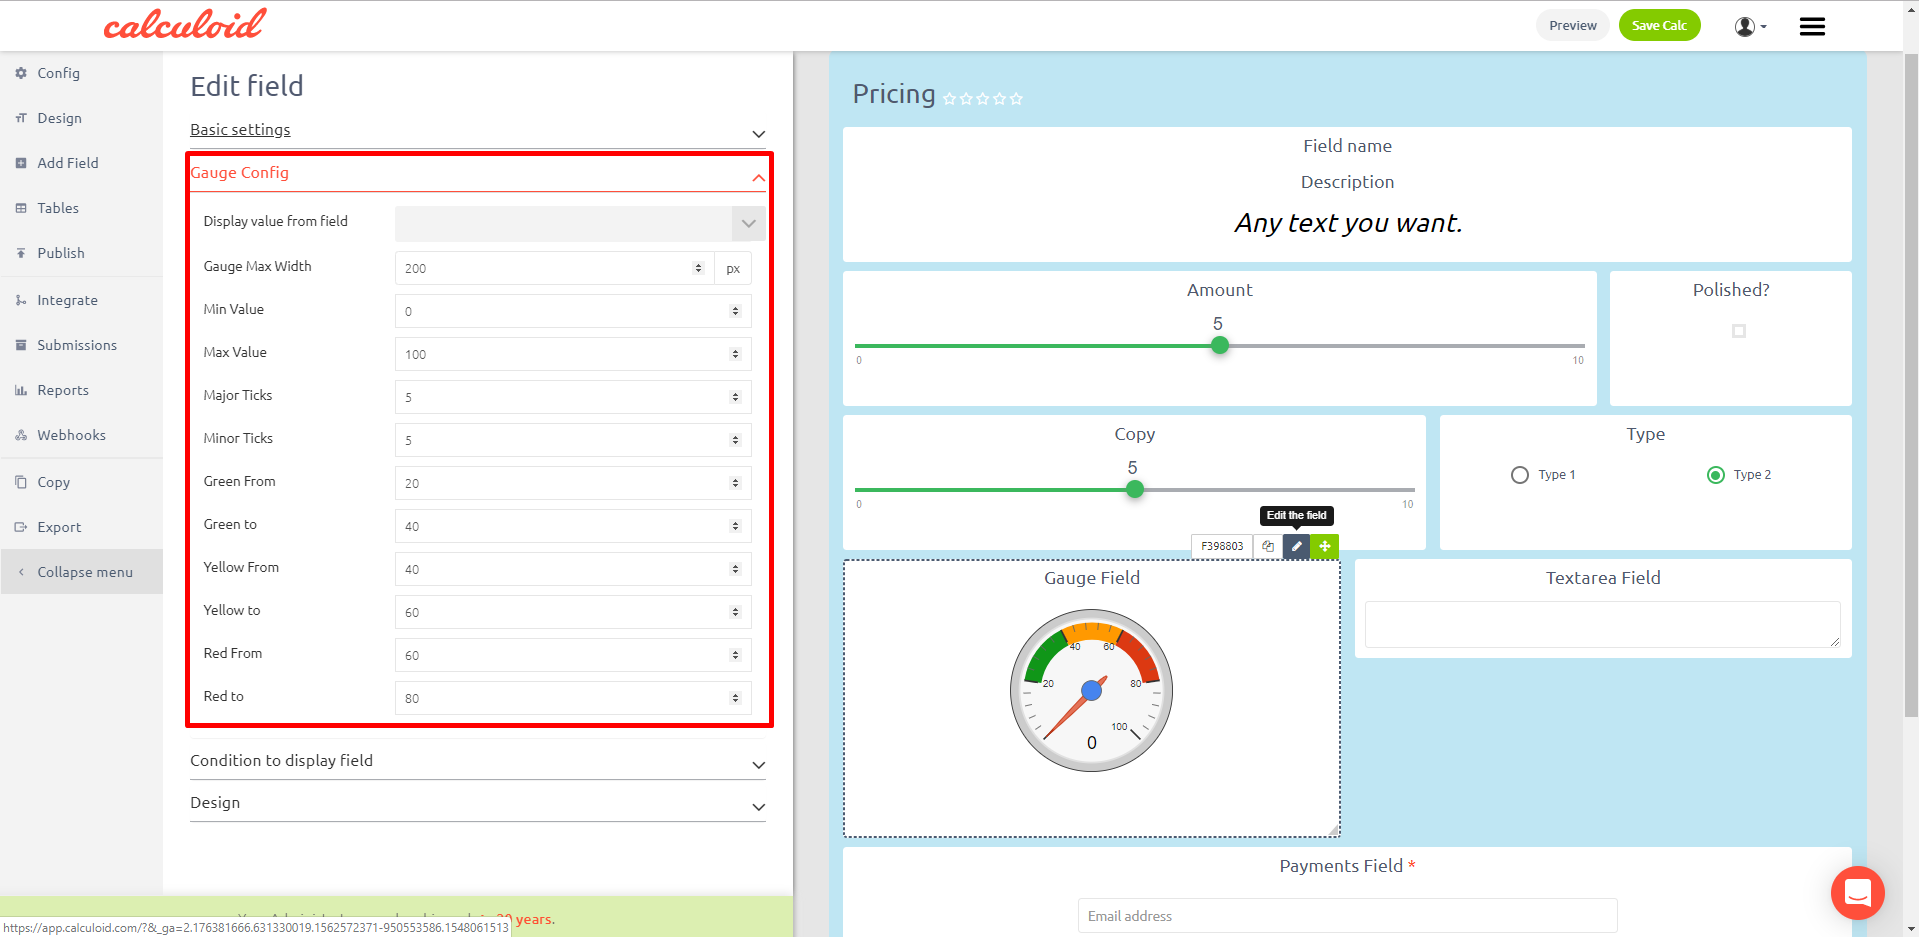
Gauge - a chart which looks like tachometer can display value of any field.
Gauge Config:
- Display value from field - select one field in the list
- Gauge Max Width - enter a value in pixels
- Min Value
- Max Value
- Major Ticks - the number of major tick marks on the gauge
- Minor Ticks - the number of minor tick marks on the gauge
- Green From + Green to - the value range for green color on the gauge
- Yellow From + Yellow to - the value range for yellow color on the gauge
- Red From + Red to - the value range for red color on the gauge
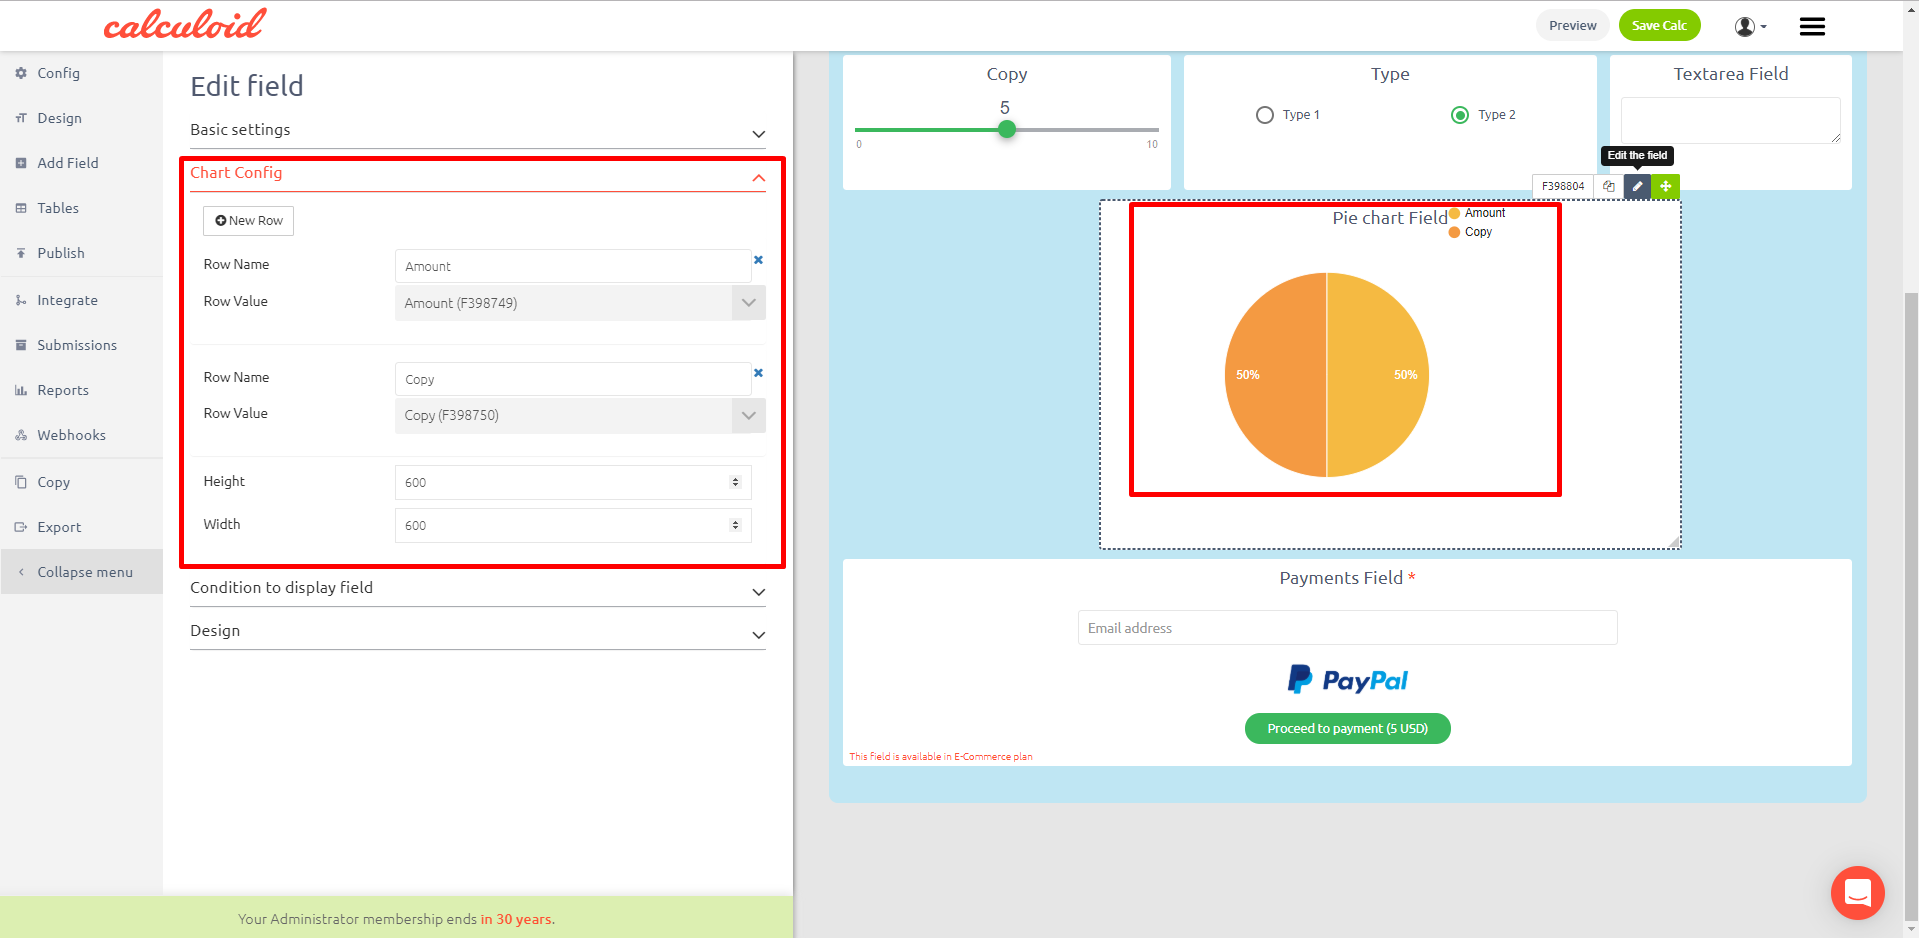
Pie chart - A circle chart to illustrate numerical proportion
A pie chart (or a circle chart) is a circular statistical graphic, which is divided into slices to illustrate numerical proportion. In a pie chart, the arc length of each slice (and consequently its central angle and area), is proportional to the quantity it represents.
Chart Config:
- New Row - add a new row into the pie chart
- Row Name - enter the name of the row
- Row Value - select any field to take the numerical value from
- Height + Width - allow changing the default dimensions of the pie chart
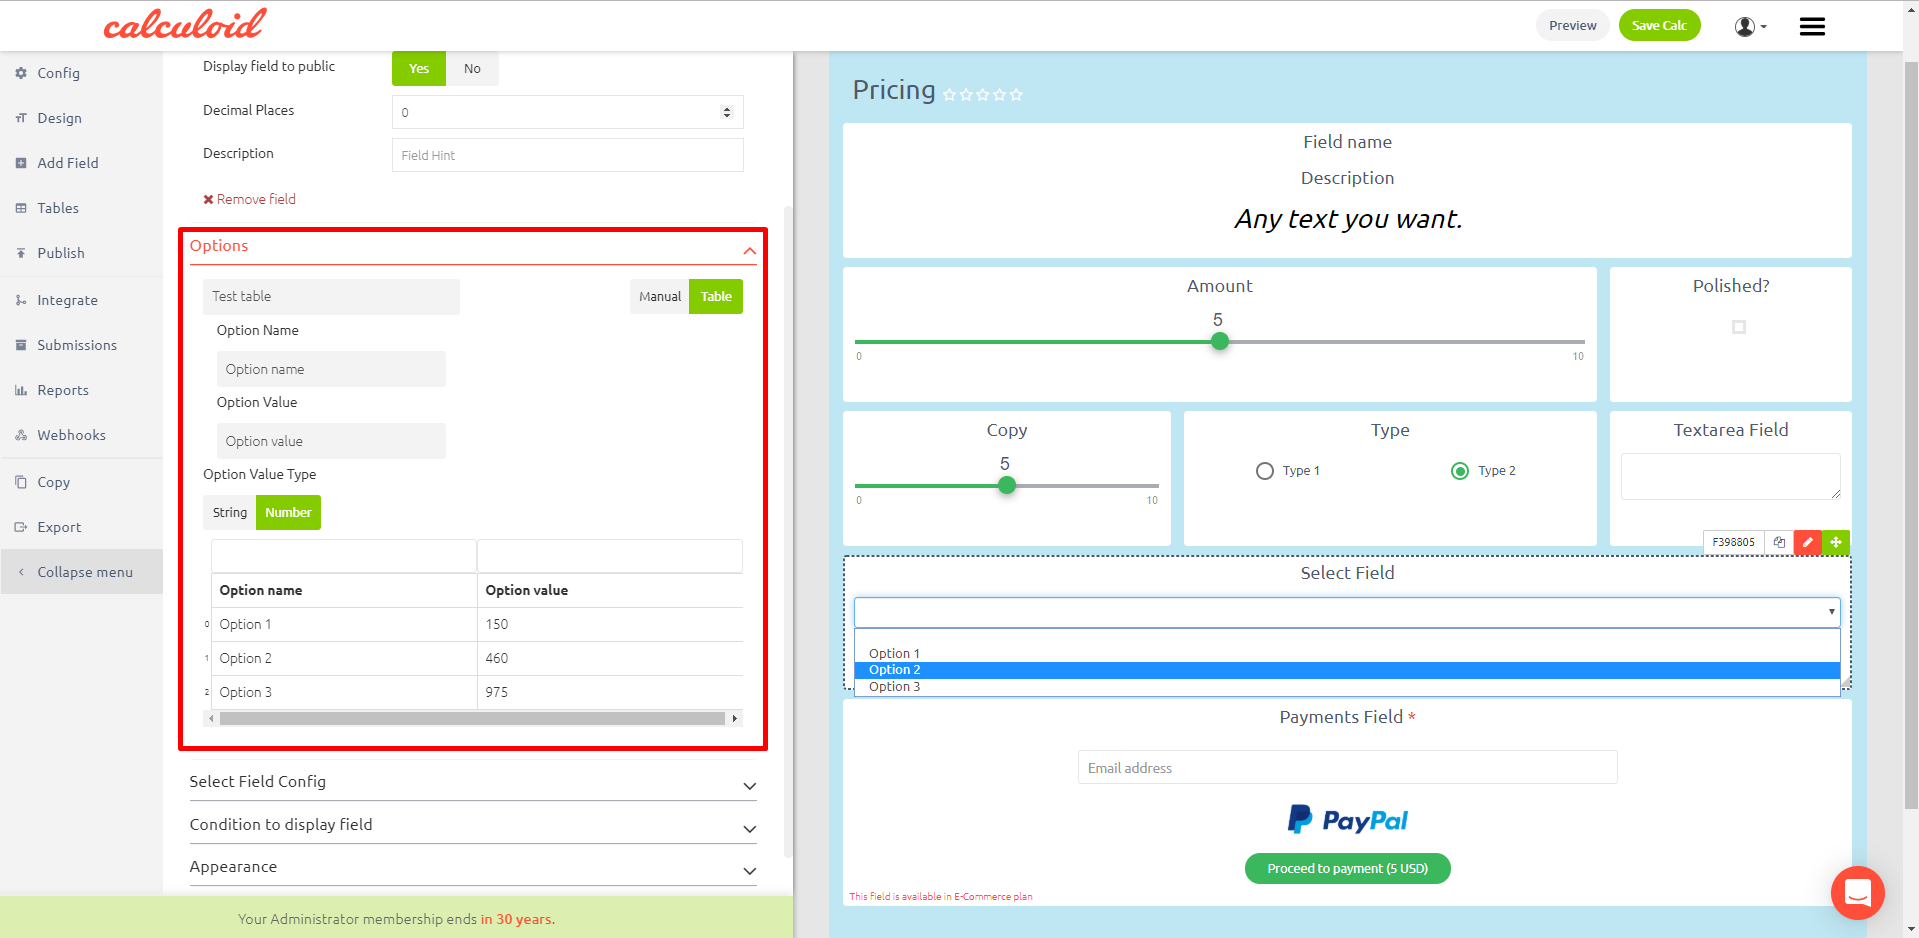
Select field - A drop-down menu with unlimited options
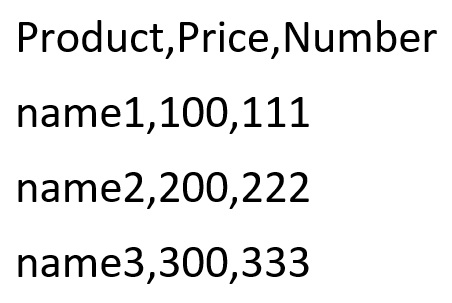
Unlike the radio box field with options shown as checkboxes, the Select field is designed as a drop-down menu so it better suits the situations when the number of options is really high. In "Edit Field > Options" menu, you can choose if you wish to add new options manually or select a table to import the options from. If you select the second option, make sure the table is added first before you can select one. To add a table into Calculoid, use the "Tables" button on the left side of the screen. When adding a table from a CSV file, please note that only commas (not semicolons) are supported as a field separator in the file.
This is an example of the correct CSV data format.
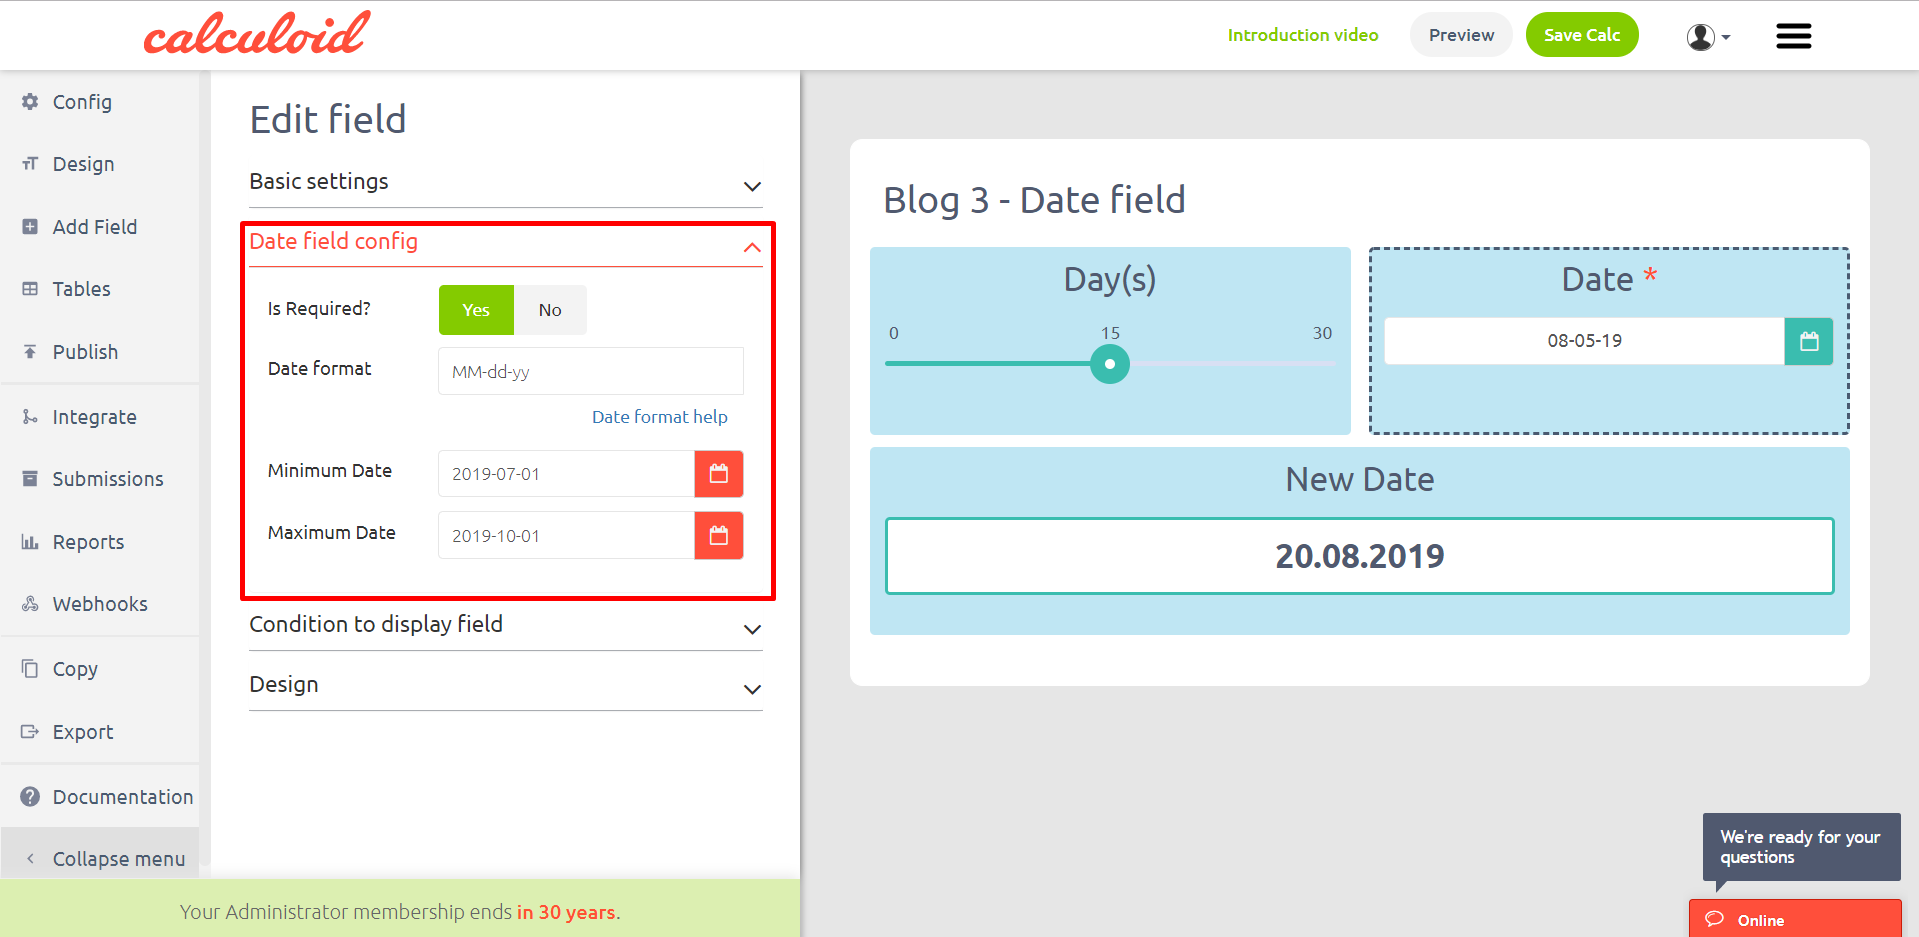
Date field - user can pick a date from the calendar, further calculations are available with functions in the formula field.
- Is required? - Yes/No option
- Date format - Setting for a custom format. Available custom formats can be found here: https://docs.angularjs.org/api/ng/filter/date
- Minimum Date - Set the minimum date to limit the final user in the date selection
- Maximum Date - Set the maximum date to limit the final user in the date selection
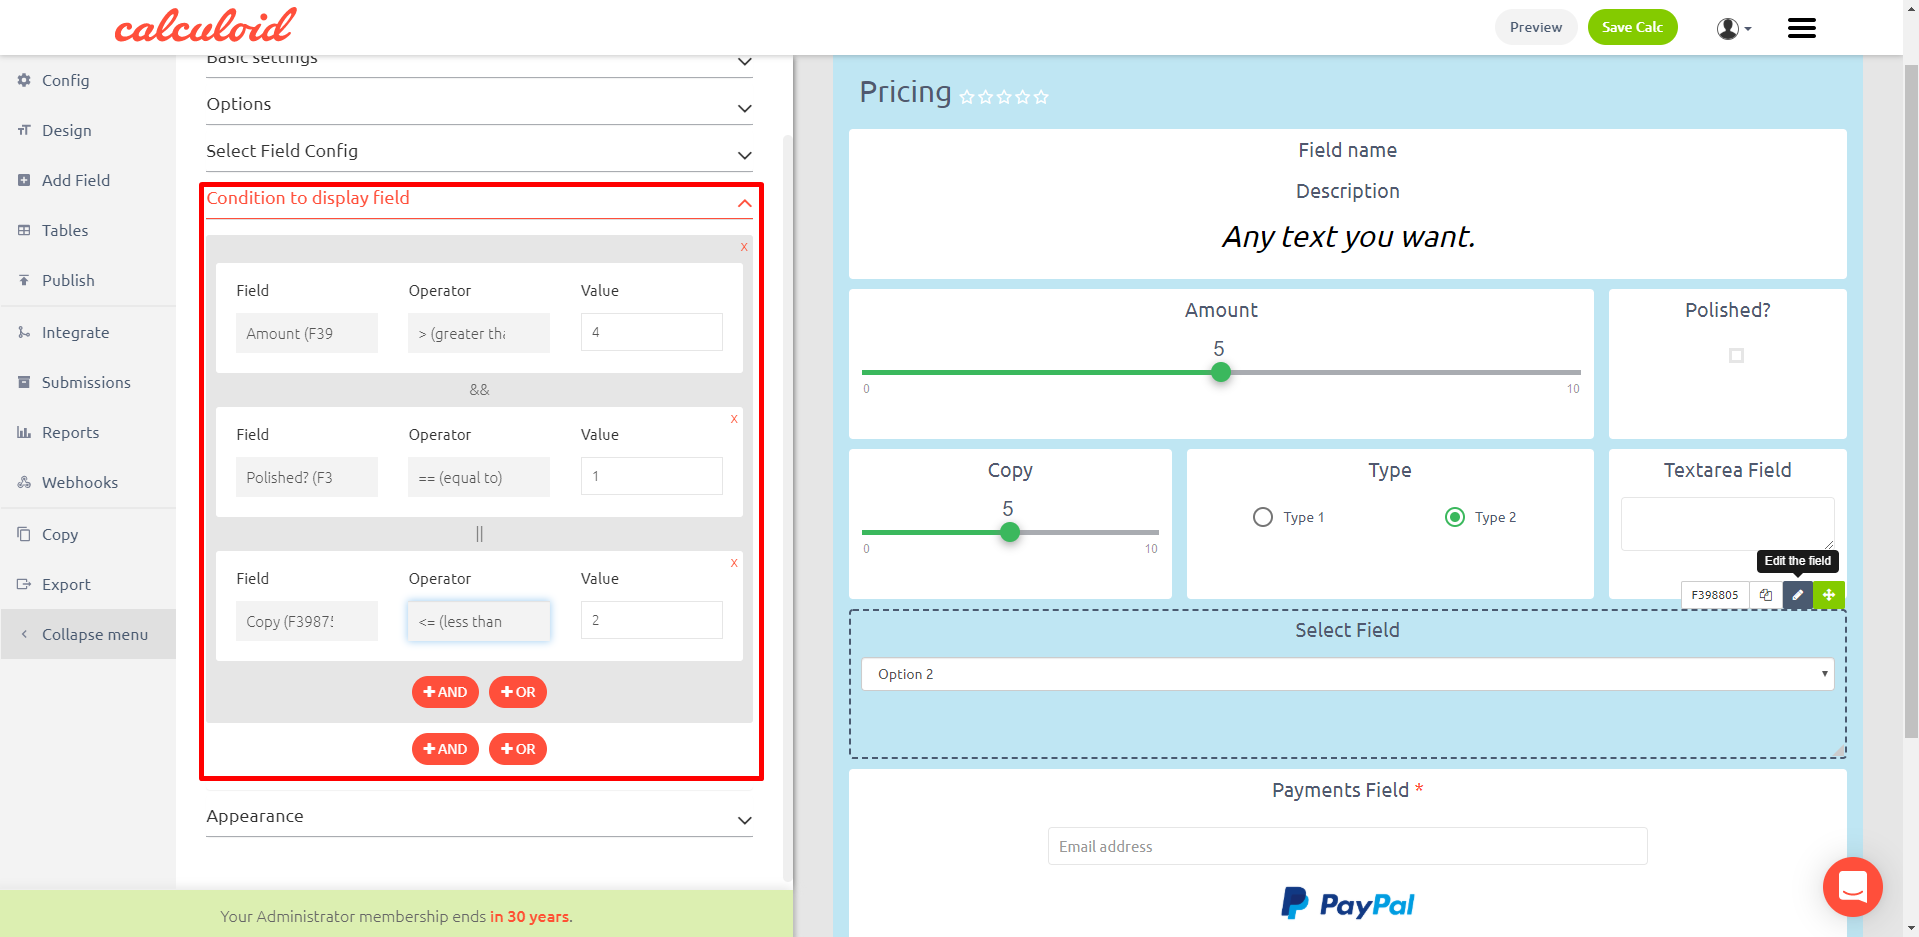
Conditional fields
In Calculoid, setting up logical conditions is used to show/hide specific fields of a calculator. When conditions for a specific field come true, the field is shown (white field), otherwise, it's hidden (gray field). Such behavior is practical when some fields in a calculator are only relevant when specific numerical values are entered into some other fields (such as a slider, gauge, formula...), i.e. the data input is only required under specific conditions but not otherwise. For more information about conditional fields, please read "Web calculator with conditional fields".
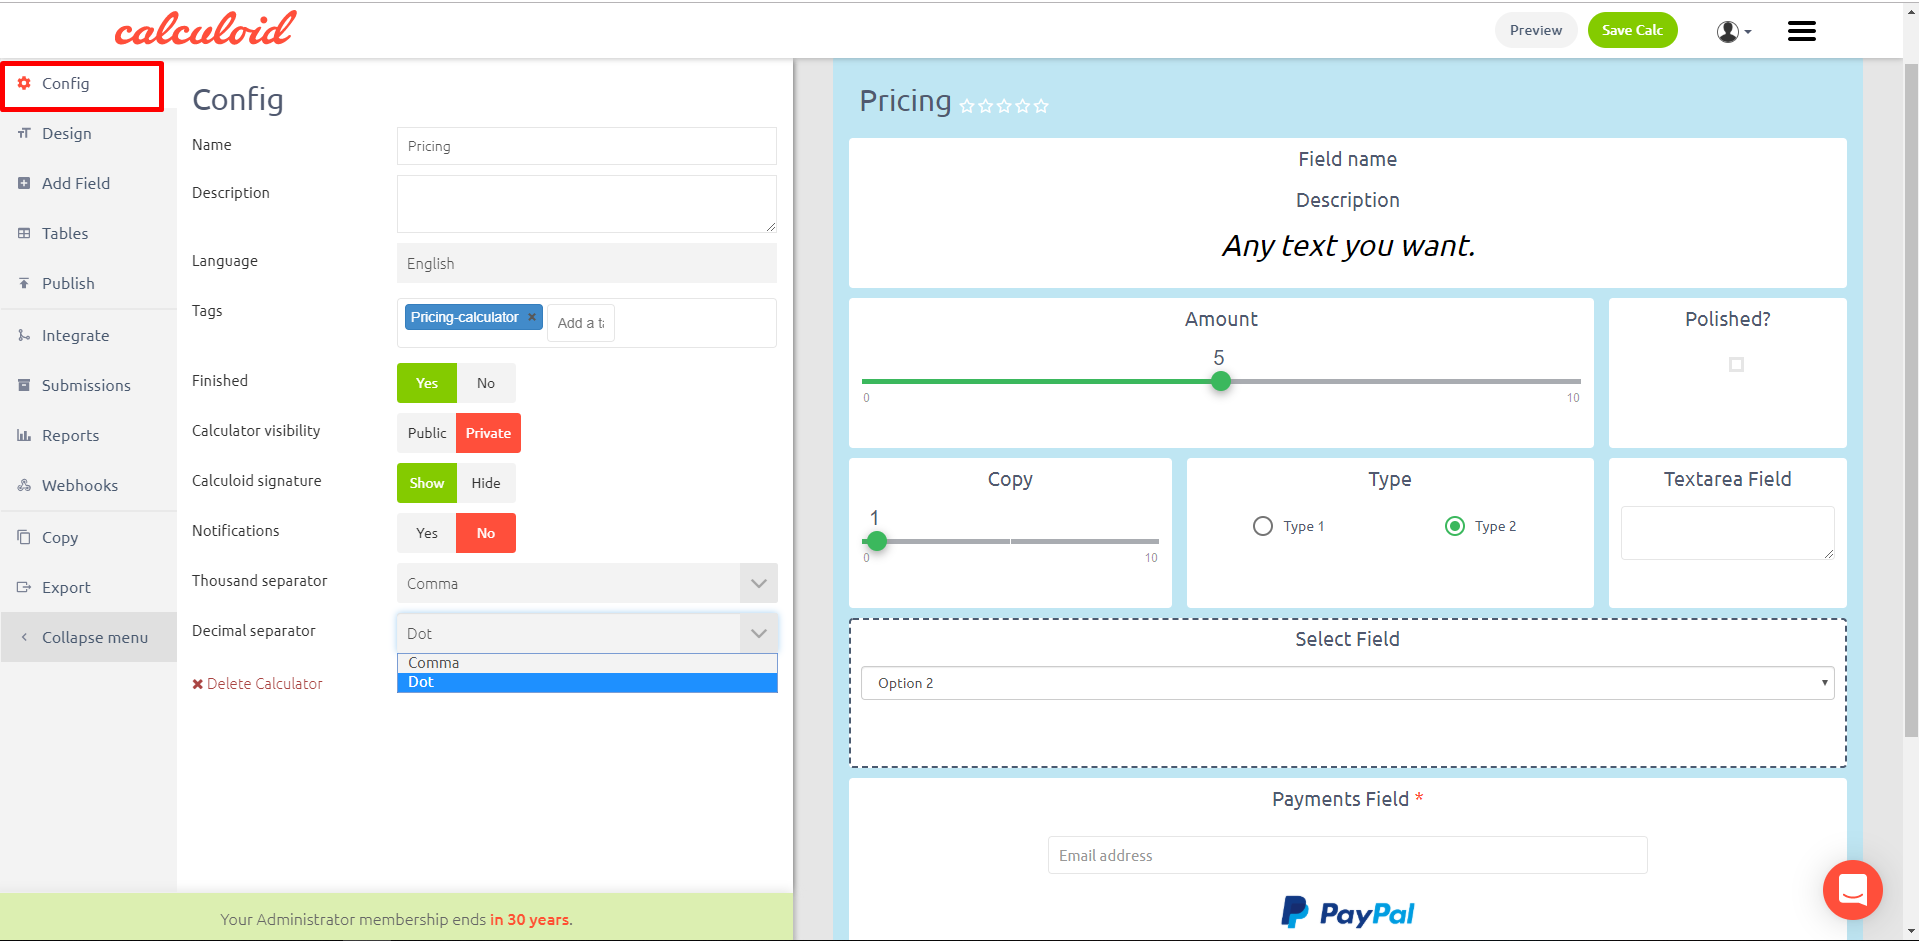
How to configure a calculator
Once you have edited all your fields, continue to the "Configure" tab with the following options:
- Name - change the name of the calculator
- Description - edit the calculator description
- Language - choose the language of the calculator
- Theme - choose the default appearance theme
- Color Scheme
- Tags - tag your calculator
- Is finished - your calculator will only appear online once embedded when you click on YES
- Calculator - check our FAQ for information on Public and Private calculators
- Signature - check our FAQ for information on Signature, it can be Hidden only when you have a paid subscription
- Notification
- Thousands separator
- Decimal separator
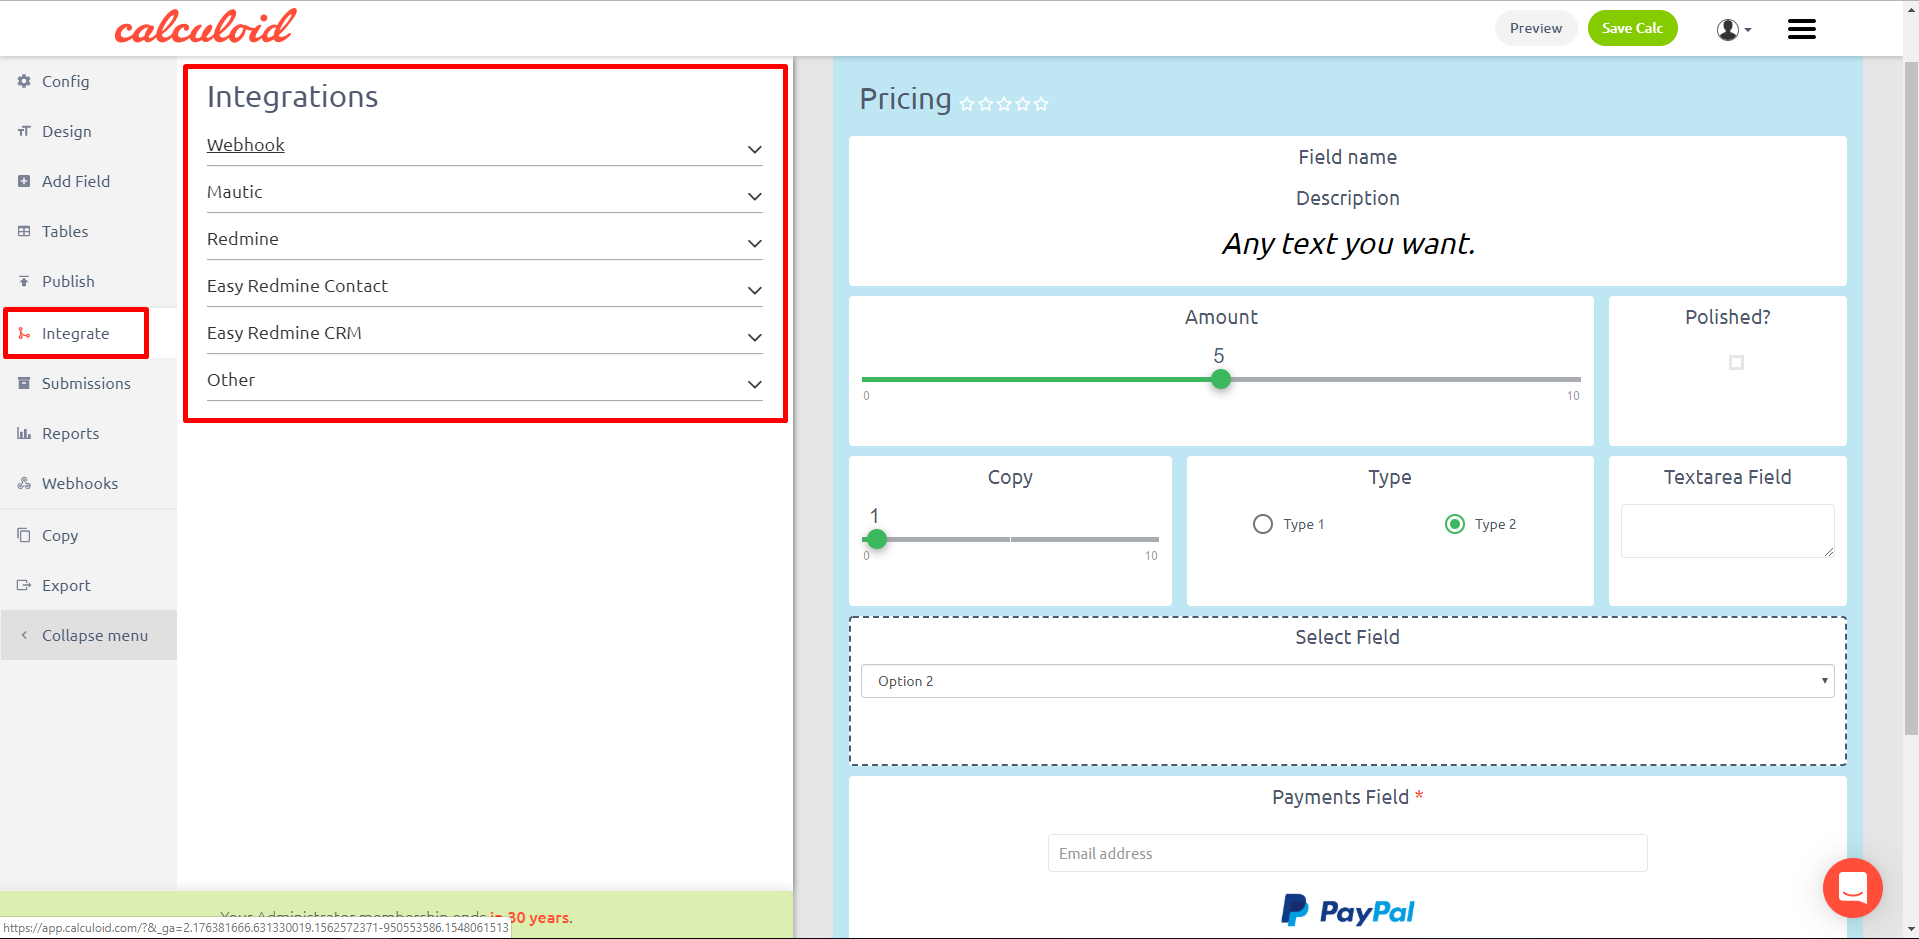
How to integrate a calculator
In the "Integrate" tab, you can find available integrations:
- Webhook
- Mautic
- Redmine
- Easy Redmine CRM
How to integrate Google Analytics
Google Analytics can track events on specific calculator fields only - namely "Send Results" and "Payments". Go to the "Edit Field" menu of the respective field. Here open the "On submit" sub-menu. Change the "Send Google Analytics event?" value to Yes. In order for Google Analytics events to work, you need to set the following fields and also include analytics.js on the same page where you embed your calculator. The iframe version is not supported. Events will not be fired while editing or previewing the calculator.
- Google Analytics event category (e.g. "Video")
- Google Analytics event action (e.g. "play")
- Google Analytics event label (e.g. "Fall Campaign")
- Google Analytics event value (e.g. 42)
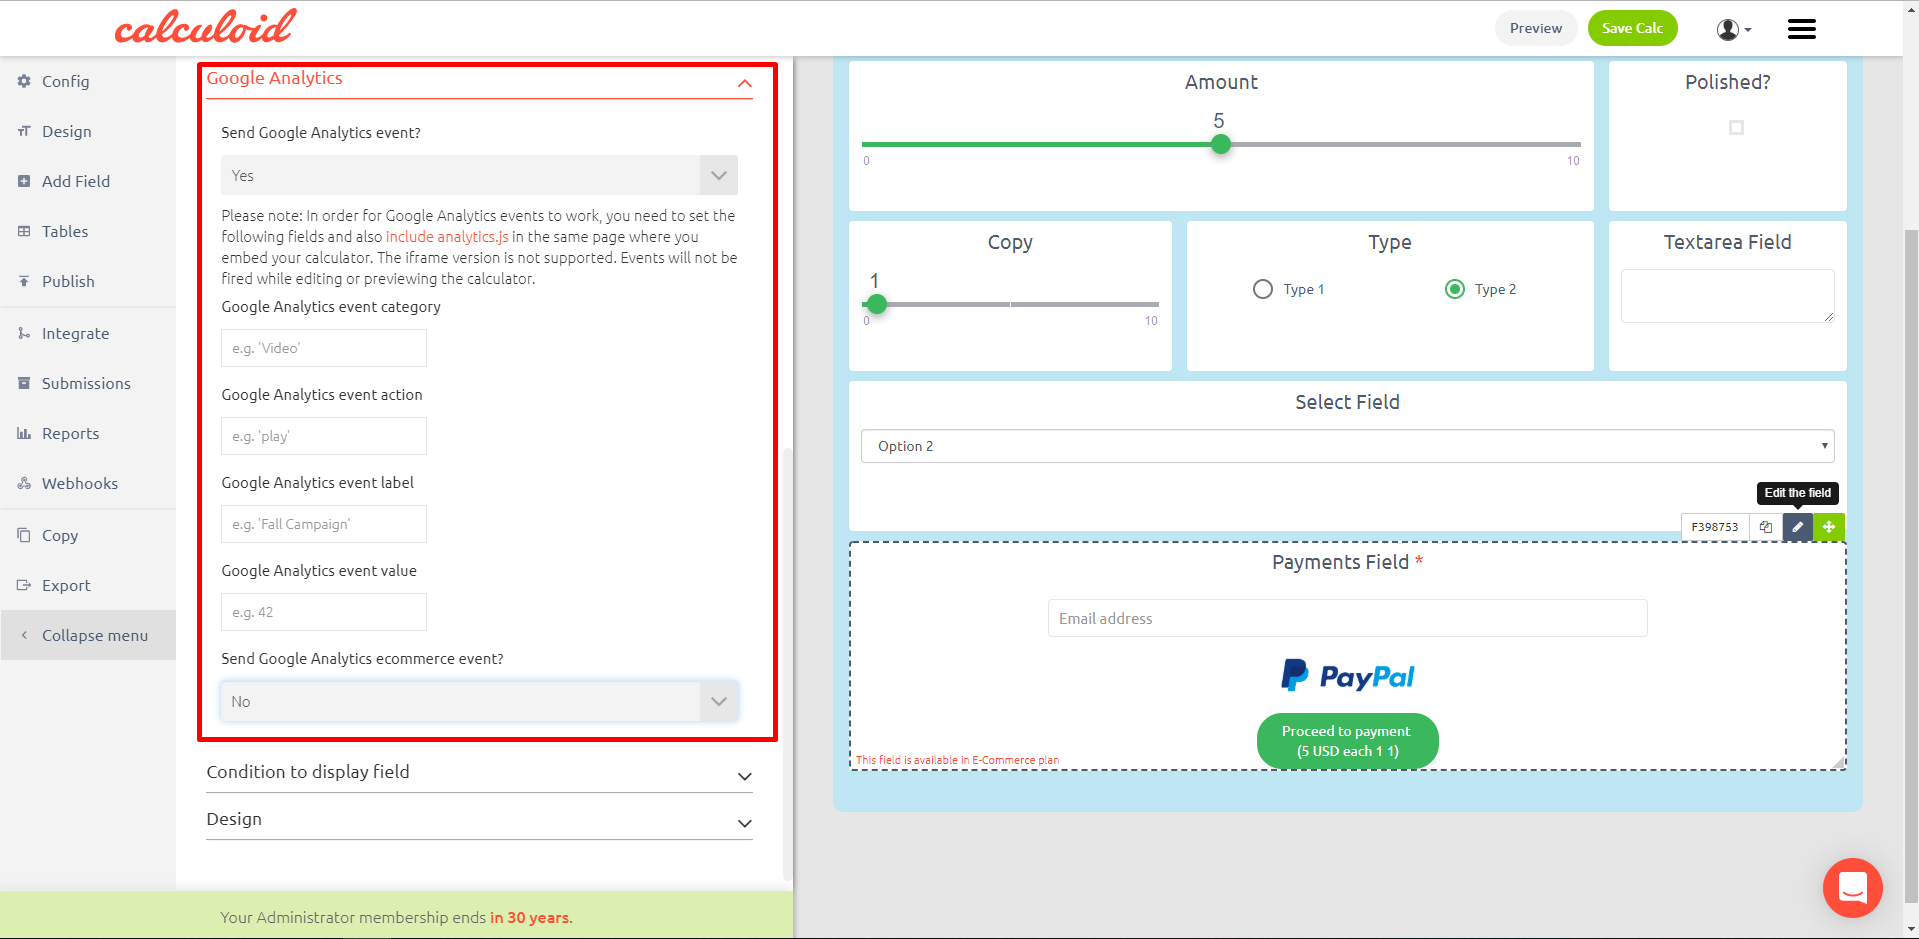
The data created by an activity on the specific Calculoid fields will show in Google Analytics as events with above-defined attributes.

How to prefill data in the calculator
There are two ways how to prefill data in the calculator, by URL query string or in ng-init attribute in the <div> element.
By ng-init atribute
Prefill configuration is inserted in ng-init – init() function as new object values (example: values:{}). To set individual values you have to add key with ID of field and his value . (example: values:{ F12345 : 'example value'} – this example configuration will prefill field ID F12345 with 'example value'). So the embed code itself will look like this:
<link rel="stylesheet" href="http://embed2.calculoid.com/styles/main.css" />
<script src="http://embed2.calculoid.com/scripts/combined.min.js"></script>
<div ng-app="calculoid" ng-controller="CalculoidMainCtrl" ng-init="init({calcId:12345,apiKey:'xxxxxxxxx', values:{ F12345 : 'example value'} })" ng-include="load()"></div>
There is possible prefill only email, slider, radio, text, textarea, payment and checkbox fields.
If is used payment field in your calculator, it is possible to prefill all billing informations (except custom checkboxes) by adding new object billing into values{} (example: values: {billing: { } }).
Billing inf. to prefill:
address, city, companyName, country, email, firstname, lastname, oac, phone, vatid, zip
Example:
<link rel="stylesheet" href="http://embed2.calculoid.com/styles/main.css" />
<script src="http://embed2.calculoid.com/scripts/combined.min.js"></script>
<div ng-app="calculoid" ng-controller="CalculoidMainCtrl" ng-init="init({calcId:12345,apiKey:'xxxxxxxxx', values:{ F12345 : 'example value', billing:{address:‘Example address‘, city:‘Example city‘, country:‘US‘, zip:‘111111‘, email:‘This email address is being protected from spambots. You need JavaScript enabled to view it.‘, firstname:‘John‘, lastname:‘Doe‘, oac:true, phone:‘+111123456789‘, companyName:‘Company name‘, vatid:‘GBxxxxxxxx‘} })" ng-include="load()"></div>
oac = Order as Company checkbox (can be only true or false)
By URL query string
Data are inserted by adding query parameters in format: field_id=prefilled_value
Example:
http://www.your.domain/index.html?F12345=example%20text&F12346=another%20example%20text
(Note: data have to be URL encoded, more information)
Variables usable in formula
- FX - field value (except email, payment and HTML field) *replace FX with the field ID. Example: F3456
- BillingFirstname - first name from payment billing information
- BillingLastname - last name from payment billing information
- BillingAddress - address from payment billing information
- BillingCity - city from payment billing information
- BillingCountry - country from payment billing information
- BillingZip - zip code from payment billing information
- BillingCompanyName - company name from payment billing information
- BillingVatid - VAT ID from payment billing information
- BillingValidViesVatID - if is VAT ID validation by VIES enabled this var. returns 1 when validation is successful, otherwise 0
- PaymentType - returns which payment type is selected (paypal = 1, stripe = 2, invoice = 3)
Available variables for integrations and emails
Some types of fields (such as Send Results or Payments) use e-mail templates. In the templates, these variables will be replaced by actual data before the e-mail is sent. The same applies for integrations.
- {FX:value} - single field value *replace FX with the field ID. Example: F3456
- {FX:name} - single field name *replace FX with the field ID. Example: F3456
- {FX:hint} - single field description *replace FX with the field ID. Example: F3456
- {FX:prefix} - single field text before value *replace FX with the field ID. Example: F3456
- {FX:postfix} - single field text after value *replace FX with the field ID. Example: F3456
- {calculatorName} - calculator name
- {fields} - list of fields
- {sourceUrl} - calculator URL
- {description} - calculator description
- {userName} - author account name
- {email} - email address from Email or Payment field
- {price} - price from Payment field
- {currency} - currency of Payment field
- {status} - pament status
- {billing:firstname} - first name from payment billing information
- {billing:lastname} - last name from payment billing information
- {billing:address} - address from payment billing information
- {billing:city} - city from payment billing information
- {billing:country} - country from payment billing information
- {billing:zip} - zip code from payment billing information
- {billing:companyName} - company name from payment billing information
- {billing:vatid} - VAT ID from payment billing information
- {submissionId} - Unique ID of email or payment submission (can be used as Reference number for invoice)
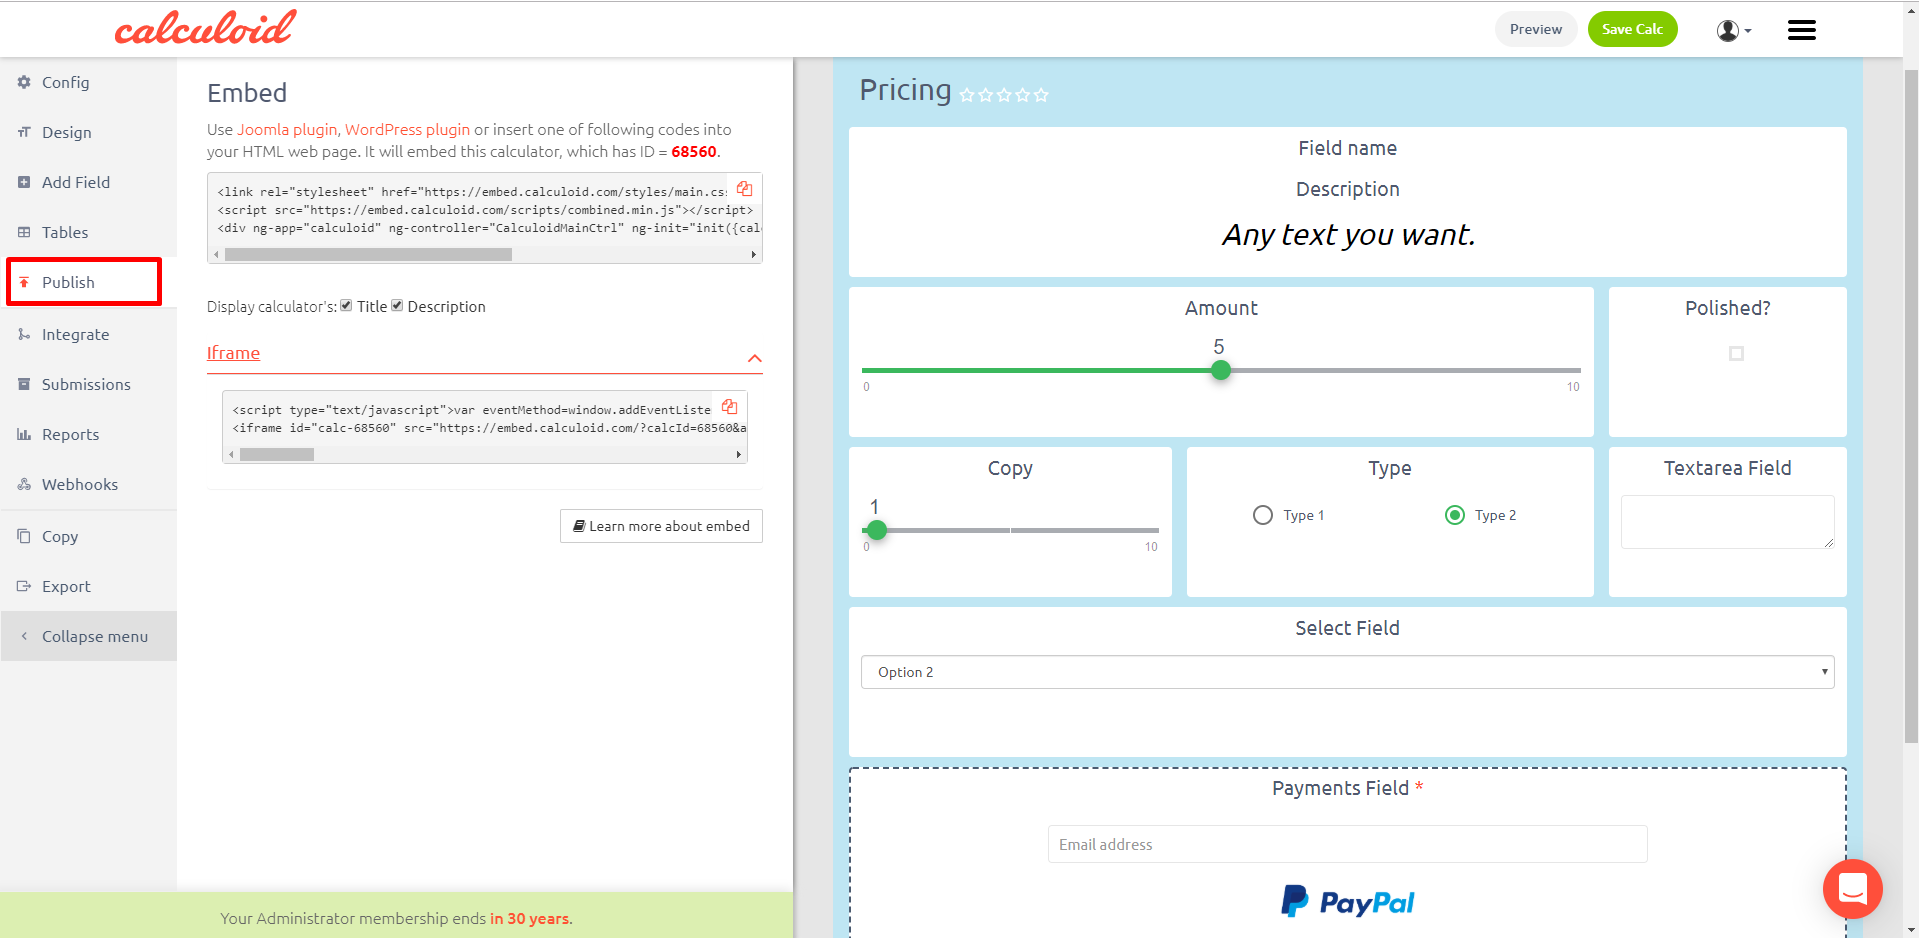
How to embed a calculator
To embed a calculator, go to the "Embed" tab and copy an HTML code:
- HTML code without iFrame - this code will adopt the CSS of your website. Make sure you test the code at CodePen
- HTML code with iFrame - should you have any problems with the formatting while embedding the calculator on your website, please use the second option where the calculator will show with the formatting you chose in Calculoid while creating your calculator
For more information about embedding, please read "Embedding of Calculoid's calculators".
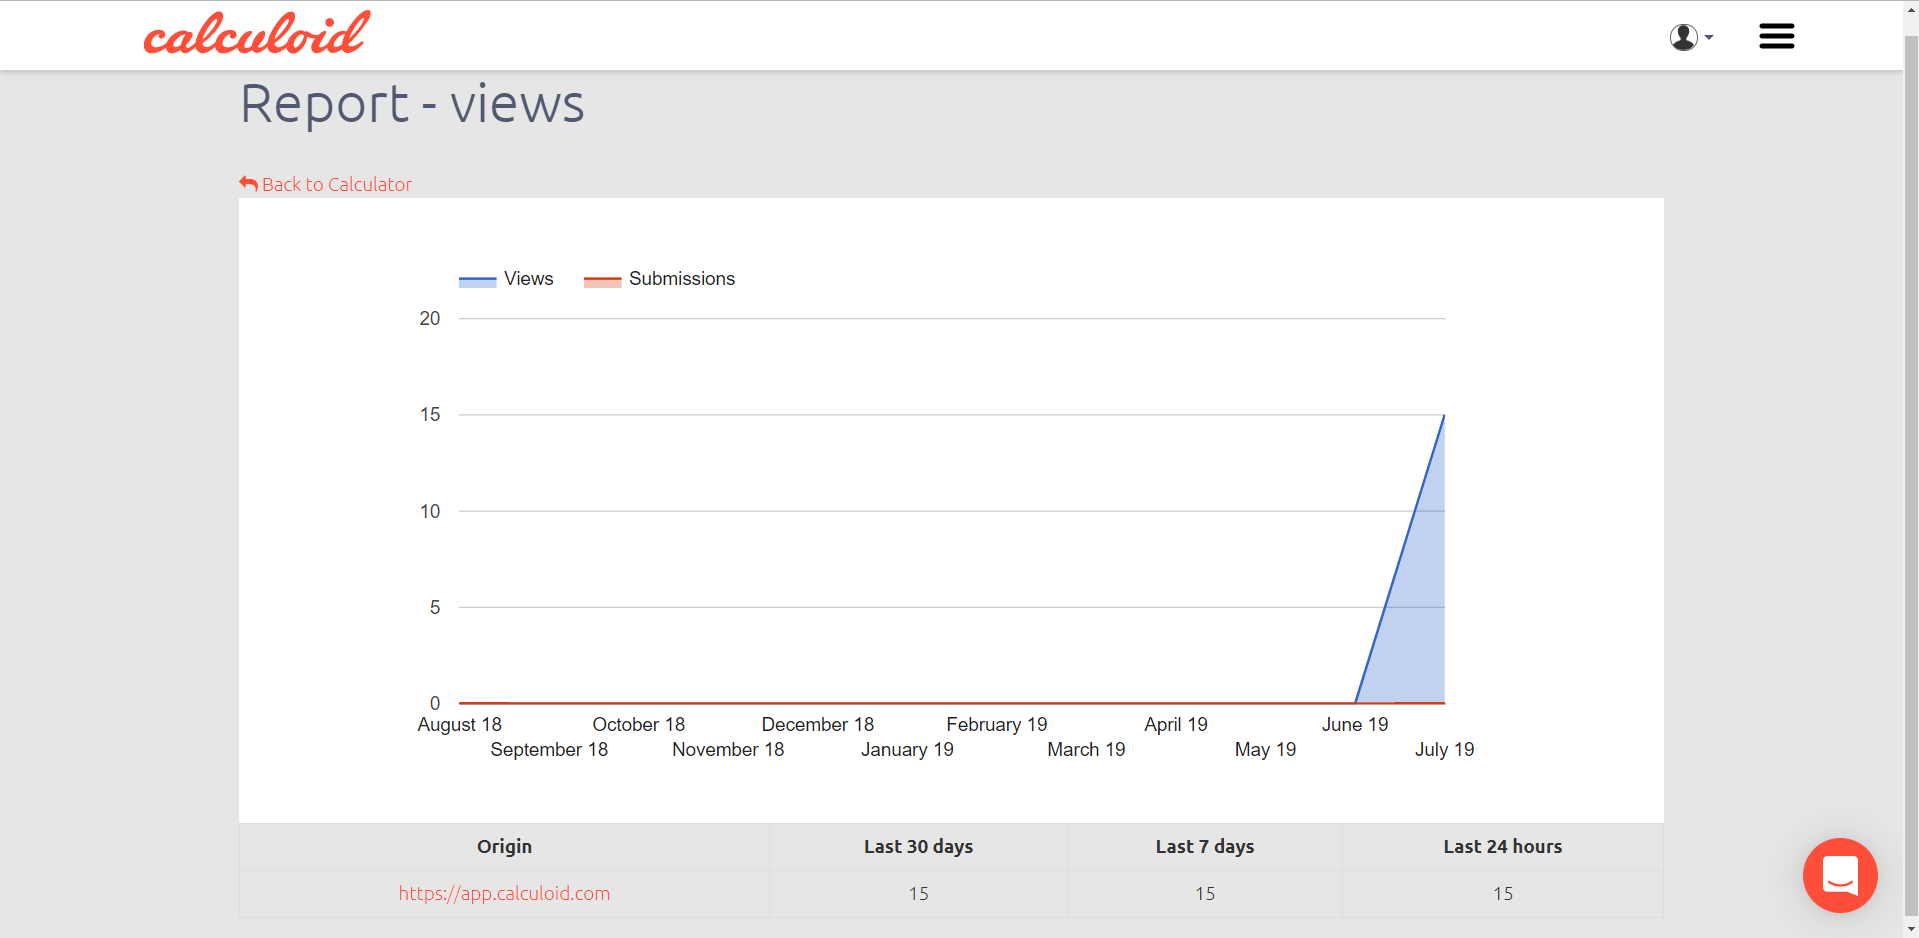
Statistics
To find submission details and reports for a particular calculator, go to the "Submissions" on the left of your calculator. For global statistics, open "Reports" menu item.
- Submissions - see all the submissions done through your calculator(s), including payments and pending payments
- Reports - see how many times has your calculator(s) been viewed and how many submissions have been done
Webhooks
The Slider field is a great option if you need to have predefined max and min values for an input field. For example, if you want to let a user select a percentage, you know that the min value is 0 and the max value is 100%. Slider is a nice interactive element for the whole calculator since it allows the user to drag&drop the pointer or select a value by just a click or touch. This field is optimized for mobile as well. Additional input option allows to type in particular number if required. With Calculoid slider you can also set particular options to choose from. Such setting is very useful when the user should pick only predefined numbers or options.