Calculoid Documentation
- General - basic information about how does the platform work
- For developers - more detailed information for advanced users and web-developers
First steps - How to create a calculator and add fields
- Slider field
- Text field
- Radiobox field
- Formula field
- Checkbox field
- Send results field
- Paymnet field
- HTML field
- Textarea field
- Gauge chart field
- Pie chart field
- Select field
- Date field
- Go to Page field
- Condition to display field feature
- Zapier - integration platform with more than 1000 applications available
- Google Analytics - direct integration
- Redmine products - direct integration with EasyProject and EasyRedmine
How does Calculoid work?
General
Calculoid is a cloud-based platform. Once you have an account with us, you can start creating your calculators. Calculoid has an editor which allows setting a calculator with no coding. All your calculators are kept under your account. To manage them you need to open 'My calculators' page. Once your calculator is ready, you can embed it on your web with HTML or iFrame. The codes are autogenerated and presented in the 'Publish' tab. To embed your calculator simply copy one of the codes and paste it on your web. After embedding the calculator you have all the statistics on your calculator's page. To use Calculoid in full, integrate your calculator with your CRM system to gain leads or with any other application available on Zapier.
For developers
Calculoid.com is plain static JavaScript web application which uses AngularJS framework to run. It is a heavyweight application compared to embed app whose main goal is to be a public library for calculators and powerful calculator editor. For more information about Calculoid, please read "How does Calculoid work?".
How to prefill data in the calculator
There are two ways how to prefill data in the calculator, by URL query string or in ng-init attribute in the <div> element.
By ng-init atribute
Prefill configuration is inserted in ng-init – init() function as new object values (example: values:{}). To set individual values you have to add key with ID of field and his value . (example: values:{ F12345 : 'example value'} – this example configuration will prefill field ID F12345 with 'example value'). So the embed code itself will look like this:
<link rel="stylesheet" href="http://embed2.calculoid.com/styles/main.css" />
<script src="http://embed2.calculoid.com/scripts/combined.min.js"></script>
<div ng-app="calculoid" ng-controller="CalculoidMainCtrl" ng-init="init({calcId:12345,apiKey:'xxxxxxxxx', values:{ F12345 : 'example value'} })" ng-include="load()"></div>
It is possible to prefill email, slider, radiobox, text, textarea, payment and checkbox fields.
If the payment field is used in your calculator, there is a possibility to prefill all billing information (except custom checkboxes) by adding new object billing into values{} (example: values: {billing: { } }).
Billing inf. to prefill:
address, city, companyName, country, email, firstname, lastname, oac, phone, vatid, zip
Example:
<link rel="stylesheet" href="http://embed2.calculoid.com/styles/main.css" />
<script src="http://embed2.calculoid.com/scripts/combined.min.js"></script>
<div ng-app="calculoid" ng-controller="CalculoidMainCtrl" ng-init="init({calcId:12345,apiKey:'xxxxxxxxx', values:{ F12345 : 'example value', billing:{address:‘Example address‘, city:‘Example city‘, country:‘US‘, zip:‘111111‘, email:‘This email address is being protected from spambots. You need JavaScript enabled to view it.‘, firstname:‘John‘, lastname:‘Doe‘, oac:true, phone:‘+111123456789‘, companyName:‘Company name‘, vatid:‘GBxxxxxxxx‘} })" ng-include="load()"></div>
oac = Order as Company checkbox (can be only true or false)
By URL query string
Data are inserted by adding query parameters in format: field_id=prefilled_value
Example:
http://www.your.domain/index.html?F12345=example%20text&F12346=another%20example%20text
(Note: data have to be URL encoded, more information)
Variables usable in formula
- FX - field value (except email, payment and HTML field) *replace FX with the field ID. Example: F3456
- BillingFirstname - first name from payment billing information
- BillingLastname - last name from payment billing information
- BillingAddress - address from payment billing information
- BillingCity - city from payment billing information
- BillingCountry - country from payment billing information
- BillingZip - zip code from payment billing information
- BillingCompanyName - company name from payment billing information
- BillingVatid - VAT ID from payment billing information
- BillingValidViesVatID - if is VAT ID validation by VIES enabled this var. returns 1 when validation is successful, otherwise 0
- PaymentType - returns which payment type is selected (paypal = 1, stripe = 2, invoice = 3)
Available variables for integrations and emails
Some types of fields (such as Send Results or Payments) use e-mail templates. In the templates, these variables will be replaced by actual data before the e-mail is sent. The same applies for integrations.
- {FX:value} - single field value *replace FX with the field ID. Example: F3456
- {FX:name} - single field name *replace FX with the field ID. Example: F3456
- {FX:hint} - single field description *replace FX with the field ID. Example: F3456
- {FX:prefix} - single field text before value *replace FX with the field ID. Example: F3456
- {FX:postfix} - single field text after value *replace FX with the field ID. Example: F3456
- {calculatorName} - calculator name
- {fields} - list of fields
- {sourceUrl} - calculator URL
- {description} - calculator description
- {userName} - author account name
- {email} - email address from Email or Payment field
- {price} - price from Payment field
- {currency} - currency of Payment field
- {status} - pament status
- {billing:firstname} - first name from payment billing information
- {billing:lastname} - last name from payment billing information
- {billing:address} - address from payment billing information
- {billing:city} - city from payment billing information
- {billing:country} - country from payment billing information
- {billing:zip} - zip code from payment billing information
- {billing:companyName} - company name from payment billing information
- {billing:vatid} - VAT ID from payment billing information
- {submissionId} - Unique ID of email or payment submission (can be used as Reference number for invoice)
First steps - How to create a calculator and add fields
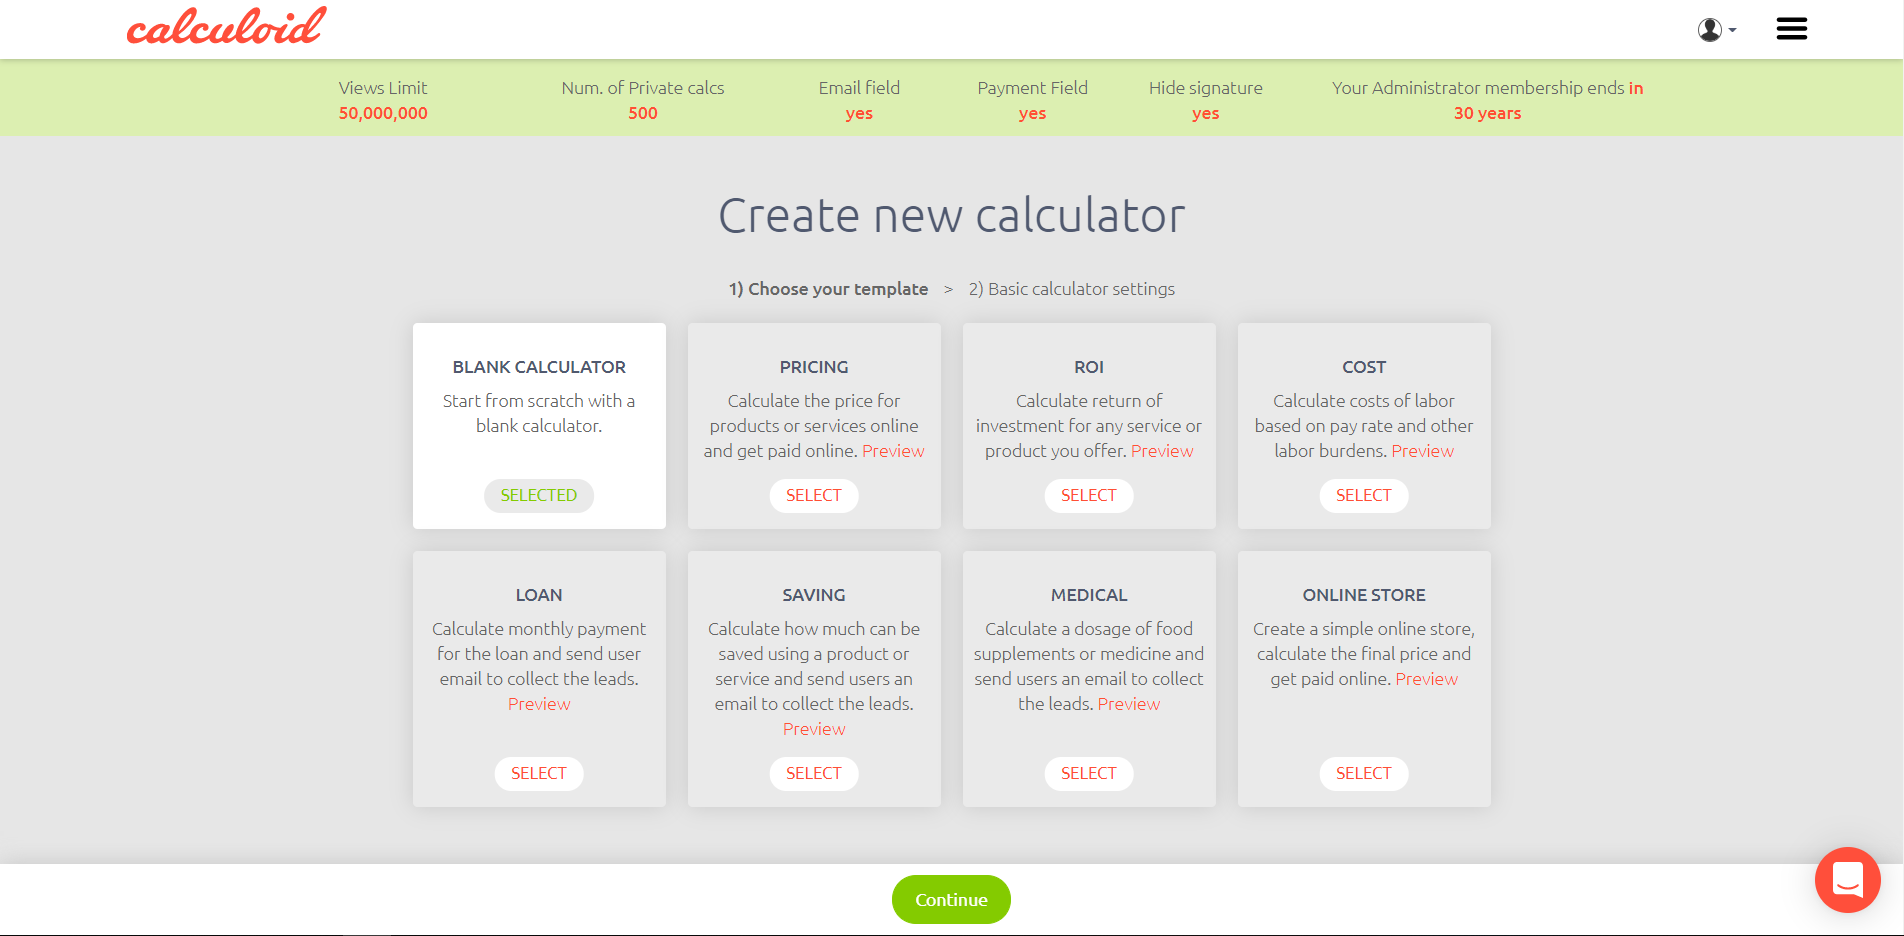
Once you have an account and log in, the system will take you to "Create your first calculator" page. On this page, you can pick a template or create a blank calculator. Press on the 'Continue' button to move onto the next step.
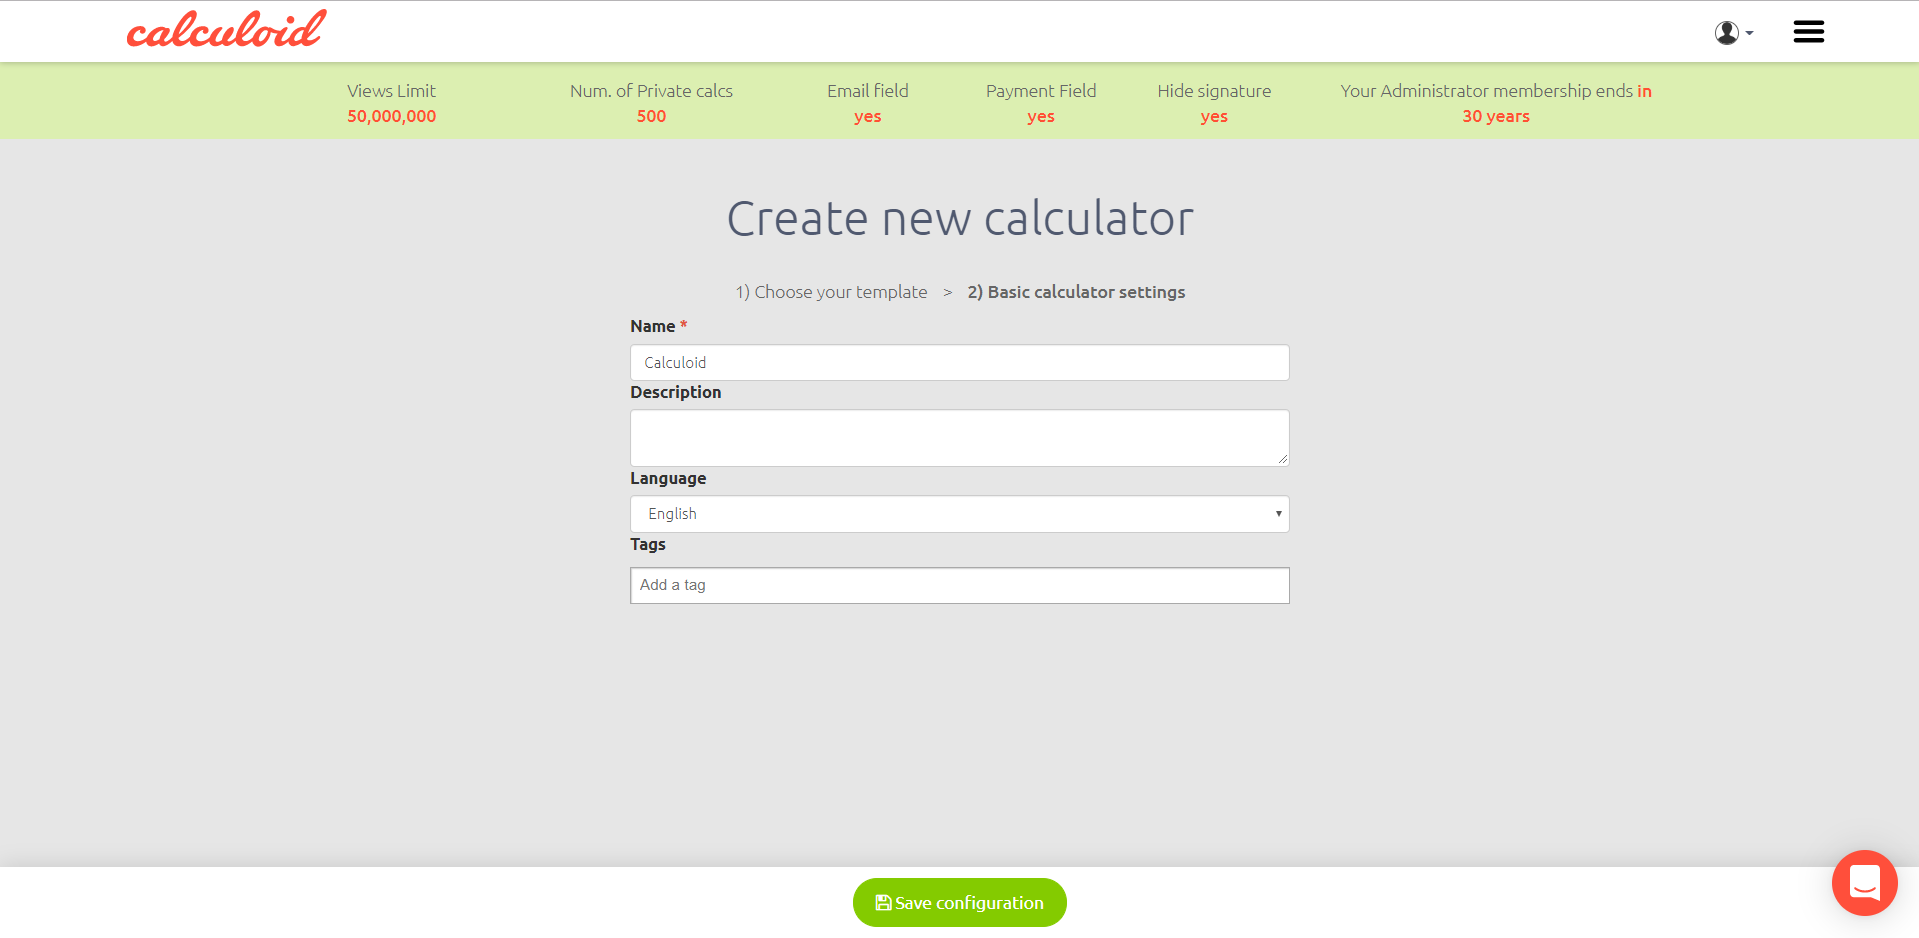
On the second step 'Basic calculator settings' you need to define your calculator name and description. Add tags and choose the language. Then press on the 'Save configuration' button. Now, you created your first calculator. You can start adding fields to your calculator.
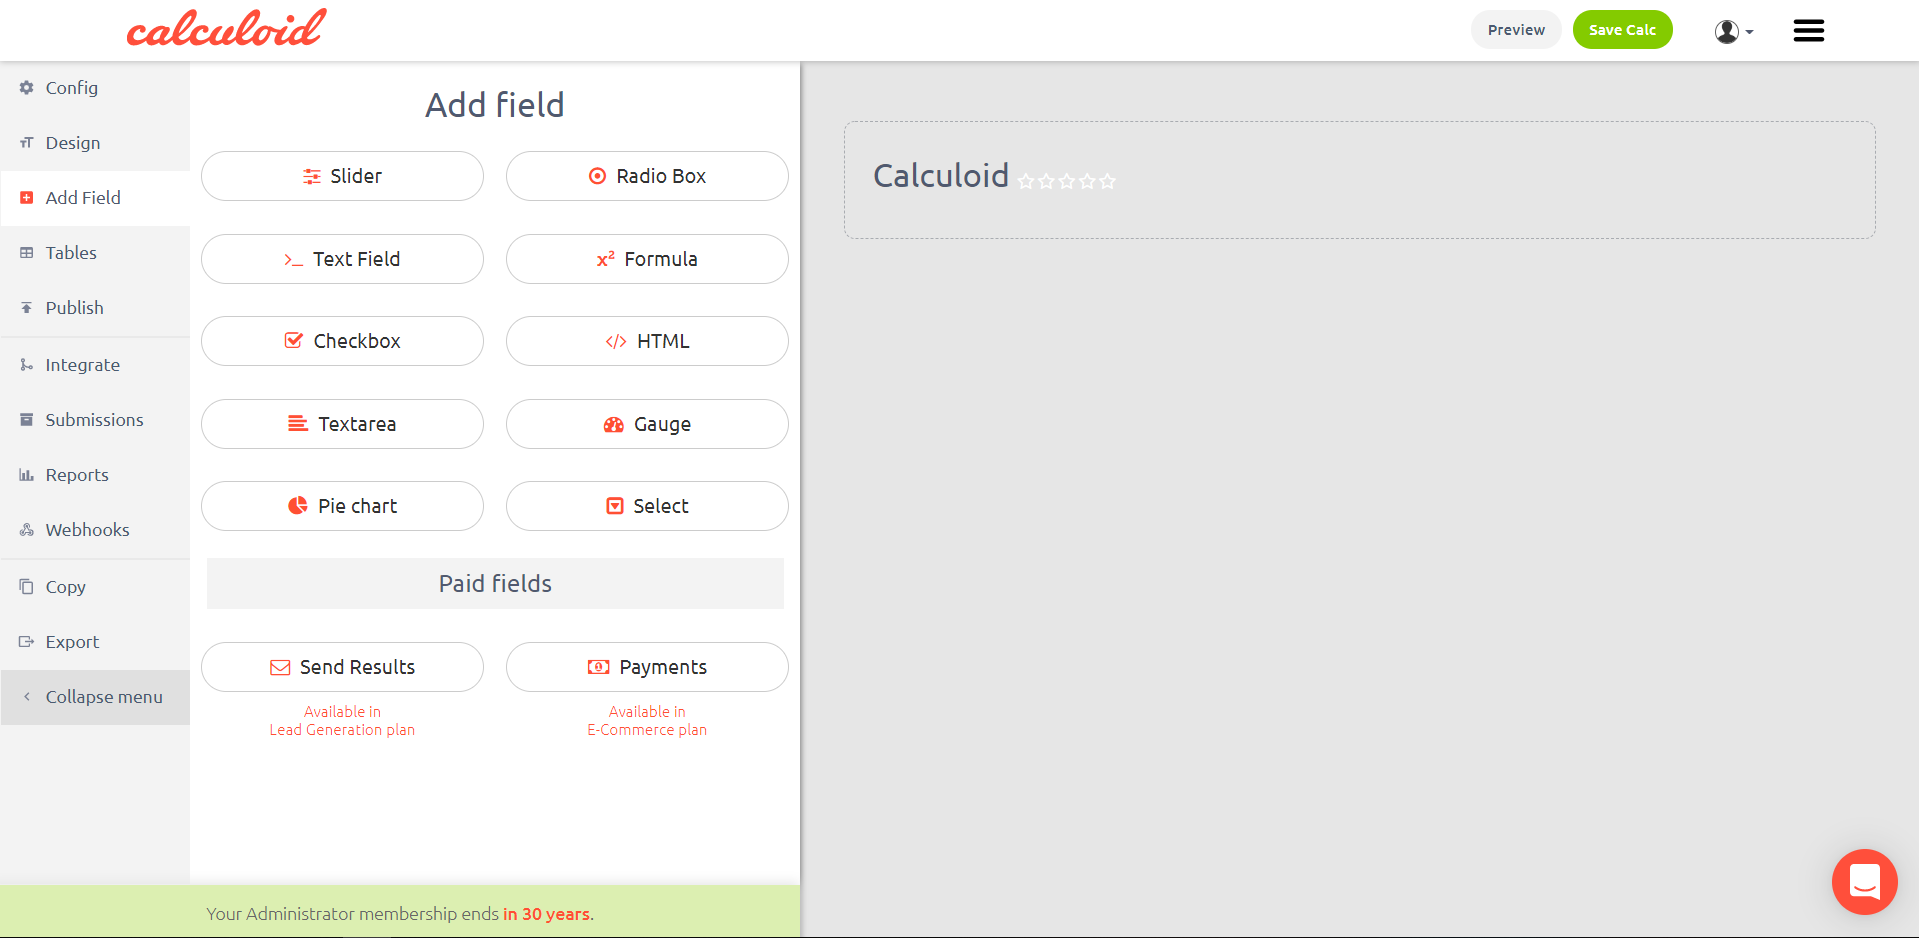
Use the 'Add field' tab in the left menu to add fields to your calculator.
To change settings for a particular field click on the orange pen icon 'Edit the field' on the field you want to set. To resize a field use the drag and drop feature.
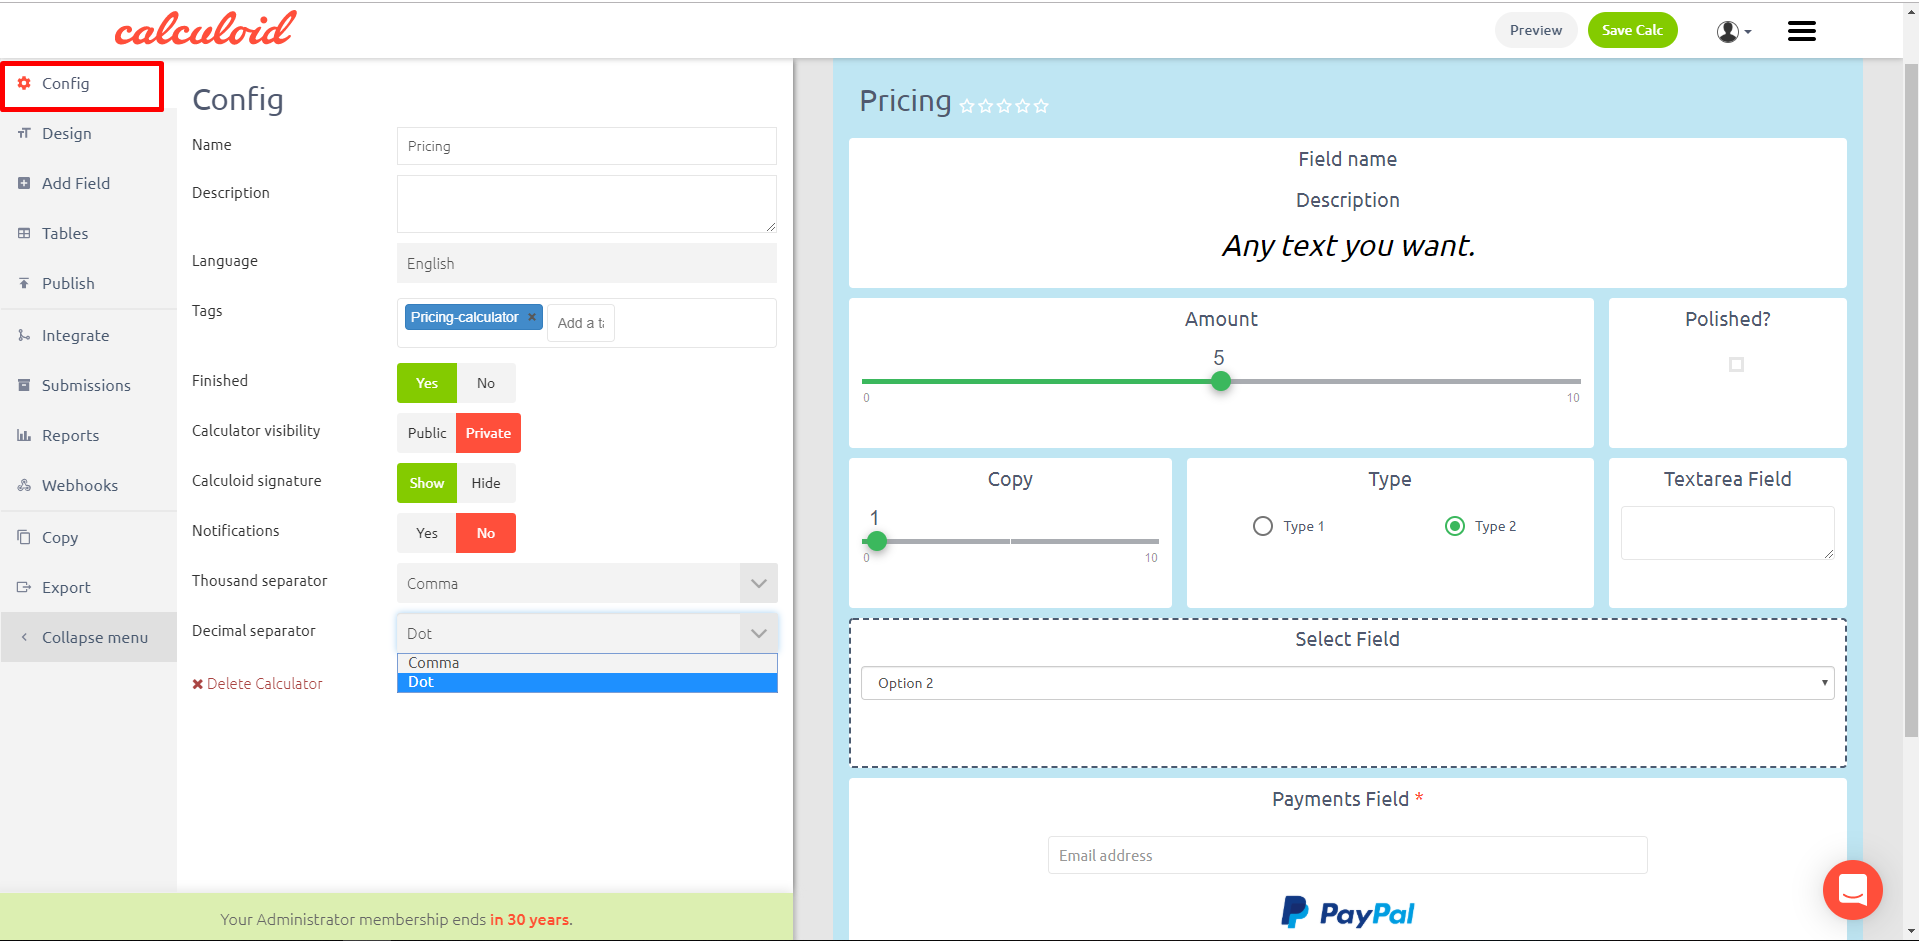
General settings are available in the 'Config' tab:
- Name - change the name of the calculator
- Description - edit the calculator description
- Language - choose the language of the calculator
- Theme - choose the default appearance theme
- Color Scheme
- Tags - tag your calculator
- Multi-page calculator - turn on multiple pages. Adds 'Go to Page' field in the 'Add field' tab in the left menu. Adds a menu above the calculator to navigate between pages in the editor. Navigation for the final user is done with the 'Go to Page' fields.
- Number of pages - seen only once the 'Multi-page calculator' is 'Yes'. A setting to define the number of pages needed in the calculator. Limits are from 2 to 30 pages.
- Is finished - your calculator will only appear online once embedded when you click on YES
- Calculator - check our FAQ for information on Public and Private calculators
- Signature - check our FAQ for information on Signature, it can be Hidden only when you have a paid subscription
- Notification
- Thousands separator
- Decimal separator
To adjust the design of your calculator you can use the 'Design' tab for global design settings and design settings in the field settings. Please note that the field design settings have priority and will overwrite the global settings for the particular field. However, there are design setting available only in the design tab:
- Calc width
- Font
- Color Scheme
- Calculator background
- Shadows
- Calc align
- Font size
Design
The design settings are divided into two groups. The first group of settings is available in the 'Design' tab on the left menu. The second group is unique for each field type and is located in the 'Edit the field' - 'Design' menu.
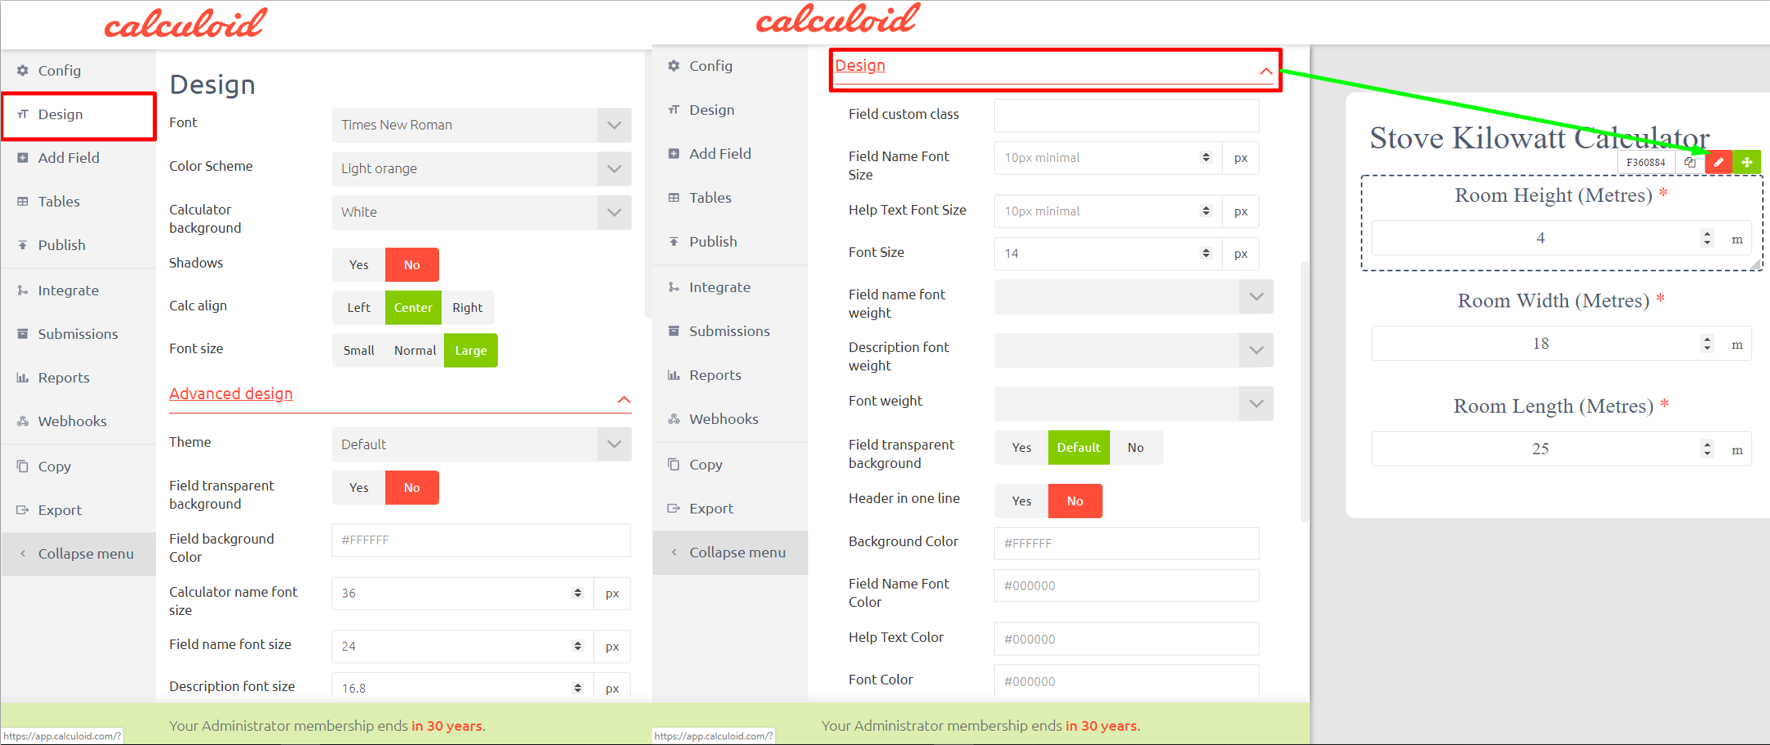
Start creating the design of your calculator with the settings above 'Advanced design' in the 'Design' tab.
Global design
Global design settings are located in the 'Desing' tab. List of all settings available:
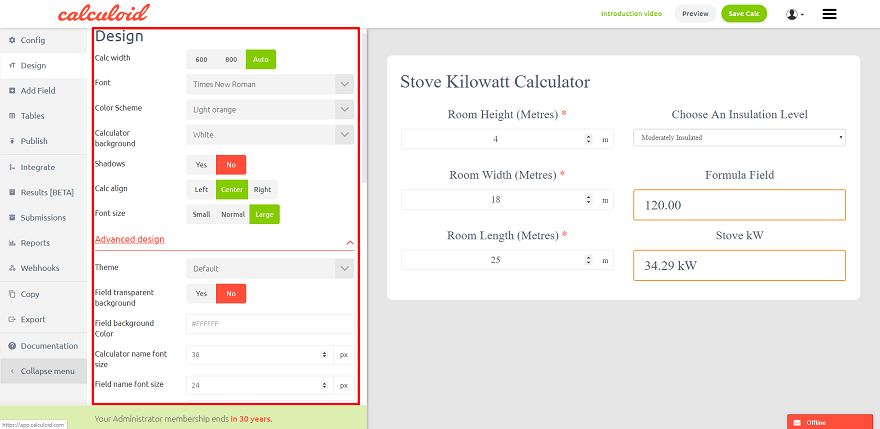
- Calc width
- Font
- Color Scheme
- Calculator background
- Shadows
- Calc align
- Font size
- Field transparent background
- Field background Color
- Calculator name font size
- Field name font size
- Description font size
- Input font size
- Formula font size
- Font size
- Calc name font-weight
- Field name font-weight
- Description font-weight
- Input font-weight
- Formula font-weight
- Font weight
- Field name font color
- Description text color
- Font color
- Input font color
- Formula font color
- Field name alignment
- Content alignment
- Input alignment
- Description alignment
- Formula alignment
Every setting from the list above will apply to each field in your calculator. After setting the global design you can modify each field separately.
Field design
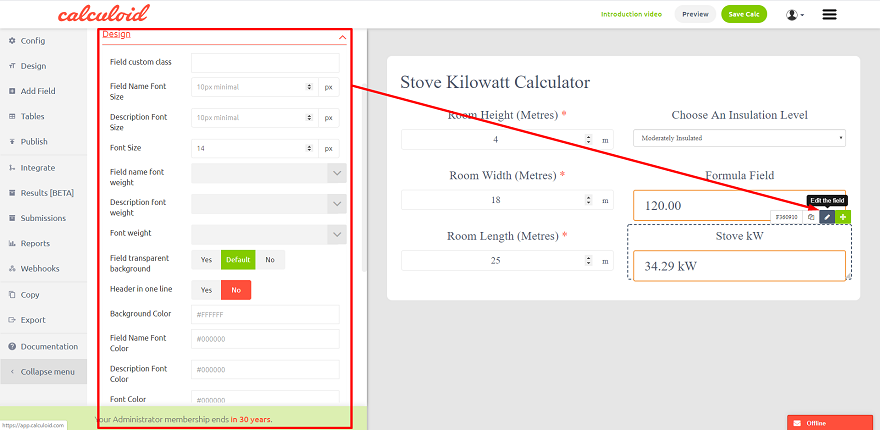
Field design allows overwriting the global design settings and adds more styling features. Each field type has its unique design settings. Also, in the field design settings, you can add a custom class to the particular field and apply a CSS style to the class set.
To reach the field design settings, click on the orange pen icon 'Edit the field' and go to the design.
Fields settings
SLIDER - VARIABLE FIELD, USERS DEFINE THE VALUE OF THE VARIABLE VIA SLIDING THE POINTER ON THE BAR.
The Slider field is a great option if you need to have predefined max and min values for an input field. For example, if you want to let a user select a percentage, you know that the min value is 0 and the max value is 100%. The slider is a nice interactive element for the whole calculator since it allows the user to drag&drop the pointer or select a value by just a click or touch. This field is optimized for mobile as well. Additional input option allows to type in particular number if required. With Calculoid slider, you can also set particular options to choose from. Such a setting is very useful when the user should pick only predefined numbers or options.
Slider settings:
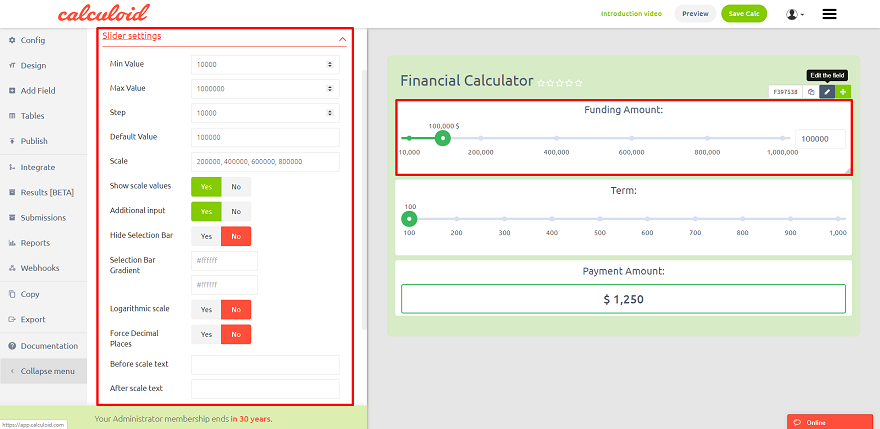
- Min Value: The minimal value a user can select. 0 by default.
- Max Value: The maximal value a user can select. 100 by default.
- Step: The step the slider can select. For example, if you have a slider from 0 to 1.000.000, you can let a user select only full thousands by selecting the step to be 1000. 1 by default.
- Default Value: The default value a user will see when the calculator loads for the first time.
- Scale: The slider field can display a scale below the slider. Fill in the scale values separated by comma character. For example: 25,50,75. If you want to display some labels instead of the actual numbers, add the labels like this: 25: low,50: medium:75: high.
- Show scale values: Yes/No setting to show or hide the scale values.
- Additional input: Add a small box next to the slider where the final user can type in the number needed.
- Hide Selection Bar: Yes/No setting to show on the scale selected part.
- Selection Bar Gradient: Design setting for the scale color.
- Logarithmic scale: Available only if Min value is more then 0. Change the space given for each section on the slider.
- Force Decimal Places: Yes/No setting.
- Before scale text: A text presented before the value on the scale.
- After scale text: A text presented after the value on the scale.
Options - alternative way to set the slider:
- New option: Adds a predefined option to the slider. Add more options to create sldier with predefined options only.
Calculoid uses this open-source library for sliders.
INPUT FIELD - VARIABLE FIELD, USERS INSERT VARIABLE VALUE MANUALLY INTO THE TEXT FIELD.
Input Field Config:
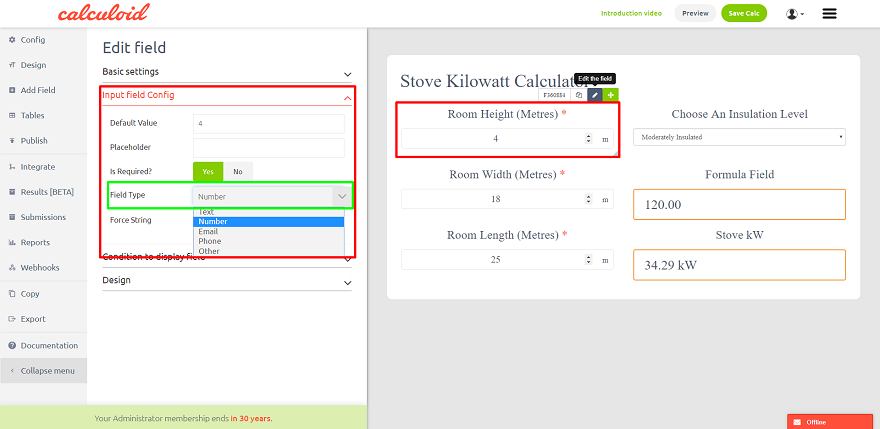
- Default Value - A value pre-filled by default, such as text string or number
- Is Required? - Yes/No - Select whether the field must be filled in
- Field type - Text/Number/Email/Phone/Other
- Force String - Yes/No - Any input entered into the field will be of string data type, including numbers, to prevent an automatic change of formatting when it is undesirable (such as for bank account numbers, personal identification numbers, social security numbers, etc.)
For more information about Text Field, please read:
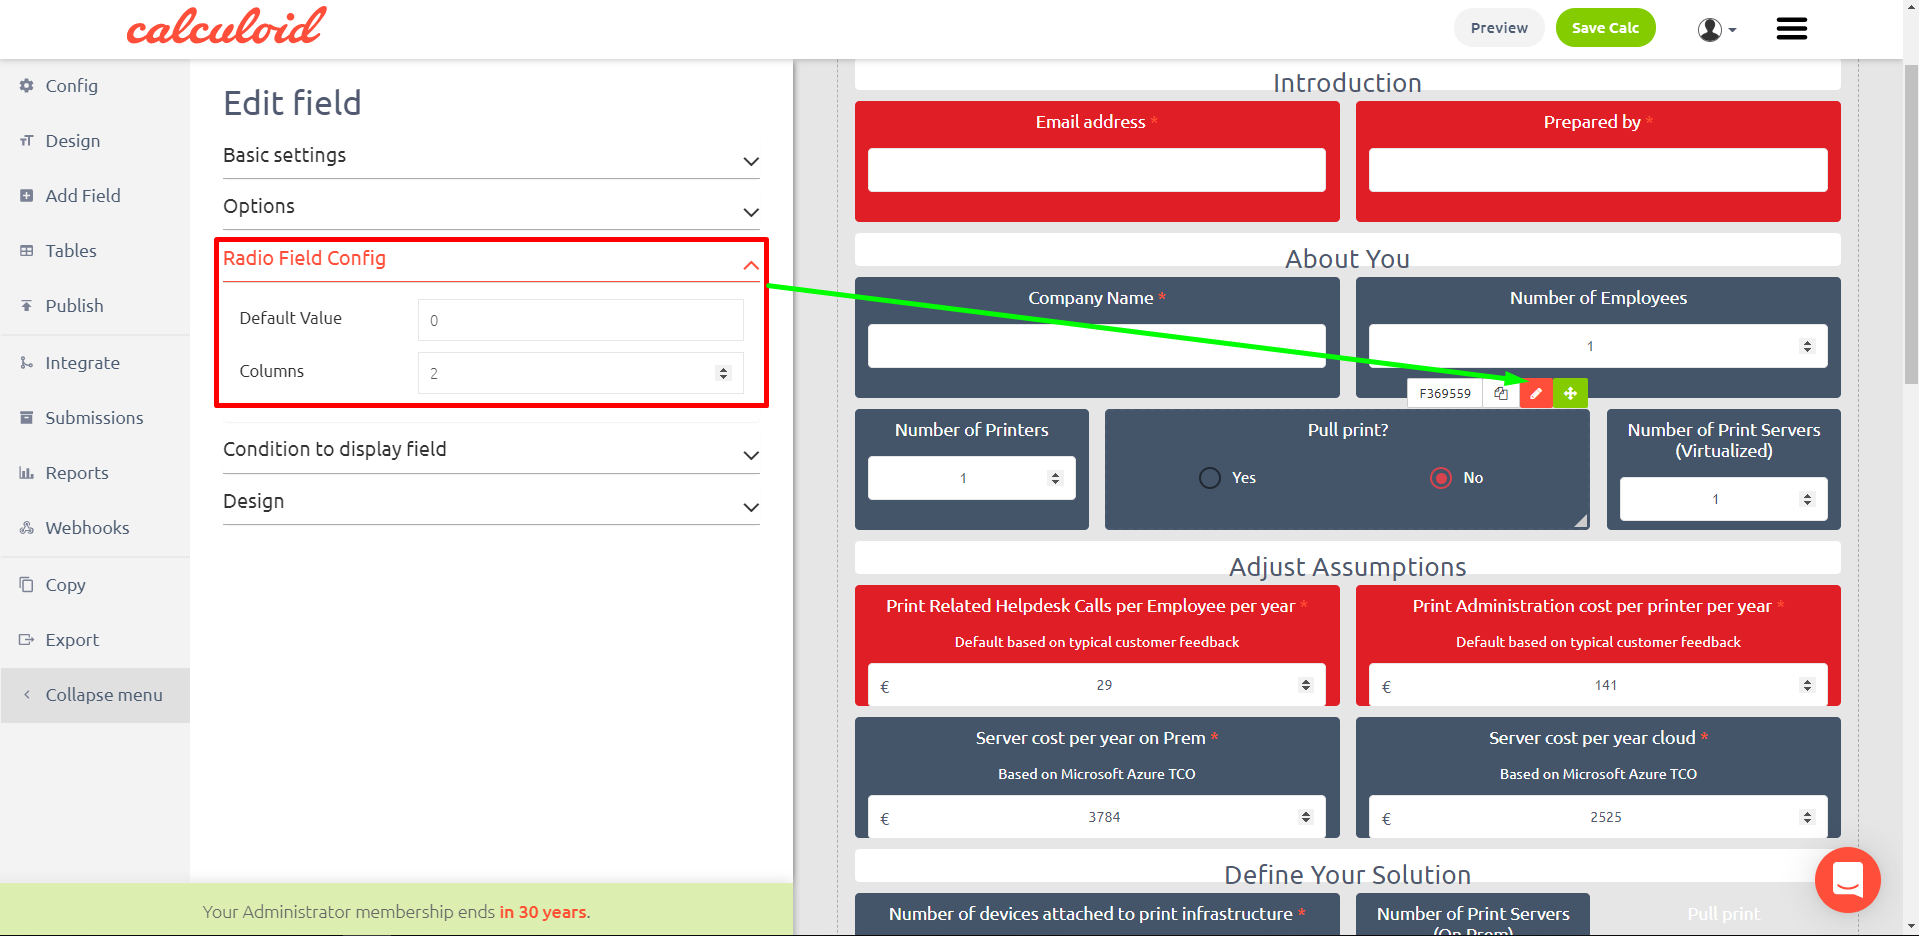
RADIO BOX - VARIABLE FIELD, USERS SELECT ONE VALUE/OPTION FROM THE DEFINED LIST.
Options:
- New Option - add a new option to select
- Option Name - a name of the option
- Option Value - a hidden value of the option, such as price (should be numerical and unique for each option)
Radio field config:
- Default Value - a value pre-selected by default when the calculator is loaded (the option having this value will be pre-selected)
- Columns - a number of columns to show the options in
FORMULA - RESULT FIELD, THE ADMINISTRATOR DEFINE HOW THE VARIABLES ARE CALCULATED. USERS SEE THE RESULT.
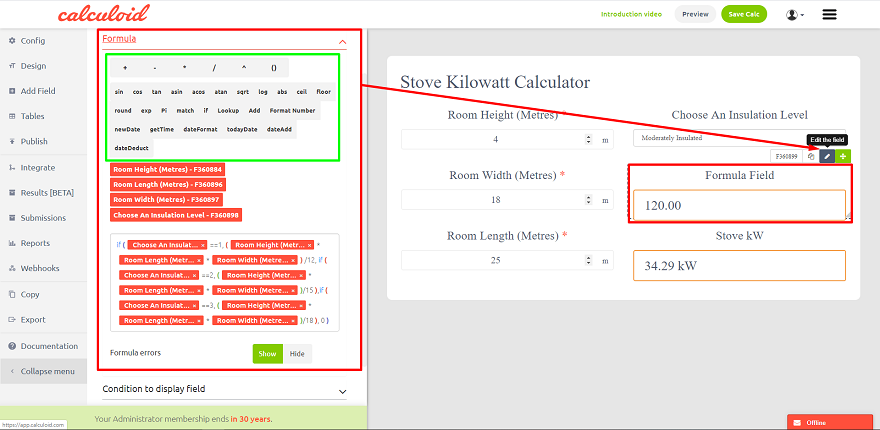
A formula is an algorithm that derives its value from other fields, expressions, or values. Formulas can help you automatically calculate the value of a field based on other fields.
Value variables:
If you've ever used Google Spreadsheet or MS Excel, you should be familiar with variables in the formula. In Calculoid formula, there aren't used rows and columns for identification of a value (because there aren't any), but each field has its unique identifier (for example F123). You will use these field IDs instead of actual values. For example, I want to create this formula: (A + B) * 45 / C So I create field A, B and C. Doesn't matter what type of the field it is. Each field has its unique ID. Let's say field A has ID F123, field B has ID F124 and field C has ID F135. Final formula will be like this: (F123 + F124) * 45 / F135
Expression Syntax:
The parser accepts a pretty basic grammar. Operators have the normal precedence — f(x,y,z) (function calls), ^ (exponentiation), *, /, and % (multiplication, division, and remainder), and finally +, -, and || (addition, subtraction, and string concatenation) — and bind from left to right (yes, even exponentiation… it’s simpler that way). There’s also a “,” (comma) operator that concatenates values into an array. It’s mostly useful for passing arguments to functions since it doesn't always behave as you would think with regards to multi-dimensional arrays. If the left value is an array, it pushes the right value onto the end of the array, otherwise, it creates a new array “[left, right]“. This makes it impossible to create an array with another array as it’s the first element. Inside the first argument of the if function can be used these operators to compare expressions:
- == Equal
- != Not equal
- > Greater than
- >= Greater or equal than
- < Less than
- <= Less or equal than
- and Logical AND operator
- or Logical OR operator
Example of if function: if(1 and 2 <= 4, 2, 0) + 2 = 4
Function operators:
The parser has several built-in “functions” that are actually operators. The only difference from an outside point of view, is that they cannot be called with multiple arguments and they are evaluated by the simplify method if their arguments are constant.
- sin(x) Sine of x (x is in radians).
- cos(x) Cosine of x (x is in radians).
- tan(x) Tangent of x (x is… well, you know).
- asin(x) Arc sine of x (in radians).
- acos(x) Arc cosine of x (in radians).
- atan(x) Arc tangent of x (in radians).
- sqrt(x) Square root of x. Result is NaN (Not a Number) if x is negative.
- log(x) Natural logarithm of x (not base-10). It’s log instead of ln because that’s what JavaScript calls it.
- abs(x) Absolute value (magnatude) of x.
- ceil(x) Ceiling of x — the smallest integer that’s >= x.
- floor(x) Floor of x — the largest integer that’s <= x.
- round(x, n)) X, rounded to the nearest integer or to n decimal places, using “gradeschool rounding”.
- exp(x) ex (exponential/antilogarithm function with base e).
- Pi - adds 3.14159265359
- match (x,y) - compares two numbers or texts, returns 'true' if x and y match, returns 'false' if x and y don't match. For integers: match (x,y). For texts: match ('x','y')
- random(n) Get a random number in the range [0, n). If n is zero, or not provided, it defaults to 1.
- fac(n) n! (factorial of n: “n * (n-1) * (n-2) * … * 2 * 1″).
- min(a,b,…) Get the smallest (“minimum”) number in the list.
- max(a,b,…) Get the largest (“maximum”) number in the list.
- pyt(a, b) Pythagorean function, i.e. the c in “c2 = a2 + b2“.
- pow(x, y) xy. This is exactly the same as “x^y”. It’s just provided since it’s in the Math object from JavaScript.
- atan2(y, x) arc tangent of x/y. i.e. the angle between (0, 0) and (x, y) in radians.
- if(c, a, b) The condition function where c is condition, a is result if c is true, b is result if c is false.
- len(n) The character length of n. i.e. len(123) = 3.
- lookup (lookup-value, lookup-column-id, result-column-id, table-id) - search a value in defined column in a CSV table uploaded and returns a value from result column defined. Search only for number, returns numbers and texts.
- add - combine text and number into one string (text). Example: add ('text', 10), result: text10.
- formatNumber(number, length of decimal,'decimal delimiter', 'thousand delimiter') - format number as defined.
- newDate(year,month,days) - returns date in standard format based on variables given.
- getTime(date) - returns date defined in absolute date format presented in milliseconds from 1970. Allow any kind of calculations with date.
- dateFormat(date,format) - returns date formated. Date and formated is defined in the brackets.
- todayDate() - returns today date in standard format.
- dateAdd(date, type,value) - adds a defined number of days, months or years to defined date. Example: dateAdd(todayDate(), d, 1) - adds one day to todays date. Available types: d - day; M - month; y - year.
- dateDeduct(date, type,value) - take defined number of days, months or years from defined date. Example: dateAdd(todayDate(), d, 1) - takes 1 day from todays date. Available types: d - day; M - month; y - year.
For more information about Formula, please read:
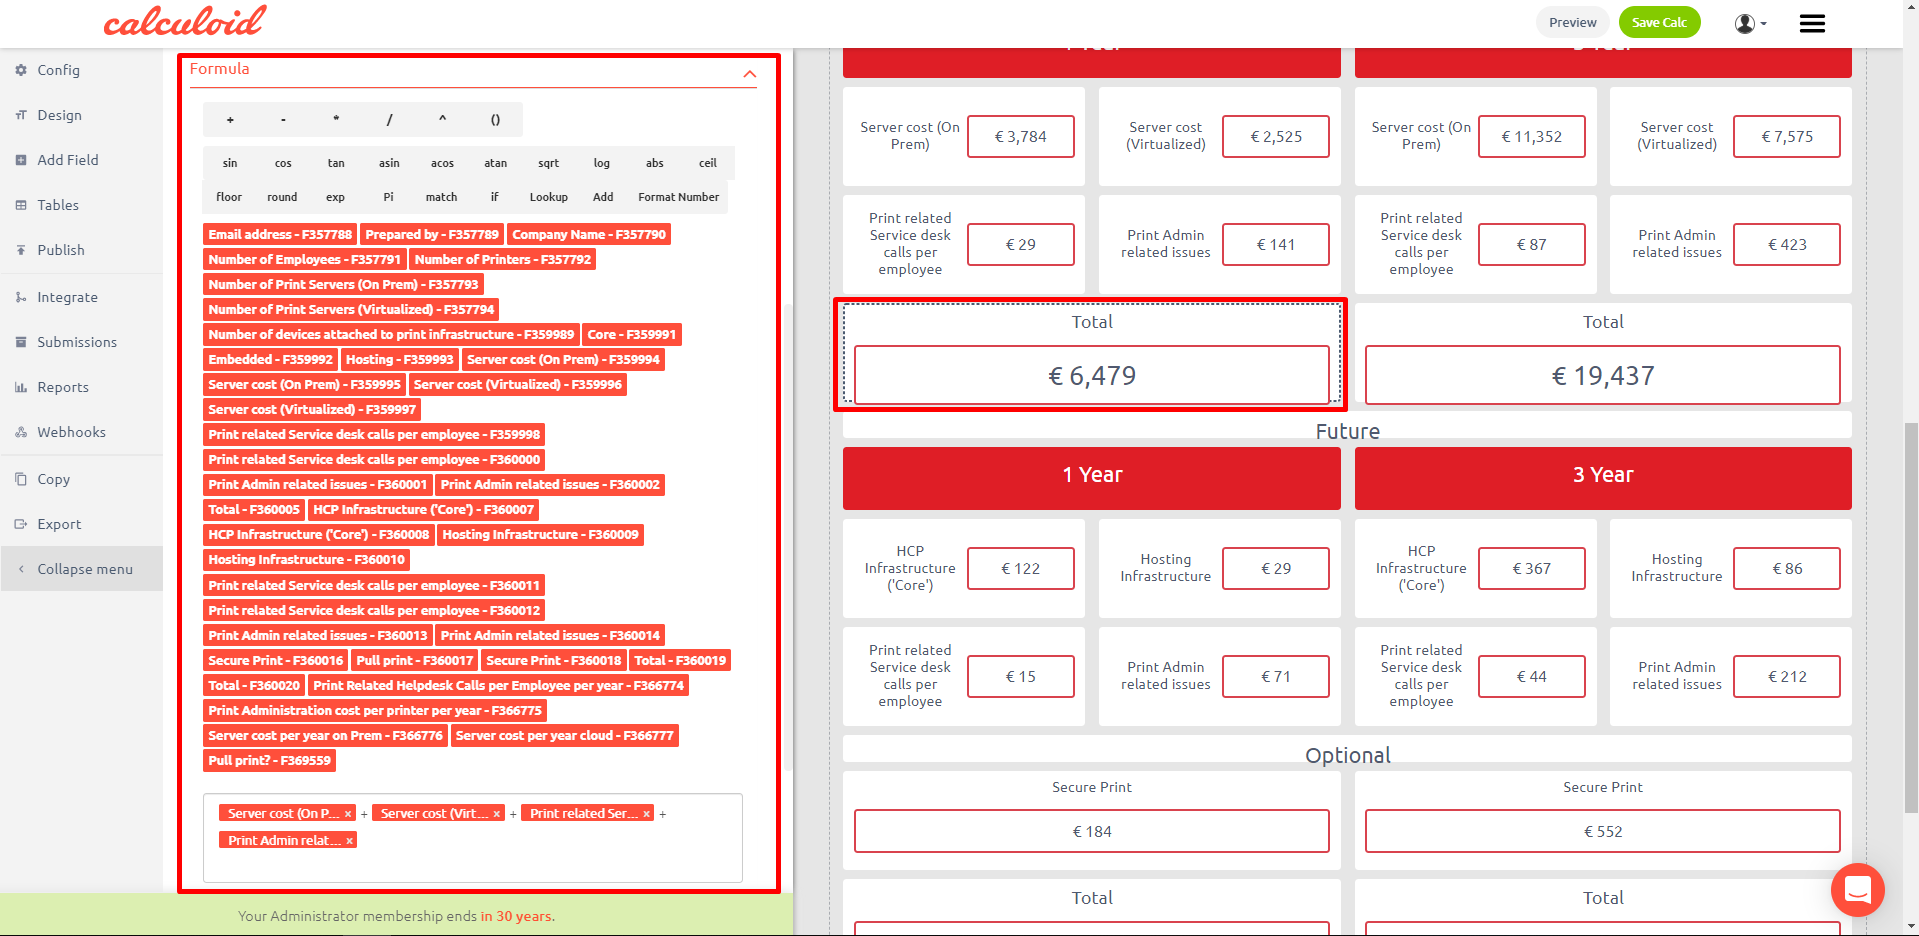
USE CASE OF FORMULA FIELD - PREDEFINED COMMENTS BOX BASED ON A FIELD VALUE
Using Formula field with "add" function in the formula, you can create a practical Comments box that shows one of the predefined comments based on the value of another field. Here is an example:
- In the Weight field, you entered a value less than 60 kg. → It will automatically show you a comment "You entered weight XX kg and that means you are lean."
- In the Weight field, you entered a value between 60-90 kg. → It will automatically show you a comment "You are a normal guy because your weight is XX kg".
- In the Weight field, you entered a value more than 90 kg. → It will automatically show you a comment "Eat less because your weight is XX kg."
Below you may see an example formula and the two fields in Calculoid.
CHECKBOX - FIELD FOR YES/NO QUESTIONS/CONDITIONS AND FOR MULTI-SELECT OPTIONS.
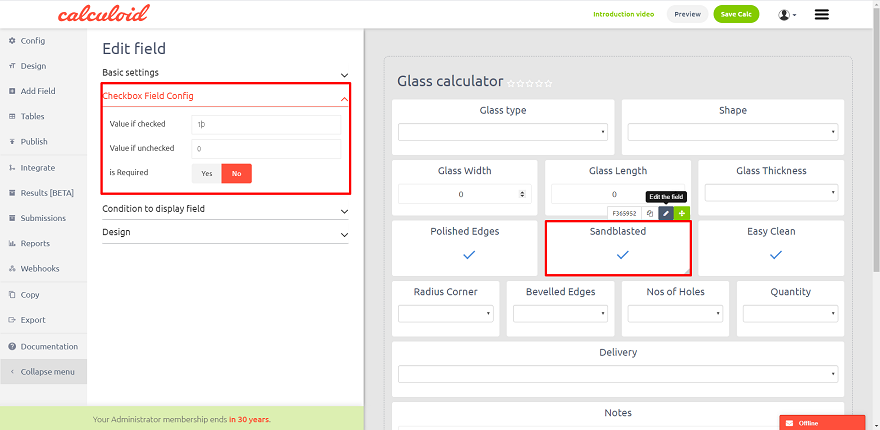
Checkbox Field Config:
- Value if checked - a numerical value of the field when checked
- Value if unchecked - a numerical value of the field when unchecked
Set value for checked/unchecked for further calculations in the formula field.
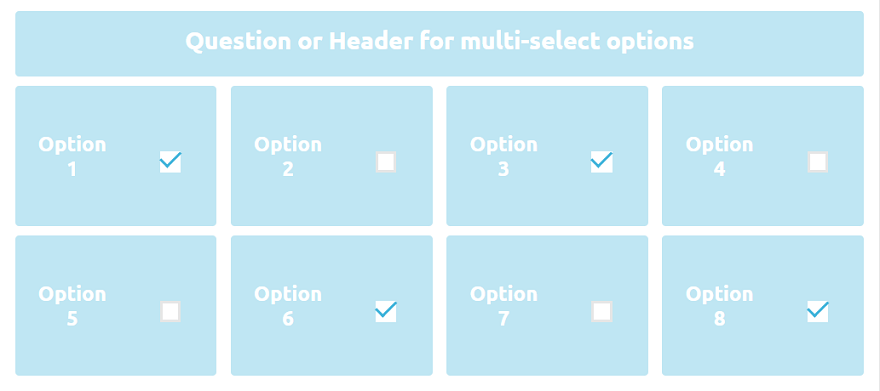
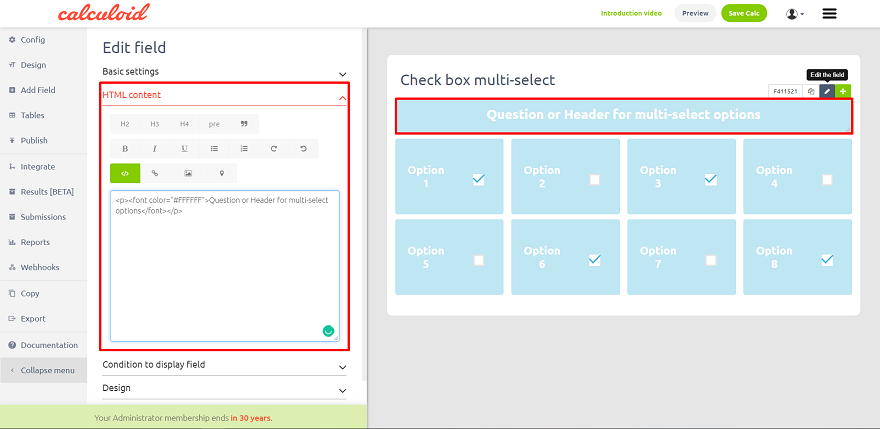
Several checkboxes can be used for multi-select. Use HTML field to present the question and the checkbox fields for answers/options.
SEND RESULTS - CONVERSION FIELD, A RESULT OF THE CALCULATION CAN BE SENT ON SUBMITTED E-MAIL.
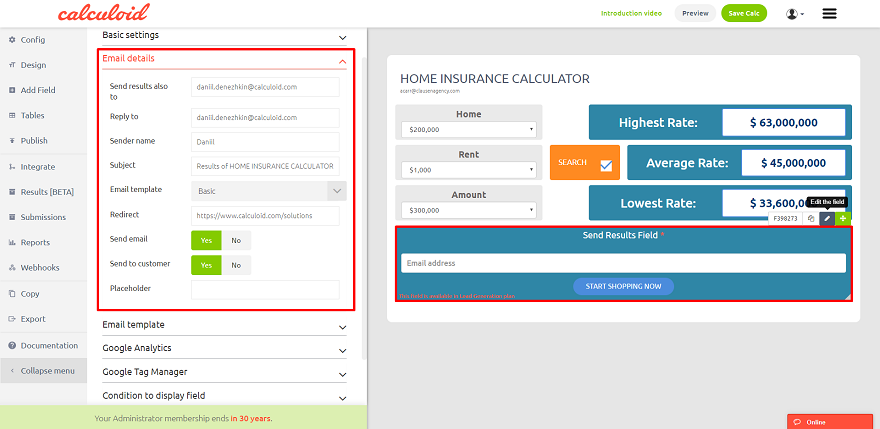
Email details:
- Send results also to - insert email address the results will also be sent to (in addition to the email address provided by the user of the calculator).
- Reply to - email address for reply.
- Sender name - from who your customer get the email.
- Subject - subject of the email.
- Email template - choose between basic HTML template or custom. Custom allows to create your own HTML template for the email.
- Redirect - enter URL to redirect
- Send email - Yes/No - if yes, an email will be sent to the address entered in "Send results also to", otherwise no email will be sent to the address
- Send to customer - Yes/No - if yes, an email will be sent to the address provided by the user of the calculator, otherwise no email will be sent to the address
- Placeholder
For more information about Send Results, please read "Craft a result email to the smallest detail".
PAYMENTS - CONVERSION FIELD, USERS CAN PAY CALCULATED AMOUNTS ON THE ADMINISTRATOR'S ACCOUNT

Available payment methods:
- PayPal
- Credit card
- Invoice / Bank transfer
Payment details:
- Send info about order to - insert email address the info will also be sent to (in addition to the email address provided by the user of the calculator)
- Currency - select a currency from the list
- Price field - choose a field with price information
- Redirect - enter URL to redirect
- Email Subject
- Email Send from
- Sender name
- Default payment gate - PayPal/Stripe/Global Payments/GoPay/GP webpay/Invoice or bank transfer
- Send email - Yes/No - if yes, an email will be sent to the address entered in "Send results also to", otherwise no email will be sent to the address
- Send to customer - Yes/No - if yes, an email will be sent to the address provided by the user of the calculator, otherwise no email will be sent to the address
Billing information:
- Show billing information? - Yes/No
Available variables:
- {amount} - The numeric amount from the field you've selected to be paid amount.
- {currency} - The currency you've selected.
Payment recurrence:
This feature enables repeating a payment automatically in a defined recurring cycle/period. Go to the "Edit Field" menu of a "Payments" field. Here open the "Payment recurrence" sub-menu. In order for payment recurrence to work, you need to set the following fields:
- Enable recurring payments - default - Select Yes or No to enable/disable recurring payments for this field by default.
- Enable recurring payments - field override - Select which field controls if the recurrent is enabled. Field value 1 for enabled, any other value means disabled. This gives the user the freedom to decide himself and overrides the above-defined default setting.
- Recurring cycle - default - Select time unit for the recurring period (days, weeks, months or years).
- Recurring cycle - field override - Select which field holds the recurrent cycle. Field value must be one of the following characters: D, W, M, Y. This gives the user the freedom to decide himself and overrides the above-defined default setting.
- Recurring period - default - Enter the number of cycles between payments.
- Recurring period - field override - Select which field holds the recurrent period. Field value must be a positive number (integer). This gives the user the freedom to decide himself and overrides the above-defined default setting.
The details about realized payments can also be found under Details > Submissions menu of the calculator with the payment field. Moreover, if you have your calculator integrated with an external system (such as Mautic, Redmine or others), a realized payment can be configured so as to automatically create a CRM case in the system.
If you have your Calculoid integrated with third-party systems, there is an option to also repeat executions of these integrations with each payment recurrence. For example, when a standard payment is set up to automatically create a new task or CRM case, another task or CRM case will be created with each repetition of the payment. To configure this setting, go to "Integrate" tab in the top menu, select "Other" in the left sidebar and toggle the switch "Recurrent Payment Integrations" to enable.

Special variables are available in the context of payment recurrence. These can be used with e-mail templates or other entities with variables applicable.
For more information about Payments, please read:
- Web calculators collecting client’s billing information
- Web calculator with online payments. Easy now!
- Payment Field use case
HTML - DESCRIPTION FIELD, SERVES FOR INSERTING ANY HTML INTO CALCULATOR.
You can put any HTML into the field and present nicely styled text. CSS styles are limited to basic attributes. HTML field is limited by approximately 3000 characters. To reduce the effective number of characters, remove HTML font styles (color, size...) from the text.
TEXTAREA - CALCULATOR USER CAN TYPE IN A MESSAGE BEFORE SENDING HIS/HER RESULT.
The best field to allow your customers leave you a comment.
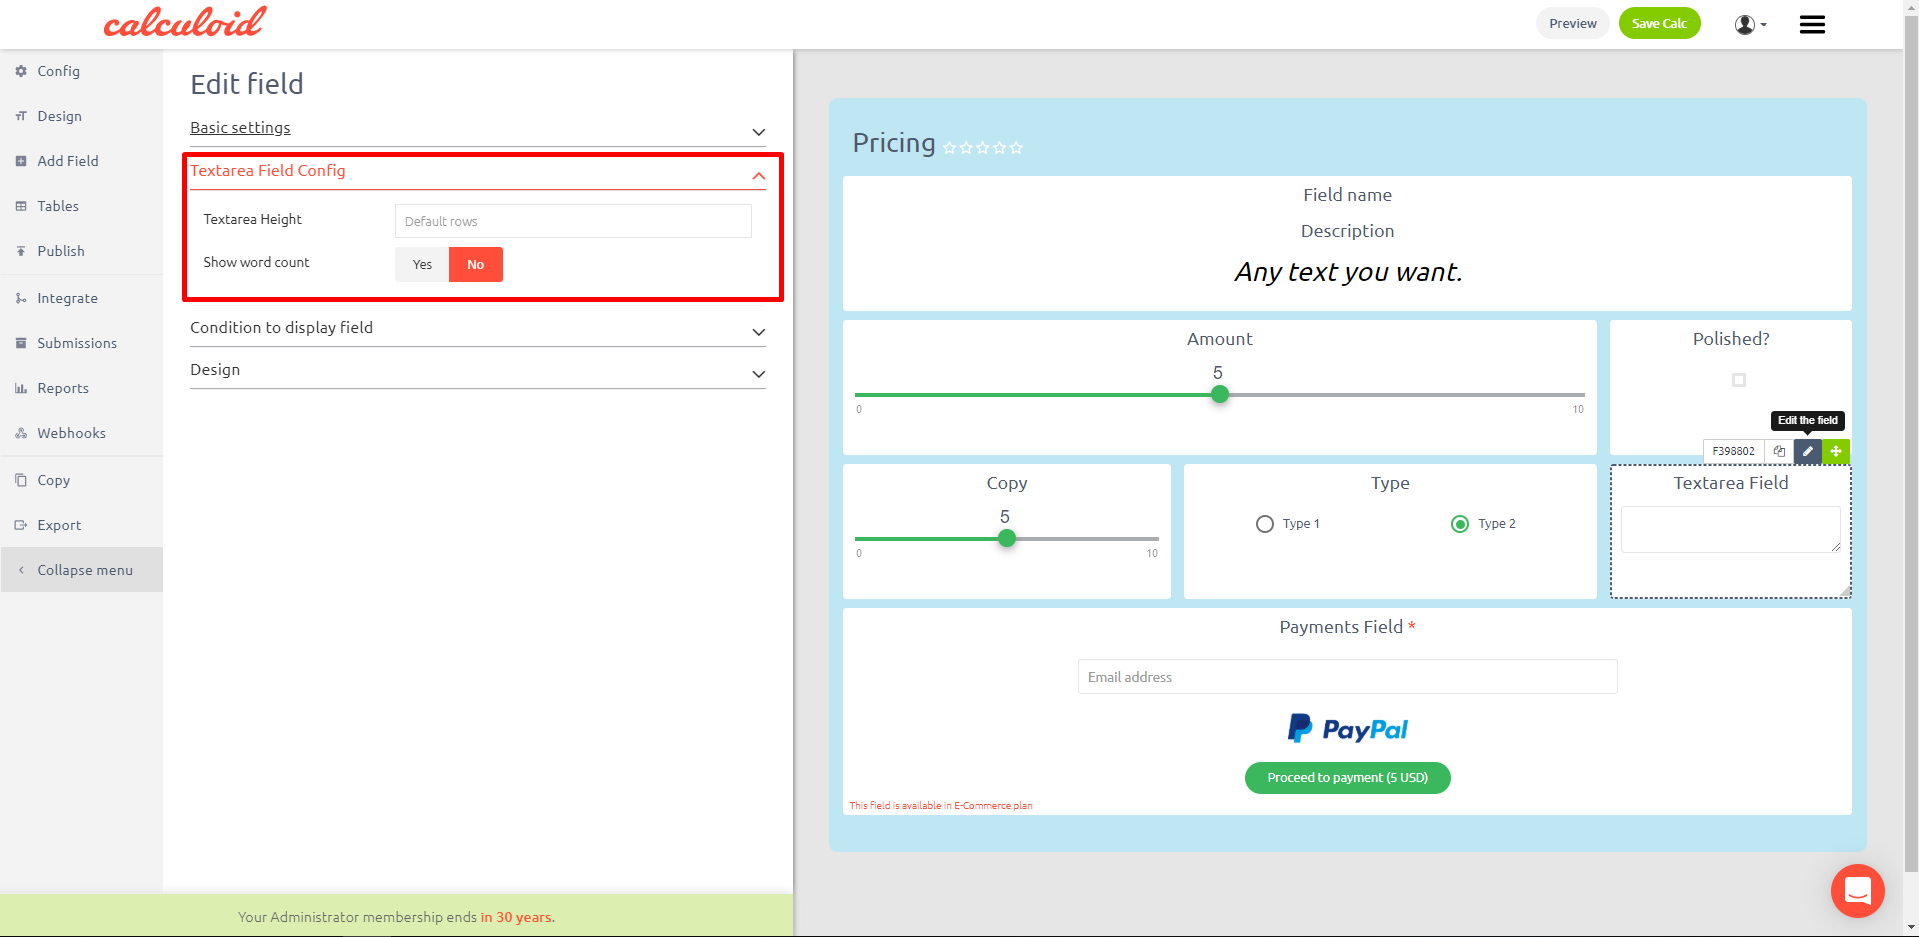
Textarea Field Config:
- Textarea Height - enter a value in pixels
- Show word count - Yes/No
GAUGE - A CHART WHICH LOOKS LIKE TACHOMETER CAN DISPLAY VALUE OF ANY FIELD.
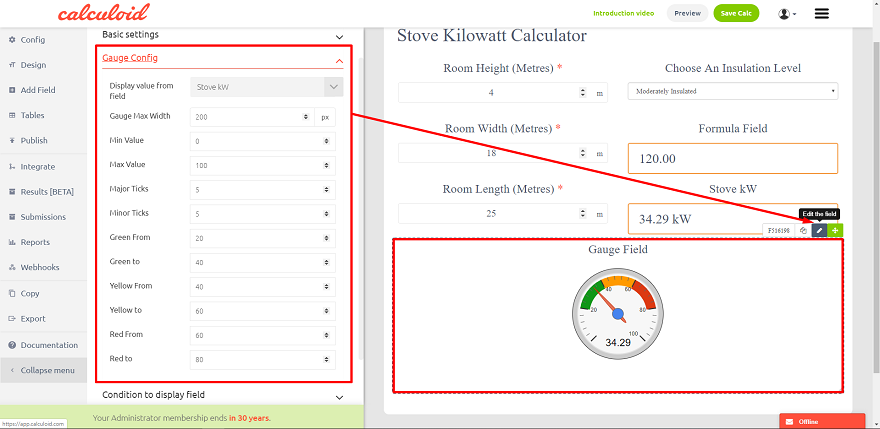
Gauge Config:
- Display value from field - select one field in the list
- Gauge Max Width - enter a value in pixels
- Min Value
- Max Value
- Major Ticks - the number of major tick marks on the gauge
- Minor Ticks - the number of minor tick marks on the gauge
- Green From + Green to - the value range for green color on the gauge
- Yellow From + Yellow to - the value range for yellow color on the gauge
- Red From + Red to - the value range for red color on the gauge
PIE CHART - A CIRCLE CHART TO ILLUSTRATE NUMERICAL PROPORTION.
A pie chart (or a circle chart) is a circular statistical graphic, which is divided into slices to illustrate numerical proportion. In a pie chart, the arc length of each slice (and consequently its central angle and area), is proportional to the quantity it represents.
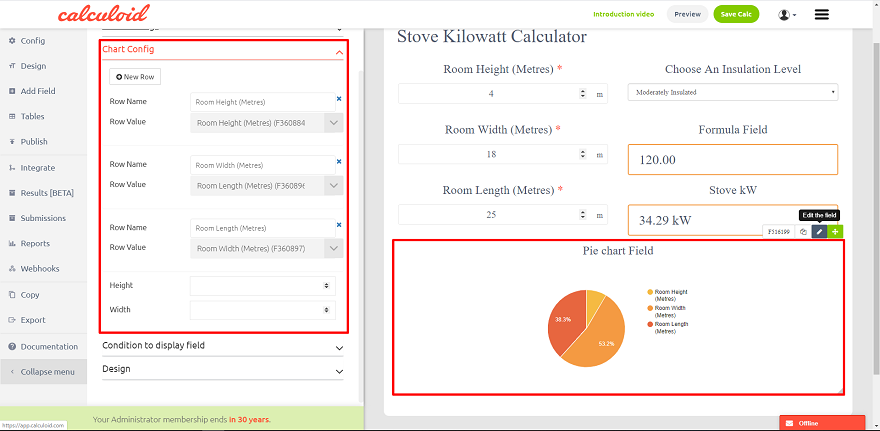
Chart Config:
- New Row - add a new row into the pie chart
- Row Name - enter the name of the row
- Row Value - select any field to take the numerical value from
- Height + Width - allow changing the default dimensions of the pie chart
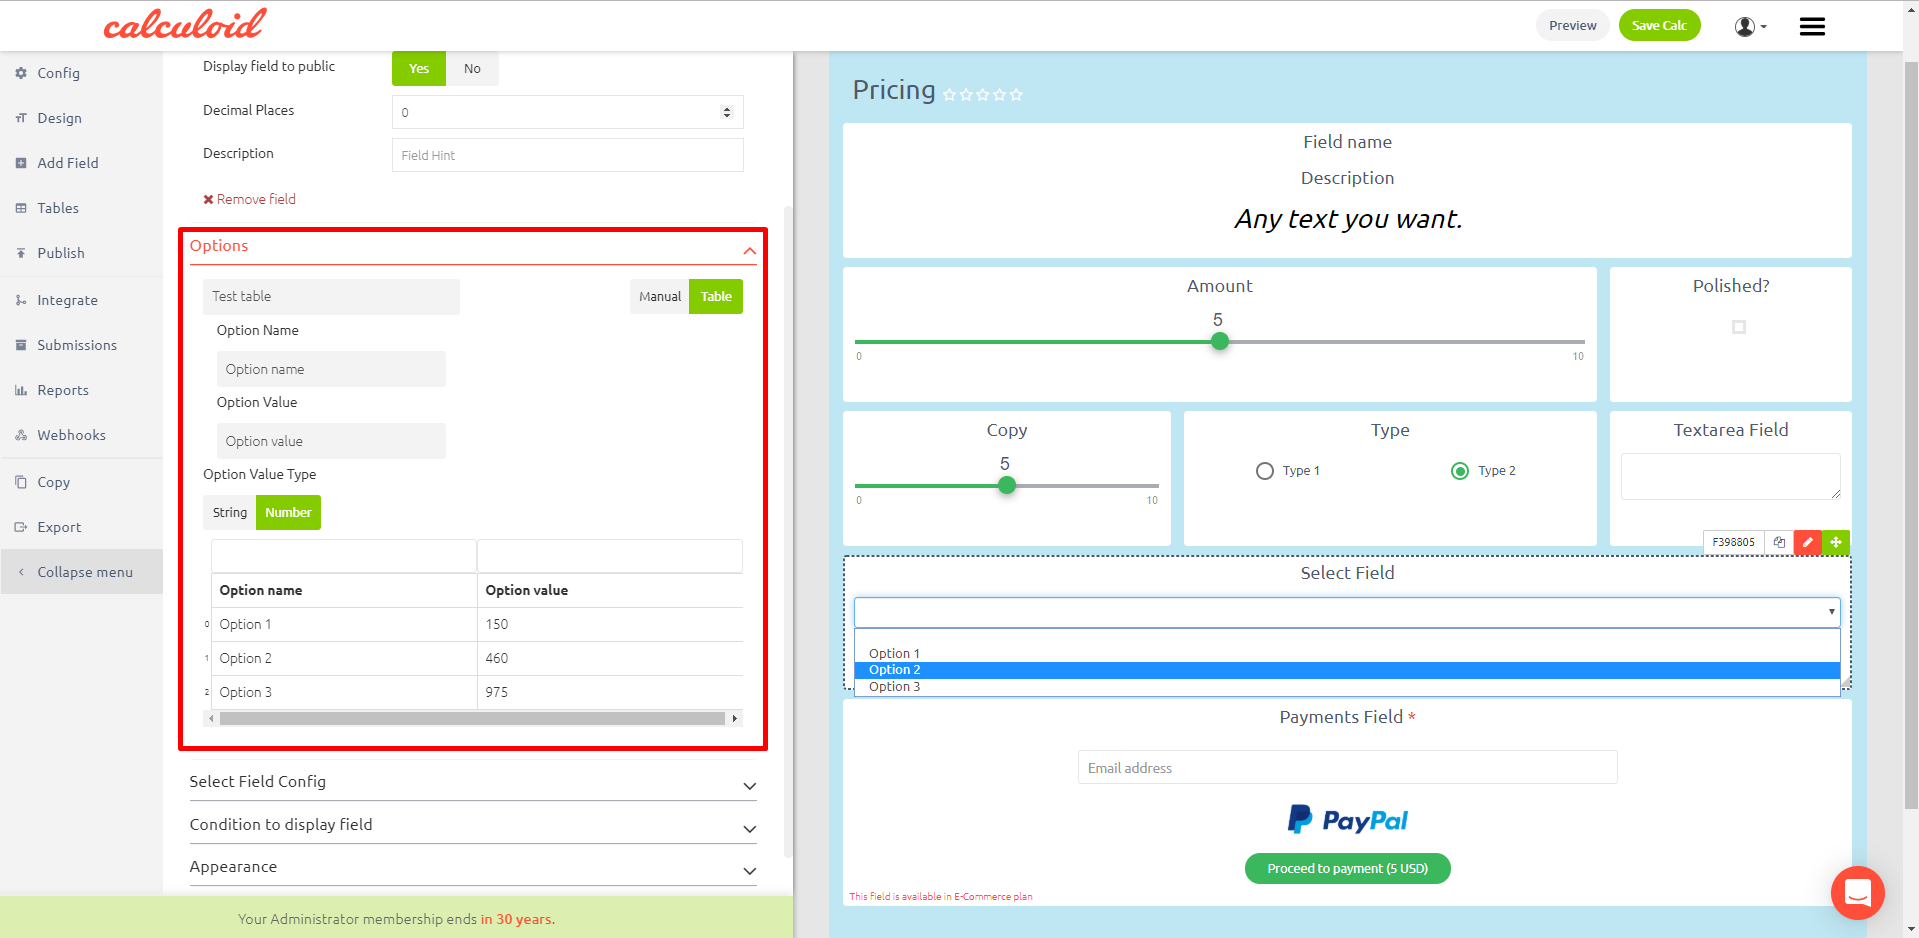
SELECT FIELD - A DROP-DOWN MENU WITH UNLIMITED OPTIONS

Unlike the radio box field with options shown as checkboxes, the Select field is designed as a drop-down menu so it better suits the situations when the number of options is really high. In "Edit Field > Options" menu, you can choose if you wish to add new options manually or select a table to import the options from. If you select the second option, make sure the table is added first before you can select one. To add a table into Calculoid, use the "Tables" button on the left side of the screen. When adding a table from a CSV file, please note that only commas (not semicolons) are supported as a field separator in the file.
This is an example of the correct CSV data format.
Options config:
Manual / Table
Option value type
New option
Option name
Option value
Select field config:
Default value
DATE FIELD - A CALANDER INPUT FOR DATE CHOICE AND FURTHER CALCULATIONS IN THE FORMULA FIELD
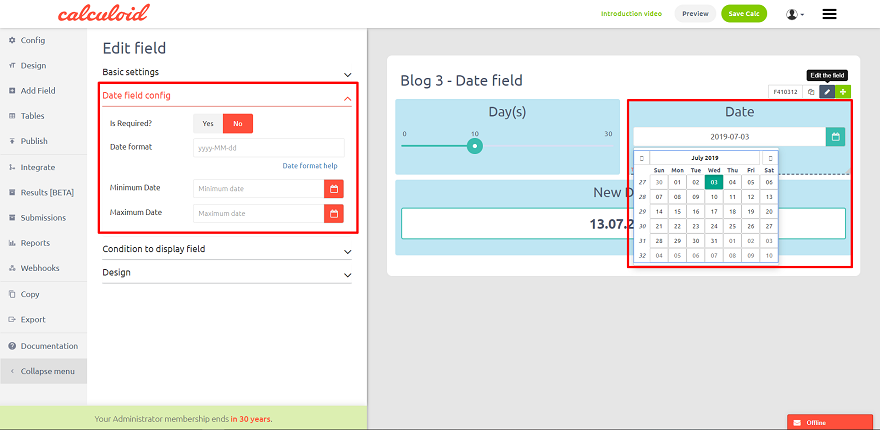
User can pick a date from a calendar. The date can then be used in the formula field for further calculations. Input only field.
Date field config:
Is Required? - makes the input a required field
Date format - set date format
Minimum Date - limit the dates available for users choice. Sets the minimum limit.
Maximum Date - limit the dates available for users choice. Sets the maximum limit.
Predefined variables for the date format (aplicable on dateFormat function in the formula field):
'yyyy': 4 digit representation of year (e.g. AD 1 => 0001, AD 2010 => 2010)
'yy': 2 digit representation of year, padded (00-99). (e.g. AD 2001 => 01, AD 2010 => 10)
'y': 1 digit representation of year, e.g. (AD 1 => 1, AD 199 => 199)
'MMMM': Month in year (January-December)
'MMM': Month in year (Jan-Dec)
'MM': Month in year, padded (01-12)
'M': Month in year (1-12)
'LLLL': Stand-alone month in year (January-December)
'dd': Day in month, padded (01-31)
'd': Day in month (1-31)
'EEEE': Day in Week,(Sunday-Saturday)
'EEE': Day in Week, (Sun-Sat)
'fullDate': equivalent to 'EEEE, MMMM d, y' for en_US locale (e.g. Friday, September 3, 2010)
'longDate': equivalent to 'MMMM d, y' for en_US locale (e.g. September 3, 2010)
'mediumDate': equivalent to 'MMM d, y' for en_US locale (e.g. Sep 3, 2010)
'shortDate': equivalent to 'M/d/yy' for en_US locale (e.g. 9/3/10)
GO TO PAGE FIELD - A BUTTON FIELD TO USE WITH MULTI-PAGE FEATURE, HELPS SET FLOW IN MULTI-PAGE CALCULATOR
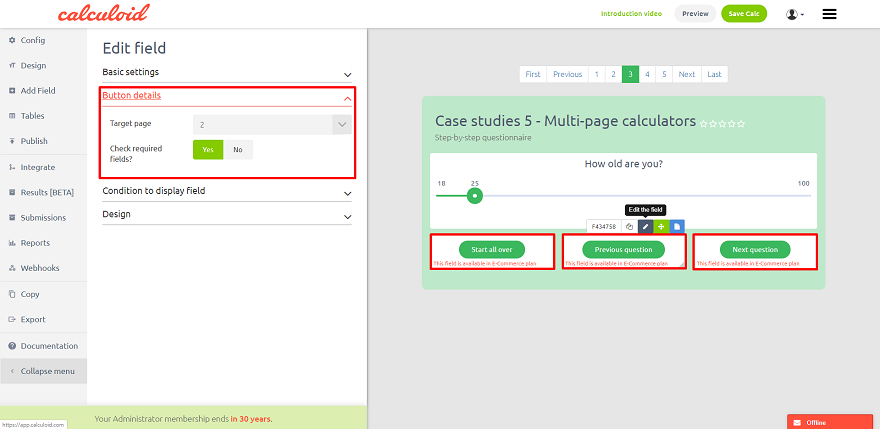
The field is available in the 'Add field' tab on the left menu. However, it is hidden until the 'Multi-page calculator' setting is set to 'Yes'. The field is used to target the final user to a particular predefined page. 'Go to Page' field in combination with conditions to display field creates a strong feature allowing you to set nonlinearly flow in your calculator.
Button details:
Target page - chose page where to redirect the final user after a click
Check required fields? - automatical check for all required fields on the page. If all the required fields are filled in, redirect to page defined, if at least one left blank presents an error message.
CONDITION TO DISPLAY FIELD FEATURE - SHOW FIELD BASED ON A LOGICAL/MATH CONDITIONS
This strong feature allows to show particular field based on logical or math condition. Once the condition is true, the field is shown, untill that the field is hidden. Hidden field can still be used in calculations. Condition to display field:
- Add new condition - add a new condition to display field
- Field - pick a field. The condition is based on the value of this field.
- Operator - basic math operators to define the condition. Available operators are: == equal to (same as =); != non equal (same as ≠); > greater than; < less than; >= greater than or equal to; <=less than or equal to.
- Value - define a true value for the selected field.
- And - adds next condition with and operator. Two conditions combined by 'and' operator must be both true to show the field. You literally say: show field C when field A is 10 AND field B is 20.
- Or - adds next condtion with or operator. When you combine two condtions with 'or' operator, only one should be true to show field. You literally say: show field C if field A is 10 OR field B is 20.
How to embed a calculator
To embed your calculator set your calculator as finished. Config > Is Finished > Yes or simply open 'Publish' tab in the left menu and press Yes. Than copy one of the two codes provided. Both are HTML codes. However one is with the iFrame and the other one is without iFrame. If you use WordPress to manage your web, install our plugin and embed with the shortcode.
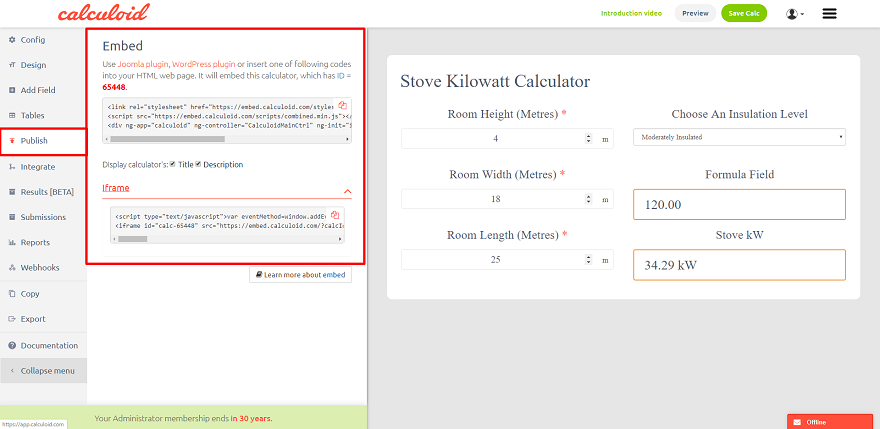
HTML
HTML code without iFrame - this code will adopt the CSS of your website and inherite fonts. Copy the code and paste on your web at any place suitable for HTML. Adopting CSS from your web may cause style conflicts.
iFrame
HTML code with iFrame - should you have any conflicts with the CSS styles of your web after embedding the calculator on your website, please use the option with iFrame. The calculator will be show with the formatting you chose in Calculoid. Using iFrame doesn't allow to adopt CSS of your web.
WordPres plugin
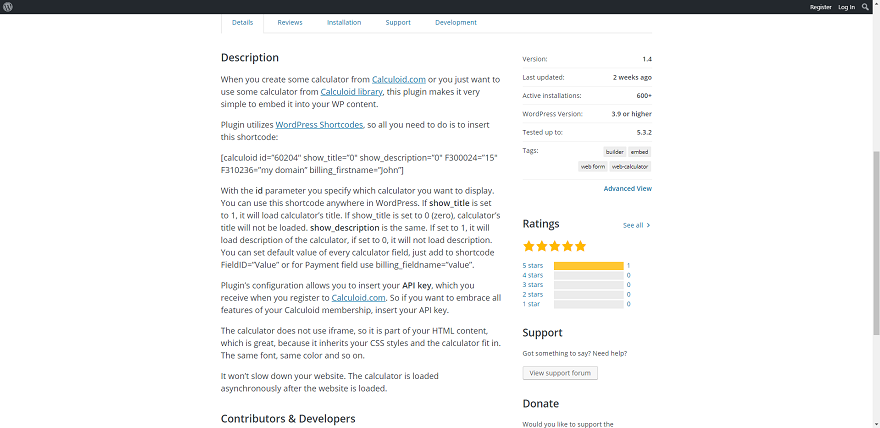
Calculoid WordPress plugin: https://wordpress.org/plugins/calculoid-calculators-builder/. Example of a shortcode: [calculoid id="60204" show_title="0" show_description="0"].
- Calculoid id - put your calculators id. Can be found in URL (6 digits code)
- show_title - put 1 if you want to display the calculators name on embed, 0 if you don't wnat to diplay the calculators name.
- show_description - put 1 if you want to display the calculators description on embed, 0 if you don't wnat to diplay the calculators descripiton.
Before using the shortcode make sure you put the correct API key in the plugin settings. The API key can be found on 'My Profile' page > APIkey.
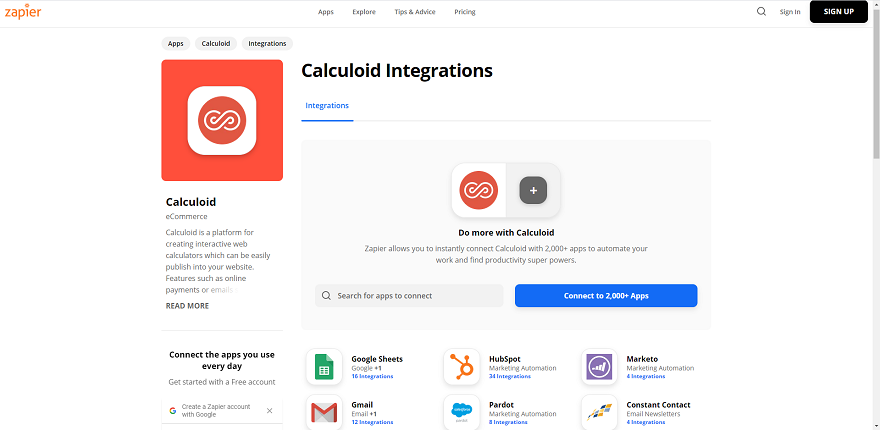
Integrations
You can easily integrate your calculator with more than 1000 applications accros the web. Calculoid has direct integrations with Google Analytics, Mautic and Redmine based products. For other integrations we use Zapier platform. To manage your integrations use 'Integrate' tab in the left menu.

Zapier - integration platform with more than 1000 applications available
To integrate your calculator using Zapier you need to have an acocunt on Zapier and accept our invite link: https://zapier.com/developer/public-invite/5286/6b4d3644d2436decec8ababbc4ee5738/ Every integration helps us get rid of this step. Once you accepted the invitation you can create integration. Go to your accounts page on Zapier and click on 'Make a Zap'. Calculoid always must be the trigger application. To connect your Calculoid account use API key called ApiKeyHeader. It can be found on 'My Profile' page. For more information please watch our use case video: https://www.youtube.com/watch?v=yUh_e4pTQAI&t=194s
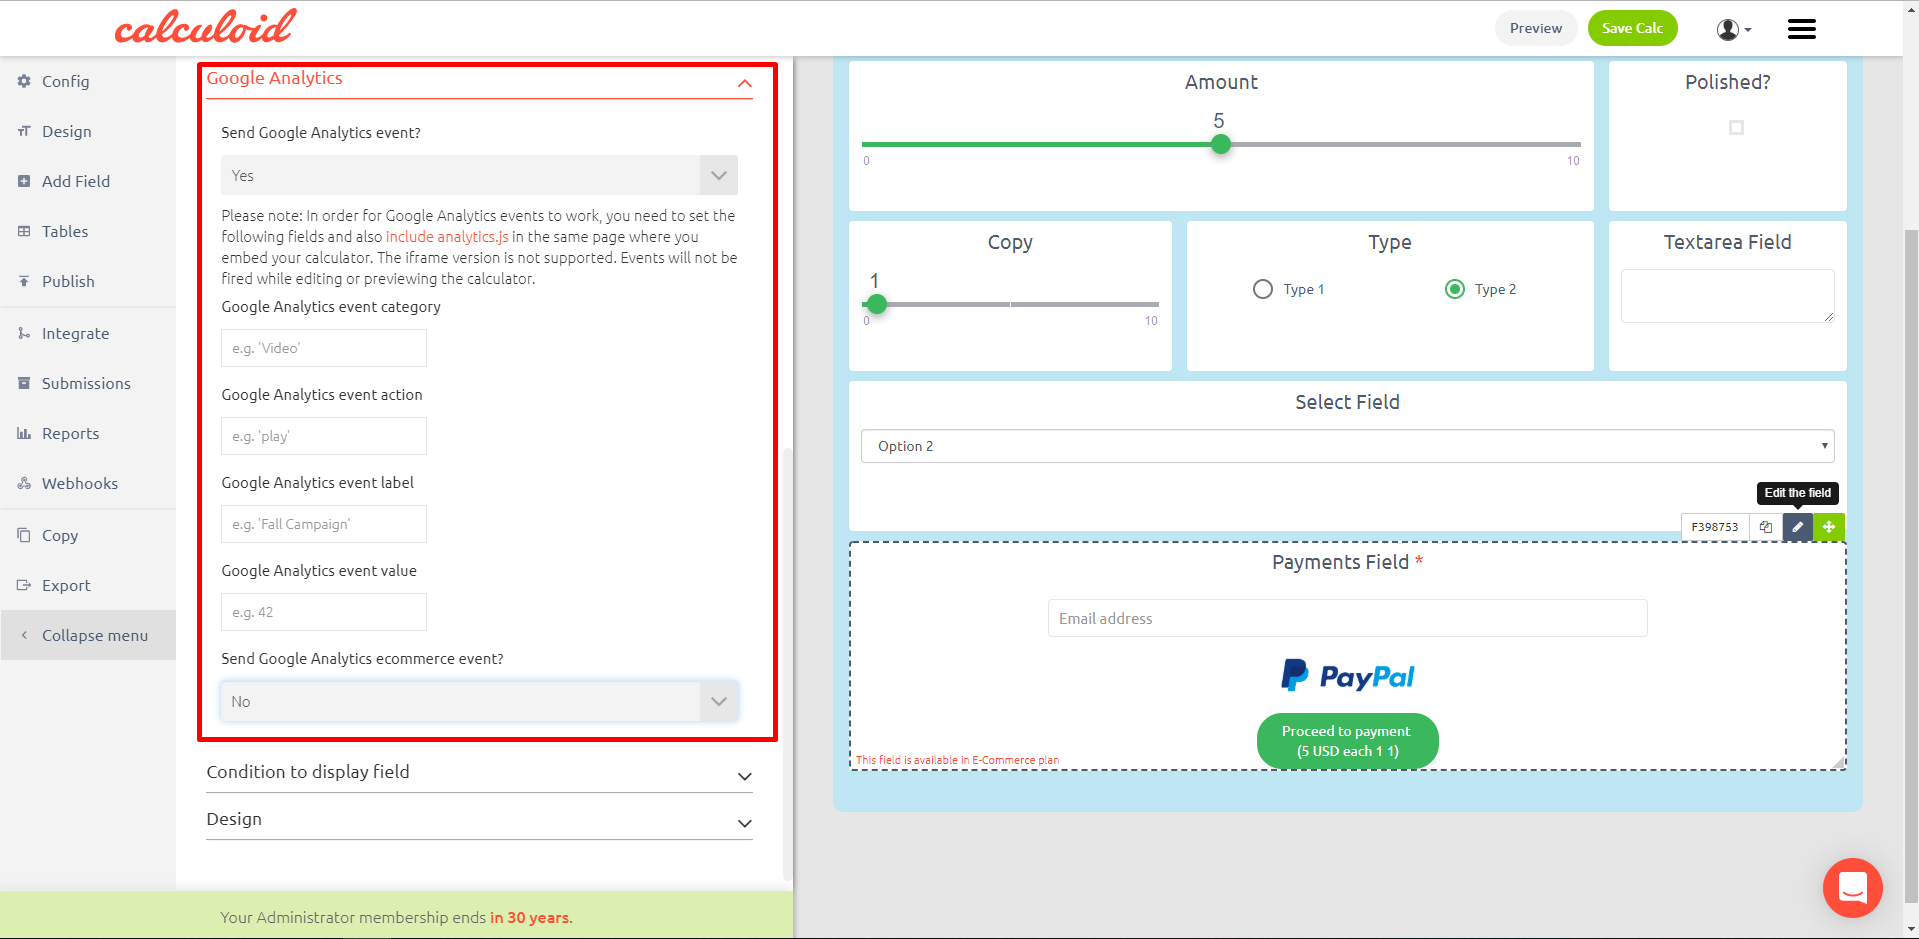
Google Analytics - direct integration
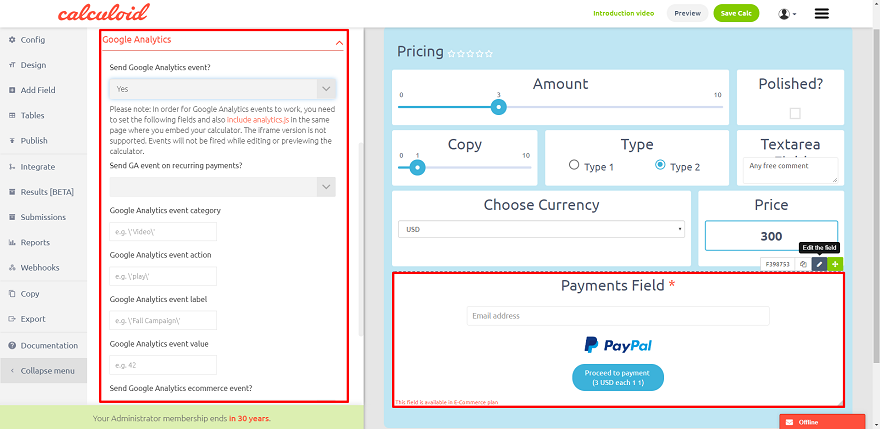
Google Analytics can track events on specific calculator fields only - "Send Results" and "Payments". Go to the "Edit Field" menu of the respective field. Than open the "Google Analytics" sub-menu. Change the "Send Google Analytics event?" value to Yes. In order for Google Analytics events to work, you need to set the following fields and also include analytics.js on the same page where you embed your calculator. The iframe version is not supported. Events will not be fired while editing or previewing the calculator.
- Google Analytics event category (e.g. "Video")
- Google Analytics event action (e.g. "play")
- Google Analytics event label (e.g. "Fall Campaign")
- Google Analytics event value (e.g. 42)
The data created by an activity on the specific Calculoid fields will show in Google Analytics as events with above-defined attributes.

Redmine products - direct integration with EasyProject and EasyRedmine

To integrate your calculator with Redmine or Redmine based products fill the reuired data in the 'Integrate' tab in the left menu and map the fields in your calculator with fields in the system.
Statistics
To find submission details and reports for a particular calculator, go to the "Submissions" tab on the left menu. For global statistics and views report, open "Reports" menu item.
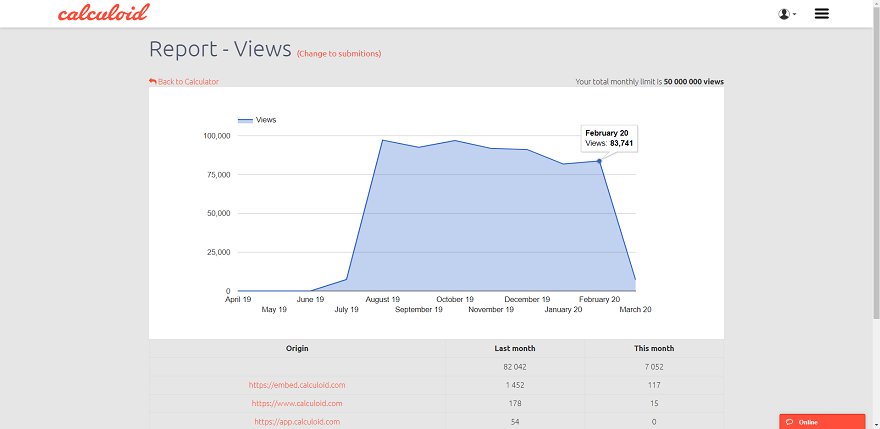
- Submissions - see all the submissions done through your calculator(s), including payments and pending payments
- Reports - see how many times has your calculator(s) been viewed and how many submissions have been done
Webhooks
